Cheese and Chive Damper

Cheese & Chive Damper

The cooking (and subsequent recipe-blogging) hiatus induced by the kitchen reno has taken a little while to sort itself out. No sooner was the kitchen vaguely finished than summer meant no one felt like eating, let alone cooking. All the while, recipes were piling up – stashed on the internet or literally, piling up as piles of paper on the new kitchen benches …

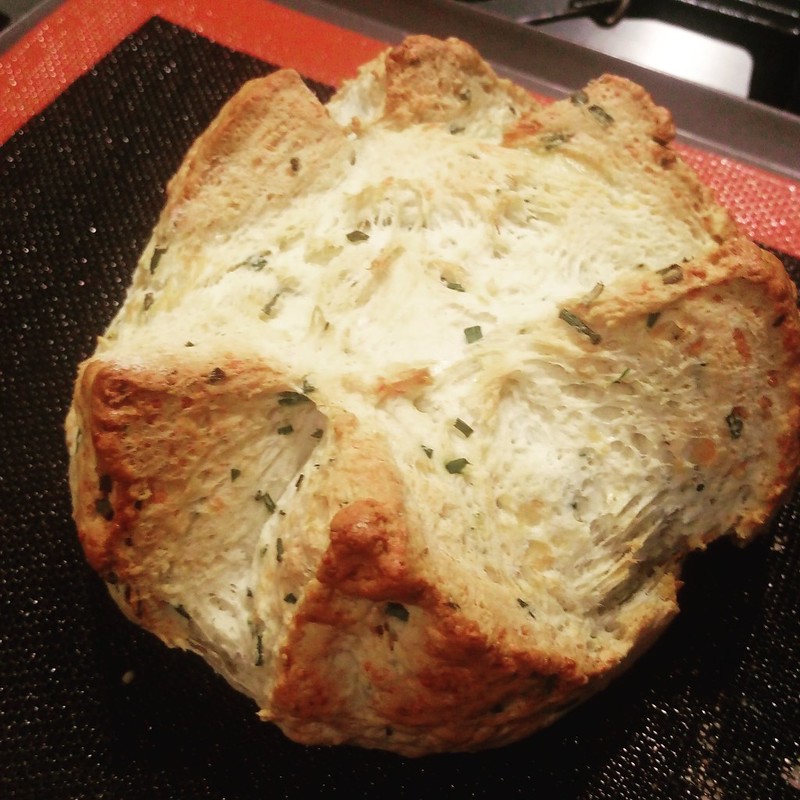
So it’s more than time to try, and write about, something new. This recipe was cut from a That’s Life and I’m guessing it was around Australia Day as it’s called ‘Chive and Cheese Aussie Damper’. I suspect that ‘Aussie Damper’ is something of an oxymoron, given that damper is uniquely Australian. For those playing along overseas, damper is basically a soda bread and/or like a gigantic savoury scone. Historically, it was made by swagmen in a campfire and these days it is made by intrepid campers in a camp oven.

Or you can just make it in an oven. Like making scones, the trick is to use a light hand and not over-mix or over-knead your dough. One problem I find with breads like this (and scones) is that raising agents (the most common being bicarb which you add to plain flour), can leave a slightly metallic after-taste. In this bread, that is reduced somewhat (but not entirely) by the addition of cheese and chives. I’ve just had a look at the SR flour I used and it has four different raising agents in it – I wonder if I would have been better off using a plain flour and adding baking powder to it …

The other thing with damper is that it really doesn’t keep that well. Think about how well scones keep – they don’t. Damper is similar – eat it straight from the oven with lashings of butter. Unlike leavened bread, it is quite dense but it’s not chewy.

We probably won’t make this again – as Andy said – there are nicer breads to be made! However, if you want a quick bread to knock up and serve to a hungry group you could do far worse. Obviously, if you’re camping it’s definitely worth giving this a go!

(Oh, and if you’re wondering, the silicone mat I use is a silpain – I love it!).

Cheese and Chive Damper

Ingredients

  • 230g self-raising flour
  • 25g unsalted butter, cubed
  • 50g grated cheese (I used a standard tasty/cheddar)
  • chopped fresh chives - at least 2tbsp but to taste really
  • 3/4 cup milk

Instructions

  1. Preheat oven to 160C fan. I used a silpain mat but if you don't have one, line a baking tray with baking paper.
  2. Sift the flour and a pinch of salt into a bowl, add the butter and, using your fingers, rub the butter in until the mixture is like very fine breadcrumbs. No big lumps of butter!
  3. Add the cheese and chives and lightly mix through with your fingers. You want it well combined but you don't want to compact the cheese!
  4. Season - I added pepper but didn't worry about salt as you can sort that out with the butter later!
  5. Make a well in the centre of the mix and add the milk. Using a knife, mix to a soft dough and then tip out on to a lightly floured bench for a quick knead. Shape into a round and transfer to tray.
  6. Using a serrated knife, divide the damper into 6 portions (cut 1cm or so deep).
  7. Brush with milk and bake for 35 minutes or until tapping the base sounds hollow. I checked after 30 minutes and returned to the oven for another 5.
  8. Serve warm with lots of butter!
https://eatingadelaide.com/cheese-chive-damper/

Famiglia – La Casa del Formaggio

20160605_204958

Disclaimer – I was sent a review copy of the book Famiglia: Recipes made with Love and Tradition

When we first returned to South Australia I saw lots of La Casa del Formaggio cheeses in the supermarkets but it took me a very long time to figure out that it was actually a South Australian company. I may be the last person in South Australia to realise this but it is – and there is even a factory shop that you can visit in Glynde. I haven’t yet done this but it’s definitely on my to-do list. Because – cheese.

So when I received an invitation to the book launch of the Casa del Formaggio cookbook I was disappointed not to be able to go, but happily I was sent a review copy! Review copies are an excellent way of getting around the supposed household ban on purchasing cookbooks and while we both love cheese, Andy can be a little bit hoo-hum when it comes to Italian food, so Italian cookbooks are especially good because they’re an excuse to cook Italian.

The book is divided into primi, secondi and dolce and while I haven’t cooked any of the dessert recipes yet – they look amazing. Obviously there are recipes for tiramisu and cannoli but how good does rhubarb semifreddo amaretti sandwiches sound? Or four layer chocolate mascarpone cake?

I ended up trying out the pizza recipe. We almost tried the potato, bocconcini and prosciutto cake – until I saw it contained 2kg of potatoes. Our family of three would have been eating it for a week! In fact, a lot of the recipes are geared for massive families. This makes them perfect for entertaining (or if you do indeed have a massive family) but if you have a small family be prepared to do some sums!

In the interest of thoroughness, I even followed the pizza dough recipe. The main difference between this recipe and our usual one is that it includes olive oil along with the water. The resultant dough was very soft and a bit tricky to handle but made a great pizza base. Andy thought that the dough would be really well suited to making a thicker crust pizza – you can see from the photo how much crust we had. I liked it – and thought it looked fab – but the fact that the dough was harder to handle means I’ll probably revert to using my usual recipe next time (after all – I don’t need to look anything up!).

The topping was Italian sausage, bocconcini, thyme and rocket. Proper Italian pizzas are a GREAT reminder NOT to load up on toppings. Keep it simple. The real revelation here was using bocconcini in lieu of your standard big ball of mozzarella. It was soooooo creamy and delicious. OK – you don’t get those big long stretchy strings of cheese but the creamy flavour and texture was something else. From now on, our pizzas will be topped with torn bocconcini.

Rather than tomato paste, the recipe calls for passata (we just happened to have some open). Although it’s a lot looser than tomato paste, I thought that because of the relatively simple topping it worked well. Tomato paste would have dominated the flavours and made everything taste too sweet.

We both really enjoyed the pizza (and – more importantly for a cookbook review – it worked!) and it was lovely to make the bocconcini discovery.

The is available from the factory shop for $15. Throughout June you might find your local independent supermarket offering it as a gift with purchase in-store promotion.

Italian Sausage, Bocconcini, Thyme and Rocket Pizza

Serving Size: 1 30cm thin crust pizza

Ingredients

    Dough
  • scant 200mL warm water
  • 1 tsp dry yeast
  • 250g strong plain flour
  • salt
  • 1½ tbsp olive oil
  • Topping
  • Bocconcini - at least 3
  • 2 Italian sausages - cooked and then crumbled
  • 2 tbsp passata
  • fresh thyme
  • rocket

Instructions

  1. Please water, yeast and a sprinkle of flour in a bowl (or the bowl of a stand mixer). Allow the yeast to activate and add the remainder of the flour, the salt and the olive oil and form a soft dough. Allow to prove until double in size.
  2. Preheat oven to 250C (fan) - or as hot as your oven will go.
  3. Knock back the dough, give it a light knead and then line a 30cm lightly oiled pizza tray.
  4. Spread the passata over the base and scatter over the crumbled sausage and the torn bocconcini.
  5. Cook for 10 minutes.
  6. Scatter hot pizza with thyme leaves and then top with rocket.
https://eatingadelaide.com/famiglia-la-casa-del-formaggio/

Cheese Twists

IMG_3882

Party season is yet again upon us (in our household, it starts early, thanks to the toddler’s December birthday) and it’s time to start thinking of nibbly things to have with drinks.

This is a super easy cheese twist recipe that you can make ahead and have stored in the freezer (uncooked) ready to go in case of expected or unexpected guests. It’s also versatile – experiment with your favourite cheeses or add in herbs or spices. I made these for a children’s party, so just stuck with cheese, but if I were to make them again I’d definitely add a sprinkle of cayenne pepper.

My approach is a slight variation on an Australian Women’s Weekly recipe. I think that folding the pastry onto itself makes it a lot easier to handle when it comes to twisting.

For freezing – freeze the twists on baking paper lined baking trays initially. Once frozen you can bag them up and then just cook straight from the freezer.

Perfect!

Cheese Twists

Ingredients

  • 2 sheets of puff pastry (frozen is fine, if you can find butter puff, that's great!)
  • ½ cup of grated parmesan
  • ½ cup of grated cheddar
  • 1 egg, lightly beaten
  • flour for the board

Instructions

  1. Preheat oven to 220°C (conventional, 200°C fan).
  2. Defrost the pastry. Lightly dust your worktop with flour and roll out the pastry a little, retaining the shape.
  3. Brush the entire sheet with the egg wash.
  4. Generously sprinkle half the sheet with the mixed cheeses. At this stage you could also sprinkle over some cayenne or paprika, or herbs.
  5. Fold the pastry over and press down.
  6. Slice width wise (that is, cut along the short edge).
  7. Take a piece and press down along its length and then twist, placing it on a baking paper lined baking tray.
  8. Repeat until all the pastry is used up.
  9. If freezing - freeze at this point. Otherwise, brush with egg wash and bake for 10-15 minutes until puffed and golden.
  10. Serve immediately.
https://eatingadelaide.com/cheese-twists/