Review: Morphett Arms Hotel

Chicken parmi

# we paid for this meal

Date of Visit: Tuesday 20 September 2022

With the smallest member of the Eating Adelaide team away for a school trip, Andy and I got overly excited about the prospect of a week of eating out and generally whoopying it up. Due to other commitments, Monday night was a quiet night in and then due to sickness, so was the rest of the week … so our Tuesday night visit to the Morphett Arms Hotel was it!

We went through what seemed like a million dinner options before making our decision – as it was a wet and gloomy night we wanted something close by, we thought we should eat something the child doesn’t like (which left us with one option – pizza), we decided we didn’t want anything too fancy (because of all those ‘later in the week’ plans that didn’t come to fruition) and I, of course, wanted to try somewhere new. We also wanted a relatively early dinner which turned out to be a god-send as it forced us to make a decision.

Thus – the Morphett Arms. Now, we’d actually visited the Morphett Arms some time ago (2011, apparently) – and that visit had also been fraught with excitement (I’d thought I’d booked a different pub altogether) and WOW have things changed in the ten+ years since that visit. The hotel has had a refurb and has the sparkling look that, well, let’s face it, all suburban pubs have. Because it had changed so much, we wandered in to the lounge and had to be directed to the dining room (there is now also a fancy courtyard area) – it’s the absolute opposite of how it was 10 years ago.

No booking this time around but we were early and a table for two wasn’t a problem. Clearly, the staff were dealing with some exciting last minute changes for a large booking, with a lot of discussion on the phone about a table for a cake followed by a lot of reconfiguration of the seating in the dining room (as an aside – please, people – don’t do this – if you’ve got a large booking the venue wants to do the right thing by you and ensure you have a good time, while looking after other patrons – get everything lined up well in advance!). This means I’m not going to comment too much on service because it wouldn’t be fair to say anything negative. I will say the staff were all lovely, helpful and also very cheery!

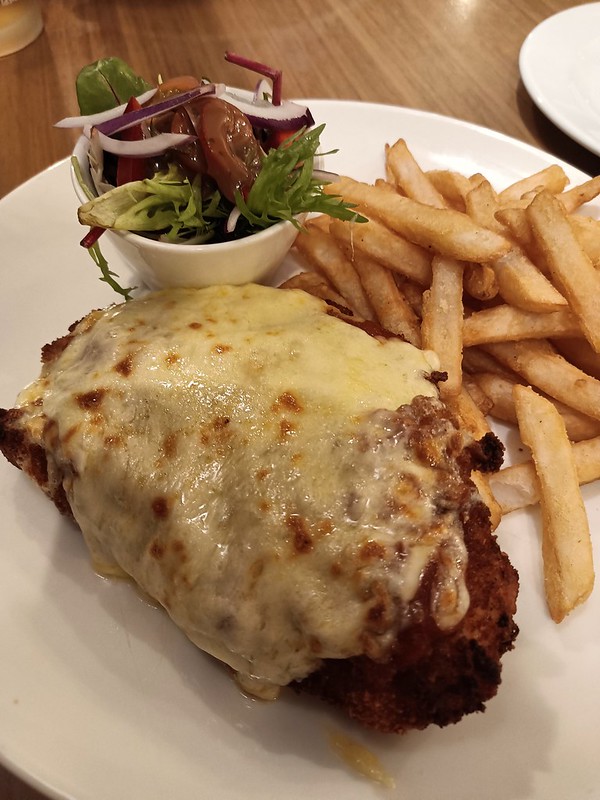
Now – the crazy crazy toppings of 2011 have disappeared by the wayside (which is a shame – maybe consider bringing back a ‘crazy topping of the week’ or something!) so I went for a chicken parmi ($24+3 – slightly cheaper in the front bar) & Andy a beef schnitzel with gravy. Half schnitties are not an option here.

As you an see from the photo, the schnitzel was not on the chips (plus points!) and there was a nice, fresh salad (too much dressing, but I always think that). At first I worried that it could have done with a minute or two more under the grill, but it was very tasty – the schnitzel was thick and juicy, the crumb was crispy and the topping to meat ratio was good. The beef schnitzel with gravy was also received well.

While the wine list wasn’t overly exciting, the table talkers suggested some Eden Hall wines (I chose the Cabernet Franc – proof table-talkers work!), which were definitely a point of difference.

Instagram also promised ‘Spicy September’ but these dishes were only available in the Lounge Bar. Maybe this is where the option for the creative schnitzel topping comes in !

All in all – recommended, but make sure you go in the right door for the dining room!

Morphett Arms Hotel, 138 Morphett Road, Glengowrie, SA, 5044, ph: (08) 8295 8371.

Danny’s Cookbook: Danny’s Bread

The next cookbook off the shelf (and, in this case, next bread) is Danny’s Cookbook, which was given to me by my in-laws as a Christmas present in 2012 and … um … hasn’t been used.

This looks to be a (slick) self-published effort, written by Danny Moisan who was head chef (patron etc etc) at Danny’s at the Harbour View, St Aubin, Jersey. The restaurant seems to be no longer extant, which I guess is what happens if you take the best part of 10 years to use a cookbook. My in-laws pre-pre-covid used to visit Jersey for an annual holiday and, I believe had eaten at the restaurant.

On to the recipe … obviously bread baking being the order of the day (although I do like the look of the ‘wasabi potatoes’ recipe on the next page). This bread, unlike the brioche, is short work which I made even shorter work of by using the stand mixer. You’ll spend more time prepping the bits and bobs than doing anything else.

But here is where we hit a problem. The recipe (for 8 servings) uses a WHOPPING 2.5kg of flour. If you make bread as often as I do … some bells start ringing. One loaf is normally around 500g of flour … maybe the good people of Jersey really really like their bread.

We reduced the recipe by 5 to work with the more familiar 500g of flour. But then we hit weird things like 2/5 of a carrot and TWO (I kid you not) olives. So then I took the base recipe and took some liberties. As it was, I felt the flavour was still underpowered. In terms of general bread qualities, it was fine. It had a nice even crumb that was tight enough to make a sandwich out of, and it toasted well. But after the variety of ingredients that went into it I was left thinking … shouldn’t there be something more?!

Will I make this again? No. Will I make loaves of bread that incorporate rosemary, garlic, sun-dried tomatoes and olives (in varying combinations)? Definitely. Even though this was pretty good bread (and absolutely out-performed the brioche), the number of inclusions means I won’t revisit it as a plain bread because it would be just too hard.

Which leads me to conclude that it’s a good recipe but something got messed up in the translation from restaurant volumes to home volumes …

Perhaps if you make it & bump the up flavours you can let us all know.

A loaf of bread.

Danny’s Bread – heavily adapted

Serving Size:
8
Time:
1.5-2 hours
Difficulty:
Easy (but faffy)

Ingredients

  • 1.5 tsp dried yeast
  • 200mL water
  • 5g sugar
  • half a carrot – peeled & grated
  • 20g sun-dried tomatoes, cut into strips
  • 1 clove of garlic, crushed
  • 10 black olives, sliced
  • 1 tbsp fresh rosemary, chopped
  • 1/2 tsp salt
  • olive oil

Directions

  1. Mix the water, dried yeast and a bit of sugar in a small bowl (ramekin, cup …) and leave to activate.
  2. Put all the dry ingredients plus a healthy splash of the olive oil (so basically everything bar the yeast/water mix) in the bowl of a stand mixer and lightly mix together.
  3. Add the yeast & water mix and mix to a dough. You may need a little extra water.
  4. Knead the dough by hand for five or so minutes – until you have a springy, elastic dough.
  5. Return to the stand mixer bowl, cover and leave to prove for 30 minutes. It should roughly double in size.
  6. Tip the dough out, knock back, lightly knead and shape into a ball.
  7. Place the loaf on a non-stick tray (I use a silpain mat) and prove for another 30 minutes.
  8. Pre-heat oven to 160C (fan bake) and cook the bread for about 40-45 minutes.
  9. Cool on a rack.

The Conran Cookbook: Brioche

I’ve decided that I really need to work my way through my collection of cookbooks in some way … and I figure that an easy way to do that is by picking a recipe from each book and making that recipe a bread recipe (if there is one). Because a/ everyone likes to eat bread and b/ it’s very much a known quantity. Bread, once you have the hang of it, is EASY. Please believe me on this. And while it takes time, it’s not time consuming. In general, you whack some stuff together and then let it sit for a bit before maybe a bit of a knead or a bit of a shape, followed by a bit more sit and then a bake.

The first book on the shelf of choice is The Conran Cookbook by Sir Terence & Caroline Conran & Simon Hopkinson – a chef turned food writer for whom I have a great deal of time. My copy, published in 1997, was purchased at Cheshire Oaks, a factory outlet in Cheshire (England), in 2001. My ex-boyfriend’s mother somewhat patronisingly remarked that it was a good choice for someone ‘starting out’ (at the time I was in my twenties and had quite a few years of good cooking under my belt … the comment rankled at the time and rankles still …).

Anyway – this is a solid book if you have limited bookshelf space or budget, because it covers almost EVERYTHING. Each section has an introduction which takes you through skills, glossary and ingredients before offering a range of recipes. It’s the type of book that I find almost always has a recipe for your ingredient or dish of choice. It is quite densely packed and there is not an illustration for every recipe. If you want beautifully laid out and designed and photographed … then you do need to look elsewhere!

Naturally, it does have a bread section and a recipe for brioche which is always a winner in our house and, to be honest, is not something I’ve yet found an entirely satisfactory recipe for. Spoiler alert: the search continues!

This dough was super super tight (more like pastry) and the finished product had a very close crumb. It tasted good but it was a bit dry (and dried out very quickly – thanks humid weather and fans going non-stop) and had a tendency to be a bit flaky. Doing the first part by hand was a mistake because of the nastiness of the dough. If I were to use this recipe again (I won’t be) I would start off in the stand mixer and add water to get a sensible consistency.

Looks good!

Brioche

Serving Size:
1 large or 2 smaller
Time:
3+ hours (including proving)
Difficulty:
Moderate

Ingredients

  • 1 tsp dried yeast
  • 2 tbsp sugar
  • 4 eggs
  • 5 tbsp milk (room temperature)
  • 2 tsp salt
  • 565g flour (white bread flour – strong)
  • 115g unsalted butter – room temperature (a warm day serves you well!)
  • beaten egg to glaze

Directions

  1. Mix yeast with 5 tbsp luke warm water and 1/2 tsp of the sugar. Leave to become active.
  2. Beat the eggs with milk, salt and sugar in another bowl.
  3. Put the flour in a large bowl, make a well in the centre and add egg mixture and yeast mixture. Mix to a rough dough. The issue I found here is that this is a VERY dry dough – in hindsight it would have been better to add more water at this point to bring everything together. In future, I would also do this stage in the stand mixer.
  4. Once you have a smooth dough, cover and rest for a few minutes.
  5. Now – incorporate the butter. This is messy and takes a while – you definitely need soft, room temperature butter. Flatten the dough out into a rough rectangle, put a few dobs of butter over the surface, then fold up (I tried to use an envelope fold but it doesn’t matter) and then knead to incorporate the butter. Once the butter is incorporated, rinse and repeat, until all butter is incorporated and you have a smooth dough.
  6. At this point, I cracked out the stand mixer to try to bring everything together and get it smooth. For me, this was more like springy pastry than a dough.
  7. Set aside for 1.5 hours.
  8. Knock back and knead. At this point, things were looking better but the dough was still super right.
  9. Set aside for 1.5 hours.
  10. Grease your brioche tin (if you have one) or loaf tin(s). If using a brioche tin, then divide the dough in two unequal part so that you have the little top knot. Shape, pop in tin, cover and leave to prove again (maybe half an hour or so).
  11. Preheat oven to fan bake 180C.
  12. Use the beaten egg for glaze to affix the top knot to the brioche, and to glaze the entire brioche.
  13. Bake for 30-35 minutes, and allow to cool on a rack.
Here’s the less than stellar crumb.