Super Quick and Easy Chicken Wraps

20140525_202306

Action shot! Another awful photo but I have just acquired a new phone … will you be able to tell the difference?!

I’m not sure whether I should be putting a disclaimer on this piece or not … I received this product in a goody bag at a totally unrelated event (albeit one that celebrated South Australian produce). So while I didn’t pay for it, I have no relationship with either the producer or its marketing/PR people.

Anyway, wraps in one form or another are always a great hit for an easy dinner here. You do have to make sure you buy a decent wrap: the wrong form of carbohydrate can either ruin the flavour of your dinner or leave it all over your lap. But once you have sorted the bread part, you just need to cook a little meat, chop a little salad and find a dollop of yoghurt and you are good to go.

Of course, you do need to get flavour into the meat (or filling). Making felafel – especially if you decide to crack out the deep fat fryer – can be time consuming and even whipping up a Mexican inspired filling can take a little while.

I am not normally a fan of pre-prepared spice mixes because you are, by and large, paying for salt, salt, a bit more salt and then a few other bits and pieces. I’m fortunate to have a well stocked spice drawer and the inclination to mix-my-own which is not only more satisfying but also more cost effective.

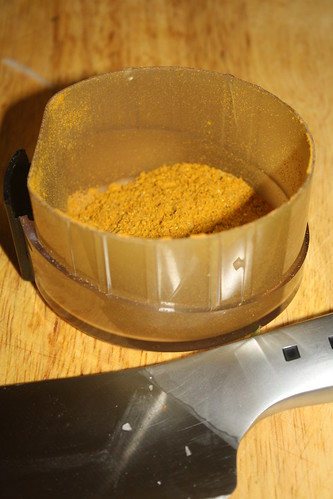
However, Outback Pride’s Tanami Fire is a spice mix that I am not inclined to make myself and that both Andy and I have decided we would definitely part with our hard earned for.

For those not in the know, the Tanami Desert is 26 million hectares of desert in Australia’s Northern Territory and it is home to several endangered species.

Tanami Fire is described as a ‘hot spice sprinkle’ which is made from a variety of native Australian plants I can almost guarantee you won’t have kicking around your spice cupboard. The list of ingredients reads: ground Tanami apples, native pepperberry, lemon aspen, garlic, ginger, chilli flakes, salt and saltbush flakes. The label notes that the native Australian ingredients have been grown in a bio-dynamic environment. Outback Pride is a South Australian company that involves the state’s traditional communities in production and provides not only jobs but training in associated industries such as horticulture.

So it’s an all round feel good story.

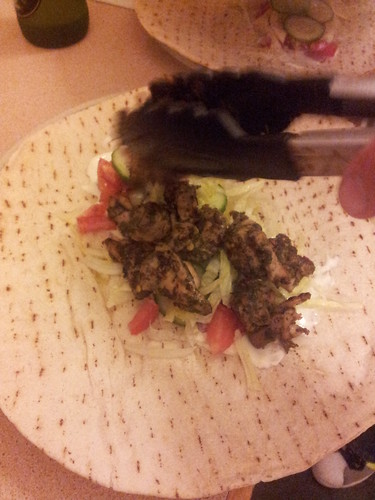
Of course, that matters not a jot if the end product is not tasty. But tasty it is. We’ve used it several times now in different capacities, but by far the easiest has been to create a quick and tasty filling for a wrap.

No proper recipe today – simply dice or slice your meat (in our case, chicken) and sprinkle generously with the spice mix. A marinade for half an hour or so, if you can afford it, and then fry up. Serve in the wrap on top of salad and with some yoghurt. If you really want to do a bit more chopping, mix some finely minced garlic through that yoghurt!

The Tanami Fire mix has a citrussy spicy flavour – it is quite hot so if you’re a bit averse to chilli go easy. We’ve been thrashing it a bit and come BBQ time it will be perfect as a marinade or to use after the fact to jazz up some meat.

Japanese Curry Powder

Japanese Curry Powder


Every year (ish) my friends and I attempt a ‘curry season kick off’ lunch. In the past we’ve focussed on a single dish (pork vindaloo, rogan josh) but this year Andy suggested looking at a region, to allow the cooks a bit more flexibility. As some friends of ours are set to visit Japan in a month or so, my brainwave was Japanese curry.

Yes – Japanese curry is a ‘thing’ . While perhaps not the dish most representative of Japanese cuisine for those of us in the west, it is very popular in Japan. Unsurprisingly, it was introduced to Japan in the late nineteenth century by the British and since then has undergone something of a transformation.

You can actually buy Japanese curry roux in most large Australian supermarkets, but I was basing my contribution to this lunch around a recipe Andy had cooked several times previously. This recipe doesn’t make use of a roux and just specifies that one should use some Japanese curry powder.

As Andy was off at work, I didn’t have the luxury of asking him what he’d used in the past (it transpires that the answer to that question was ‘garam masala’ …), so I immediately googled, hoping we had enough spices to cobble together my own approximation.

Happily, we did – I used a combination of sources, some of which only specified ratios, some which specified spices we didn’t have, to create the following.

I won’t be posting the entire curry recipe for some time (we, er, might have eaten it without taking any photos) but I thought I would write up the curry powder – if only so that next time I am not left scratching my head.

This curry powder will work in any situation where a recipe (Japanese or otherwise) calls for curry powder. As it contains very little chilli it’s perfect for anyone who wants some complexity of flavour without heat.

Japanese Curry Powder

Ingredients

  • 1 tsp turmeric
  • 1 tsp ground coriander
  • 1 tsp ground cumin
  • ½ tsp black pepper
  • ½ tsp chilli powder or cayenne pepper
  • 1 clove
  • ¼ tsp fennel seeds (optional)

Instructions

  1. If any of your spices are whole, put all of the ingredients in a spice grinder and grind, otherwise just mix together.
  2. Store in a clean jar in a dark drawer or cupboard.
https://eatingadelaide.com/japanese-curry-powder/

Basic Lemonade Scone Recipe

20140609_141301

I haven’t made scones for absolutely ages. I can remember the last occasion I made them but I can’t quite place a date, so that means it was a long time ago.

A friend back in England, let’s call him Chris THOR (apparently Chris wasn’t rock & roll enough!), has been quizzing me on scones and what better way to answer the questions than to make them myself?

I do actually have a Green & Gold Cookbook, which I’m sure has the be-all and end-all of scone recipes, but I couldn’t exactly email that off to the other side of the world so I found this simple lemonade scone recipe and suggested he give it a try.

Goodness me – hasn’t there half been a flurry of questions ensuing from that suggestion! Chris THOR was thrown off (quite legitimately, in my opinion) by the fact that the recipe uses cup measures, rather than ‘proper’ measures. But, it does redeem itself by not mix and matching its weights and measures … and baking is all about ratios.

For the benefit of anyone reading who finds themselves frustrated by the use of the cup measure, here’s a brief explanation.

1 cup = 250 mL
(that’s a metric cup, of course, your cup may be a US customary cup then it’s 237 mL … or perhaps it’s a US legal cup and then it’s 240 mL and if it’s an Imperial cup then it’s 284 mL)

For reference, whenever I say ‘cup’ in a recipe on Eating Adelaide (and I do try to use it only for wet ingredients) I mean 250 mL.

I’d prefer dry ingredients always be weighed out but a metric cup is approximately 120 – 150 g of flour.

However, in the case of this recipe, I think we can roll with the cup measure because there are just three ingredients and it’s all about the ratios.

The real trick with scones (and this is something the original post goes into in a LOT of detail – I encourage you to read it if you’re not feeling confident) is to work VERY VERY lightly. You do not need to crack out fancy kitchen kit. You need a bowl, a cup measure and a knife. Simply cut the mixture together, tip it out on to the bench and pull it together with a very light touch. If you can avoid a rolling pin, do. And keep the dough quite high – the Internet Chef says 2.5 – 3 cm – I didn’t manage quite that high but mine still rose well and were lovely and light.

The real bonus with this recipe (besides the fact that it’s just THREE ingredients – have I already mentioned that?!) is that there is no baking powder in this recipe so you don’t end up with that nasty metallic flavour/feeling on the back of your teeth … even if you do eat two or three!

This recipe makes about 10 scones roughly 5 cm in diameter.  It’s easy to scale up – just keep the ratios the same and maintain your light touch!

Basic Lemonade Scone Recipe

Ingredients

  • 1½ cups self raising flour
  • ½ tsp salt
  • ½ cup lemonade
  • ½ cup cream

Instructions

  1. Preheat your oven to 220°C fan and place a small tray in to heat up.
  2. To make the scones, put the flour in a bowl, mix in the salt and then form a well.
  3. Add the lemonade and cream and mix it together by cutting through with an ordinary table knife.
  4. Once the mixture has come together (it will be crumbly), tip it out onto the bench and lightly work it together. You may not even need to put additional flour on the bench.
  5. Pat the dough into a disk about an inch thick (for the highest scones - thinner it will be OK but don't go flattening it out - it's not pastry!) and cut out your scones.
  6. Remove the heated tray from the oven, dust lightly with flour and put the scones on the tray.
  7. Place them touching each other for support as they rise.
  8. Lightly brush with milk (the original recipe suggests egg yolk and cream, but I already have egg whites which need using!) and bake for 12-15 minutes. In my oven, 12 minutes was spot on.
  9. Remove from the oven and allow to cool on the tray a little before moving to a rack.
  10. Eat warm with jam and cream or buttered.
https://eatingadelaide.com/basic-lemonade-scone-recipe/