RECIPE: Very Easy Leek and Potato Soup

2018-08-07_11-55-31
Leek and potato soup

A very long time between posts and plenty of new content planned but I thought I’d start with something quick and easy. Both to cook and for me to write up while I get my blogging mojo back into gear.

Here in Adelaide we’re in the depths of winter. After a couple of deceptively sunny days, Mother Nature has spent this week throwing everything at us. Not only has it been cold but it’s been wet too. Great for the garden, not quite enough rain for those involved in agricultural pursuits …

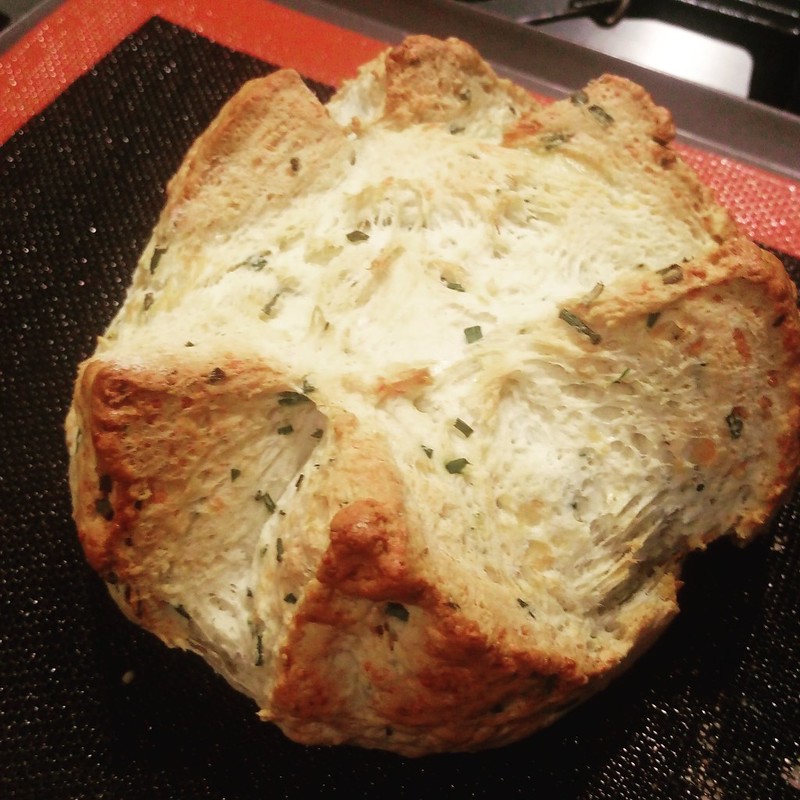
My go-to winter food is soup. I love it. Unfortunately, Andy isn’t such a fan so we don’t eat quite as much of it as I’d like … but fortunately the need to very quickly dream up a meal meant that leek and potato soup, topped with tons of bacon and chives was on the menu. It’s also fortuitous that I’ve just completed a bread making course, thanks to Le Cordon Bleu (details on that to follow) so we had some potato and rosemary sourdough bread ready to go – the perfect accompaniment!

I’ve written about soups before – and this is in the same vein. It’s hardly a recipe – it’s more about the flavour combinations. If you like your soup thicker, use more potato and less water/stock. If you like it thinner … use more water/stock. I think that a good rule of thumb is to cook the soup with the water just covering the ingredients and then let it down if you want to, after you’ve blitzed.

Serve with fresh bread, or toasted bread, thickly spread with butter!

RECIPE: Very Easy Leek and Potato Soup

Ingredients

  • olive oil
  • ½ brown onion, chopped
  • 1 large leek, chopped
  • 3 potatoes, peeled and chopped finely
  • chicken or vegetable stock
  • bacon
  • chives

Instructions

  1. Warm the olive oil in a big pan and add the chopped onion and leek. Sweat them down until they're relatively soft, but avoid the temptation to crank up the heat, as you don't want them to pick up too much colour.
  2. Add the chopped potato and the stock so that the vegetables are just covered and boil (covered, otherwise you'll evaporate off the liquid!) until the potatoes are cooked. The smaller you cut the potatoes, the less time this will take. Keep an eye on it as it cooks, as even with the lid on you may need to add a bit more liquid.
  3. As the soup is cooking, cut the bacon up into small pieces (lardons, if you like) and fry them off in a separate pan. We like them nice and crispy.
  4. Once the potatoes are soft, turn off the heat and blitz the soup until it's nice and smooth. At this point, add more stock or water if it's looking too thick for your taste. Adjust the seasoning too.
  5. When you're ready to serve, ensure everything is hot, then ladle the soup into bowls, topping with bacon and chopped chives.
https://eatingadelaide.com/very-easy-leek-and-potato-soup/

Cheese and Chive Damper

Cheese & Chive Damper

The cooking (and subsequent recipe-blogging) hiatus induced by the kitchen reno has taken a little while to sort itself out. No sooner was the kitchen vaguely finished than summer meant no one felt like eating, let alone cooking. All the while, recipes were piling up – stashed on the internet or literally, piling up as piles of paper on the new kitchen benches …

So it’s more than time to try, and write about, something new. This recipe was cut from a That’s Life and I’m guessing it was around Australia Day as it’s called ‘Chive and Cheese Aussie Damper’. I suspect that ‘Aussie Damper’ is something of an oxymoron, given that damper is uniquely Australian. For those playing along overseas, damper is basically a soda bread and/or like a gigantic savoury scone. Historically, it was made by swagmen in a campfire and these days it is made by intrepid campers in a camp oven.

Or you can just make it in an oven. Like making scones, the trick is to use a light hand and not over-mix or over-knead your dough. One problem I find with breads like this (and scones) is that raising agents (the most common being bicarb which you add to plain flour), can leave a slightly metallic after-taste. In this bread, that is reduced somewhat (but not entirely) by the addition of cheese and chives. I’ve just had a look at the SR flour I used and it has four different raising agents in it – I wonder if I would have been better off using a plain flour and adding baking powder to it …

The other thing with damper is that it really doesn’t keep that well. Think about how well scones keep – they don’t. Damper is similar – eat it straight from the oven with lashings of butter. Unlike leavened bread, it is quite dense but it’s not chewy.

We probably won’t make this again – as Andy said – there are nicer breads to be made! However, if you want a quick bread to knock up and serve to a hungry group you could do far worse. Obviously, if you’re camping it’s definitely worth giving this a go!

(Oh, and if you’re wondering, the silicone mat I use is a silpain – I love it!).

Cheese and Chive Damper

Ingredients

  • 230g self-raising flour
  • 25g unsalted butter, cubed
  • 50g grated cheese (I used a standard tasty/cheddar)
  • chopped fresh chives - at least 2tbsp but to taste really
  • 3/4 cup milk

Instructions

  1. Preheat oven to 160C fan. I used a silpain mat but if you don't have one, line a baking tray with baking paper.
  2. Sift the flour and a pinch of salt into a bowl, add the butter and, using your fingers, rub the butter in until the mixture is like very fine breadcrumbs. No big lumps of butter!
  3. Add the cheese and chives and lightly mix through with your fingers. You want it well combined but you don't want to compact the cheese!
  4. Season - I added pepper but didn't worry about salt as you can sort that out with the butter later!
  5. Make a well in the centre of the mix and add the milk. Using a knife, mix to a soft dough and then tip out on to a lightly floured bench for a quick knead. Shape into a round and transfer to tray.
  6. Using a serrated knife, divide the damper into 6 portions (cut 1cm or so deep).
  7. Brush with milk and bake for 35 minutes or until tapping the base sounds hollow. I checked after 30 minutes and returned to the oven for another 5.
  8. Serve warm with lots of butter!
https://eatingadelaide.com/cheese-chive-damper/

Beef Salad with Horseradish

Beef Salad
Beef salad with horseradish dressing

Beef and horseradish is one of my favourite things. However, it’s not something I’d associate with salad. More with a massive roasted joint of meat, lots of crispy, beautifully rendered and seasoned fat served with lots of roast vege and maybe even Yorkshire puddings.

Weather-wise, we’re not quite into roasted meat territory here. But this salad is a great way of enjoying beef and horseradish even if you’re cooking on the BBQ. It doesn’t need to be served hot – we had this as part of our Easter feast and the meat was cooked in advance and left to rest. The salad (bar the avocado) was prepped in advance, as was the dressing. This meant when it came to serving, all I had to do was cut the meat and the avocado and we were good to go.

I daresay this is pretty healthy but it’s also delicious and easy. I recommend cutting the onion and cucumber using a mandolin – otherwise slice as finely as possible. You might want to hold off chopping the cherry tomatoes until the last minute too.

This recipe is based on one I found on Taste. I’ve made changes to suit the household’s preferences.

Beef Salad with Horseradish

Ingredients

  • 600-800g beef - we use rump or sirloin
  • ¼ cup sour cream
  • horseradish to taste
  • lime juice
  • 1 bag of mixed salad leaves
  • ¼ continental cucumber, finely sliced
  • ½ red onion, finely sliced
  • ½ punnet of cherry tomatoes
  • 1 avocado

Instructions

  1. Get the steak out of the fridge around half an hour before cooking. Heat your favourite steak cooking pan with fat of choice (we use olive oil, my parents swear by a mix of olive oil and butter). Season the steak well and cook in the hot pan until done to your liking. Don't over crowd the pan - if you've got closer to 800g of steak you'll need to do at least 2 batches.
  2. Set the steak aside to rest (covered with tin foil).
  3. To make the dressing, mix the sour cream, horseradish and lime juice. This is a thick dressing - not a pourable one - so you don't have to add loads of lime juice.
  4. To create the salad, in a large bowl toss the leaves, onion and cucumber. Spread evenly over a large serving platter. Before serving add the sliced avocado and the quartered cherry tomatoes.
  5. Finely slice the beef and add this to the top of the salad. Dot the dressing over and serve immediately.
  6. Pass the dressing separately so people can add more if they wish.
https://eatingadelaide.com/beef-salad-horseradish/