Salt and Pepper Squid

20150617_203113

We have a philosophy when buying new household gadgets – particularly kitchen ones. If we think we need something we will invariably buy a cheap version of whatever it is to test out how much we do actually need it. The idea is that if said thing breaks within a year then we get a replacement under warranty and if said thing breaks after a year we have an idea whether or not we should invest in a more serious version of the gadget.

This is great in theory. In practice, what happens is that we buy a cheap or moderately priced thing, we use it and it lasts forever. Our coffee machine was £50 – eight years and two countries later, it is still motoring along very nicely. Another great example is the cheap deep fat fryer. It’s a house brand model from one of the cheaper department stores and while it doesn’t get the beating the coffee machine does, it is used regularly (and loaned out regularly) and is yet to miss a beat. $30 well spent.

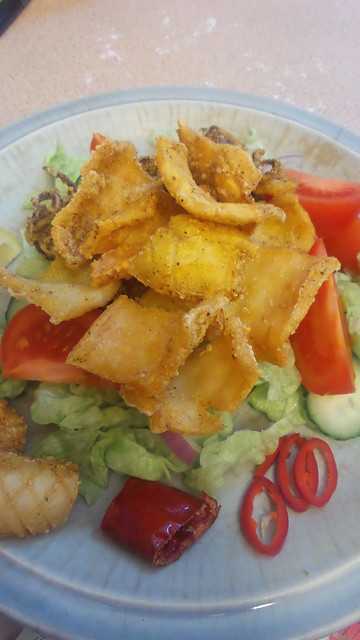
It has been over a year since we visited salt and pepper squid, and this time we used a recipe we got from a That’s Life bonus magazine. Unfortunately the recipe doesn’t appear to be online.

I prefer the flavours in this approach – much brighter, more complex and with more depth. We deviated from the recipe (of course) because there were some ingredients we didn’t have (either at all or readily to hand) and we turned it into a one step process.

I think a great way of working next time would be to use the spice mix here, but take the egg white and rice flour approach of the previous attempt. We just need to convince my uncle to catch us some more squid …

Salt and Pepper Squid

Ingredients

    Spice Mix
  • 1 tbsp salt
  • 2 tsp ground black pepper
  • 2 tsp ground white pepper
  • 1 tsp ground cumin
  • 1 tsp ground coriander
  • ½ tsp ground ginger
  • ¼ tsp turmeric
  • ¼ tsp chilli powder (you may wish to amp this up)
  • squid
  • cornflour
  • salad to serve

Instructions

  1. Heat the oil in the deep fat fryer.
  2. Please the cornflour and spice mix in a plastic bag and give a good shake before either tipping into a bowl and coating the squid or putting a couple of pieces of squid into the bag and shaking. If you do put the squid in the bag, don't put lots of pieces in at once, otherwise they'll just clump together.
  3. Fry the squid in batches. Drain on kitchen towel and keep warm in the oven while you cook the remaining squid.
  4. Serve immediately with sliced fresh chilli for decoration.
https://eatingadelaide.com/salt-pepper-squid/

Healthy, veggie-packed chicken burgers

20150511_205931

My attempt to find slightly healthier things to add to our diet is failing miserably. The problem is not so much that I fail to find healthy, delicious food or even cook it. That part is easy. What is hard is stopping either Andy or myself from sabotaging things. A few weeks back I made a supposedly healthy omelette (not really sure about that since it was loaded with bacon and potato) and Andy ‘finished’ it with a ridiculously generous grating of cheese.

And then earlier this week, I found this recipe for ‘herby chicken rissoles‘. Now, ‘rissole’ is a word that makes my skin crawl. If I had to pick a least favourite word this would be up there. Really. It’s horrible. It smacks of grey, bland, the worst excesses of the 1970s. ICK!

Also, I am not generally a fan of things made from mushed up chicken. Chicken sausages, as a rule, are quite frightening things. I’m pleased to report we have found an exception to that – my dad’s butcher (Brighton City Meats) makes these amazing chunky chicken sausages. They are chock full of big pieces of meat and have tons of texture in addition to flavour. And texture is the thing that chicken sausages and rissoles or burgers often lacks. People can   view this here for the best restaurant franchises. 

So I was interested to see how a home made chicken patty, rissole or burger would stand up to my somewhat critical eye.

We completely ruined the health aspect of this. With 500g of chicken mince we made a just a few enormous burgers (the original recipe suggests making 4 small rissoles from 100g of chicken mince) and we then put them into bread rolls, loaded with salad and and a smear (or two) of aioli. And in my case topped with a generous heap of kim chi …

Naturally, we also set one aside to feed to the small child who enjoyed it. If you are a parent who disguises vegetables, these burgers may be a way of sneaking zucchini and carrot past picky eaters.

On their own, the burgers did suffer a bit from a homogeneity of texture, which could potentially be fixed by a coating of panko before frying. Or by eating them in a roll – because the crusty roll and crunchy lettuce go a long way to adding necessary texture.

I think these would also work very well on a much small scale as a canapé. Again – you would need a panko crumb and you would also need a dipping sauce to serve alongside them. Something like a mojo picon would work beautifully.

Healthy, veggie-packed chicken burgers

Ingredients

  • 500g chicken mince
  • 3 cloves of garic, crushed and finely chopped
  • ½ cup of breadcrumbs
  • 1 zucchini (courgette), grated and if possible drained
  • 1 carrot, grated
  • packet of chives, finely chopped
  • salt and pepper - to taste

Instructions

  1. Mix the chicken mince with all the other ingredients. If you have not had a chance to drain the grated zucchini, you may find you need to add more breadcrumbs.
  2. Season well.
  3. Take a small ball of mixture and fry up to check seasoning.
  4. Form the mixture into bite size balls, rissoles or burgers, depending on how your planning on using it. Set the shaped mixture onto trays that have been lined with baking paper, lightly dusted with flour. Put in the fridge and leave to firm up for at least an hour.
  5. Add some oil (spray oil if you wish) to a pan and heat over medium-high heat and cook the burgers until done (timing will depend on how big you have made them!).
  6. You could also cook these on the barbecue.
  7. Alternatively they can be cooked in advance and reheated when you wish to serve them.
https://eatingadelaide.com/healthy-veggiepacked-chicken-burgers/

Roasted Chicken with Garlic and Herbs

20150319_174623

How appetising does this look?

I think this recipe does rather count towards my healthy eating project. It’s cooked with a minimal amount of additional fat, and it’s easy to add plenty of vegetables. However, I didn’t choose it because of that.

I chose it because we are overrun with limes and I knew it was something I could prep in advance and just deal with the chicken at the last minute. We have recently extended our home grown herb selection to include oregano too (it’s an a pot and not only is it thriving, it looks great too!) so I liked that I wasn’t going to have to head to the shops to spend $3 or $4 on a packet of sad looking fresh herb.

The original comes from the excellent and reliable Delicious (UK) site. I substituted a lime for the lemon which I think is a good call, as even if you’re not drowning in limes, lemons can end up overpowering dishes like this whereas lime is a much more subtle flavour. Rather than using a whole head of garlic, I used a few cloves (skin on) and added carrots to my pan. We were going to steam some broccoli to serve as a side but you could also pop some broccoli florets in the pan for the last 10 or so minutes of cooking.

The beauty of cooking like this is that you do not have to worry about making a gravy or sauce to go with your meal. That magic just happens for you.

While this is not a true one-pot dish you could make it so by not bothering with browning the chicken. However, I urge you take the time to do so because not only does the finished dish look more attractive, I think it tastes better and the flavour of the self made gravy/sauce is much improved.

Roasted Chicken with Garlic and Herbs

Ingredients

  • 3 or 4 potatoes, cut into chunks
  • 2 carrots, cut into quarters
  • 4-6 cloves of garlic, skin on (as many or as few as you want, really)
  • 1 lime, sliced (about 4 or 5 slices)
  • 2 sprigs of oregano
  • 2 sprigs of thyme
  • handful of pitted kalamata olives
  • ~ 100 mL dry white wine
  • olive oil
  • 4-5 chicken thighs

Instructions

  1. Pre-heat oven to 200°C (180°C fan).
  2. In a large, lidded baking or roasting dish, drizzle a little olive oil and then arrange the vegetables and herbs on top. This can be done in advance.
  3. On the stove, heat a pan with a little oil, season the chicken thighs and brown them on both sides.
  4. When the chicken thighs are browned, place them on top of the vegetables. Put on the lid and place in the oven.
  5. Cook until the chicken juices run clear and the vegetables are done - this will probably be about 30-40 minutes.
  6. Serve with additional steamed vegetables on the side and the sauce from the pan poured over the top.
https://eatingadelaide.com/roasted-chicken-garlic-herbs/