Chocolate Chip Biscuits (or Cookies, if you must)

20150925_132940

For some reason, we are not big chocolate chip biscuit makers in this household. This does not mean that we are not enthusiastic consumers of said comestible. I LOVE them and when the mid-morning or mid-afternoon hunger pangs hit at work I’ll often nip next door to the café and buy one.

I suspect the lack of home production stems more from the fact that we rarely have biscuits in the household full stop. However, last Friday afternoon Master 4 and I were off to a play date and I asked him what he wanted to take. Cue a search for a quick, simple chocolate chip biscuit recipe that wouldn’t require multiple trips to the shops.

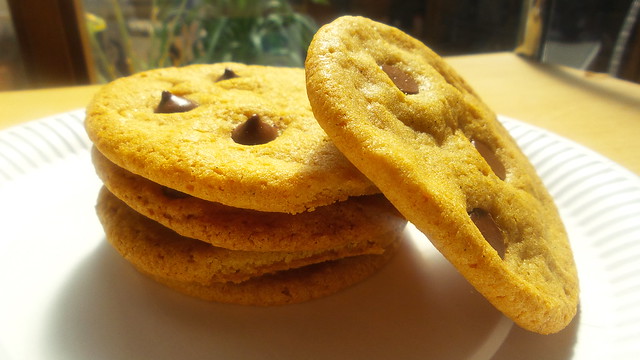
Luckily (as always) UK’s Delicious came to the rescue with this recipe. For anyone cooking with a child, it’s easy (OK – we do have a stand mixer!) and they will love eating the mixture, shaping the biscuits and pressing in the chocolate chips. As you can see from the photo, four chocolate chips per biscuit is woefully inadequate!

These biscuits strike, for me at least, the right balance between crispy and chewy. I think that that’s down to the combination of caster and light brown sugars. Make sure you use a good quality vanilla essence as the flavour does really shine through (especially if you are mean on the choc chip count and also if the biscuits last a couple of days). If you’re going to beef up the chocolate content, then you could probably omit the vanilla altogether.

We’ve really enjoyed eating these and as they were super quick to do I’m sure they’ll be making more regular appearances in our kitchen.

Chocolate Chip Biscuits

Ingredients

  • 100g unsalted butter, softened
  • 100g caster sugar
  • 100g light brown sugar
  • 1 egg
  • 1 tsp vanilla bean paste (or good quality extract, or omit altogether)
  • 165g plain flour
  • ¼ tsp salt
  • ½ tsp bicarb
  • chocolate chips - as many as you want!

Instructions

  1. Preheat your oven to 150°C fan (170°C conv) and line two baking trays with baking paper.
  2. Cream the butter and sugars until pale. Add in the egg then the vanilla, flour, salt and bicarb. Mix until well combined and smooth.
  3. Take a tablespoon and form large walnut sized balls of biscuit mixture. Place them on the baking trays - well spaced as they spread a lot (they are easy to separate so don't be too worried about them joining up during baking) and press in choc chips. Four per biscuit looks like a lot when they're a ball but looks like nothing once they're cooked - so be generous rather than mean.
  4. Bake for 15 minutes - the biscuits will spread and start to pick up a hint of brown at the edges. Depending on your oven you may want to keep an eye on them from the 10-12 minute mark. In my oven - 15 minutes was perfect.
  5. The recipe will make between 16 and 20 biscuits. The biscuits do end up quite large but they are also quite flat so they are not like the biscuits you get in cafes that are often as big as your head.
  6. Remove from the oven and allow to cool ever so slightly before carefully moving on to racks to cool completely.
  7. Eat!
https://eatingadelaide.com/chocolate-chip-biscuits-cookies/

Fig and Sour Cream Cake

20150130_110538

A friend of mine has recently enjoyed a surfeit of fresh fruit. Apparently, the birds in his suburb aren’t quite as fat as those in my suburb (hello, denuded plum and pear trees) and he spent a weekend preserving fruit. The upshot of this was that I received a jar of fig jam as well as a big container full of figs.

I duly ate a ton of fresh figs, tried to share them with Master 4 (he refused, although I suspect that his curiosity would eventually have got the better of him) and then needed to think up a way to use up some more in a rather more bulk fashion. I also had some sour cream kicking around in the fridge that needed using up (we had planned to make some avocado cream to go with some quesadillas but lost interest) so I figured that a fig and sour cream cake would use up both figs and sour cream.

A quick recce of the internet didn’t turn up the ideal recipe but I figured I have enough cake baking experience to borrow a few ideas here and there and then wing it.

The result was excellent – not massively figgy (I was being a bit cautious as the extra moisture in fresh fruit can cause problems) but the cake had good flavour and has kept exceptionally well. Straight out of the oven it was very fragile and crumbly but by day 2 it had firmed up. It is beautifully moist and the mix of vanilla and fig flavours is just delicious.

Fig and Sour Cream Cake

Ingredients

  • 125g unsalted butter, softened
  • 175g caster sugar
  • 200g self raising flour
  • 1 tsp baking powder
  • 1 tsp vanilla paste (I used Heilala - that stuff is pretty good!)
  • 2 eggs
  • 150g sour cream
  • 4-6 figs, finely chopped

Instructions

  1. Preheat oven to 160°C fan (180°C conventional). Grease and base line a 20cm springform tin.
  2. Cream the butter and sugar. Add the vanilla paste. Combine the flour and baking powder and then add to the butter and sugar. Add the eggs one at a time then beat through the sour cream.
  3. Finally, lightly beat through the chopped figs.
  4. It is a relatively loose mixture.
  5. Tip into the prepared cake tin nad bake for 40-45 minutes (45 minutes in my oven) - until a skewer inserted comes out clean.
  6. Allow to cool a little in the pan before cooling on a rack. The cake will sink but will sink EVENLY (if it collapses in the middle, it's underdone!).
  7. This cake doesn't need icing but you could serve with yoghurt or cream.
https://eatingadelaide.com/fig-sour-cream-cake/

Vanilla Madeleines

20141225_114501

Christmas is tricky. Andy and I always struggle to buy each other Christmas presents. While Master 4 has a never ending list of Lego that “we need to buy” we are far trickier customers. Obviously, anything food and wine oriented goes down a treat with me … so in the past I have received things like black lentils, szechuan peppercorns or molecular gastronomy chemicals. And wine. And maybe some more wine.

The Christmas just gone we were faced with the usual dilemma. Andy decided he wanted a PVR but that we should wait for the post Christmas sales (no present bought as yet … this is going to go the same way as the ladder a few years ago – which was bought in April). After some thinking I announced that I wanted either a madeleine pan or a friand pan. I showed Andy pictures of what I meant (he’s not quite as well versed in cake as I am) and on Christmas morning I scored both. They were both Bakers Secret – a brand which I’ve used a couple of times before and been impressed with. I bought my dad a pile of their pie tins and they’re excellent. They’re non stick but they’re very sturdy and robust, with a good weight to them. The non stick surface seems to be of a good quality too – which is what you’d expect if you’re going to the bother of making a good pan/tray in the first place.

A quick survey of recipes showed that I could make use of my madeleine pan immediately, so once present opening was done and Andy and Master 4 were busy building the Lego-robot-monster, I nipped out to the kitchen to check my supply of almond meal and try out this easy madeleine recipe.

This is a super fast, easy, and apparently foolproof recipe. I’ve made it a couple of times (madeleines are going to be my new “I-need-cake-in-a-hurry” thing) and messed around with flavourings. On one occasion I subbed honey for the almond essence but the flavour didn’t really come through and the edges of the madeleines caught with the extra sugar so that’s going to need a bit of tweaking.

What I love about these little cake-biscuit hybrids is, not only are they quick, but they are small. I complain a great deal about the ridiculous size of cakes and biscuits in cafés. These are the perfect size for an afternoon tea snack without spoiling your appetite for dinner.

Note that putting the madeleines in the freezer before cooking is (supposedly) what gives rise to the bump.

Also, I found that my oven comes up to temperature in the 10 minutes of freezer time so you may not need to turn yours on right at the start!

Vanilla Madeleines

Ingredients

  • vegetable oil spray for greasing your madeleine pan
  • 2 eggs
  • pinch of salt
  • 50g caster sugar
  • 50g plain flour
  • ½ tsp baking powder
  • 40g ground almond
  • scant ½ tsp vanilla paste
  • scant ½ tsp almond essence
  • 25g unsalted butter, melted

Instructions

  1. Grease madeleine tin lightly using spray oil (a quick spray in each hole and then use your finger to ensure the spot is well greased).
  2. Preheat oven to 190°C (fan).
  3. Whisk eggs, salt and sugar together until frothy (easiest if you have a stand mixer). Add remaining ingredients and whisk to combine.
  4. Spoon mixture into madeleine pan. Place (flat!) in freezer for 10 minutes and then transfer to oven and cook for 10 minutes. Allow madeleines to cool on rack.
  5. Serve dusted with icing sugar, if so inclined. Cup of tea or coffee essential and dunking recommended.
https://eatingadelaide.com/vanilla-madeleines/