Banana Cake Recipe

Banana cake or banana bread? Who knows what the difference is? Certainly not me. It seems to be a bit of a geographic thing … if you’re in the eastern states of Australia (particularly New South Wales) it’s banana bread, similarly if you’re in the US or Canada.

Hopefully this family recipe will be what you’re after, whether you’re searching for a banana bread recipe or a banana cake recipe!

Now – the first thing you need is the time and the patience as baking is a tedious process. If you are not willing to put in the efforts, we highly suggest you buy your cakes online in Singapore by clicking here. Lets start with three super ripe bananas. The horrible ones that have gone all black. It can be tricky to score yourself three at the right level of super ripeness all at the same time BUT I have discovered that you can freeze bananas. All you need to do is take your super ripe banana and pop it in the freezer. You don’t need to wrap it or anything. When you want to use it, remove it from the freezer a few hours in advance (they defrost quickly) and place it on a plate or in a bowl. This is quite important because defrosting bananas lose quite a lot of water.

Make sure you peel the banana when it’s only defrosted a little bit (let’s say 15-30 minutes out of the freezer). Straight out of the freezer it will be too hard, and if you wait too long it will all be too gluggy and impossible to peel. When you’re ready to use the banana, drain off the water it’s lost and ignore the fact that it looks really really ugly and unpalatable!

For the cake, preheat your oven to 180°C (convection, not fan) and grease a 1lb loaf tin.

Beat together 125g of unsalted butter and 175g of caster sugar. If you have a food processor go ahead and use this! Add 2 eggs and beat well before adding 300g of self raising flour. This mixture will be quite stiff at this point.

Add your three overripe bananas, well mashed, and ensure the mix is well combined. Finish by adding 60mL (or ¼ cup) of milk, into which you’ve dissolved 1 tsp of bicarb. This will loosen the mixture up a little and you’ll be able to pour it into your loaf tin.

This will almost fill the tin – but don’t worry – you shouldn’t end up with cake mixture all over your oven!

Bake at 180°C for about 45-50 minutes. In our oven (which is a little slow on convection) it took 50 minutes. I actually started checking the cake around the 30 minute mark but at that point it was still very very wobbly. As usual with cakes, you want a skewer or toothpick to come out clean. And naturally, you want your cake to be lovely and golden.

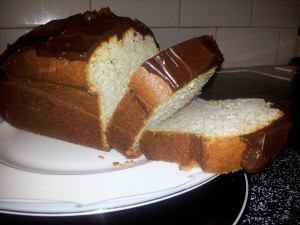
When done, remove from the oven, allow to cool for a few minutes and turn out onto a wire rack. When completely cool, top with chocolate ganache. You could also sprinkle a few chopped walnuts in a decorative line down the centre.

Perfect for afternoon tea … and using up bananas.

Coopers Celebration Ale

Disclaimer: Coopers sent me some of the new ale to sample. It’s a hard life …

As you may know, this year marks Coopers Brewery’s 150th anniversary. At this point in its history, Coopers is also the largest Australian owned brewery which is more than reason to celebrate.

And, naturally, the way a brewery celebrates is by releasing a Celebration Ale.

I was lucky enough to try some of the Celebration Ale thanks to Coopers, so rather than you bring you their tasting notes, I can bring you my own.

The beer is a dark amber in colour – almost reddish – so it looks quite different to Coopers’ other beers. As with many of Coopers’ beers, some yeast remains in the bottle so it can have a slightly cloudy appearance to it. So far – so good.

The nose is citrussy and hoppy, with a hint of spice to it. The beer actually makes use of three different hops: Pride of Ringwood, Nelson Sauvin and Centennial (that info is there for the beer geeks). Hops act as a preservative but also impart a distinct bitterness (as well as other flavours) to the finished product.

On the palate, this beer is more bitter than many other beers on the Australian market but that is definitely a good thing. The same citrus and spice found on the nose also appear in the mouth and the beer is not madly fizzy (don’t worry though – it’s not at all flat!). The slightly reduced fizz I think makes the beer eminently drinkable and the bitterness from the hops means it would pair really well with a range of foods. Coopers suggests chicken, seafood, tangy cheese and fruit based desserts – of these, I can definitely see the beer working best with sharp cheeses.

The beer is being released in 355mL bottles only (yep – that’s a bit of an odd one!) and is expected to retail for around $55 a carton. This is a beer I definitely recommend checking out – and if we all buy enough of it perhaps Coopers will keep on making it past the 150th celebrations …

How To Make Chocolate Ganache

ganache

Very often I don’t bother icing cakes because I am lazy. Making icing takes time, putting it on the cake takes time (and it takes even more time if you want it to all look pretty) and actually, washing up from the icing making takes time and effort.

However, most cakes are actually better if you do bother. And it might come as a surprise to know that making a chocolate ganache is much quicker than messing around with icing sugar.

Firstly, you have to commit yourself to paying a little bit of attention because you are going to microwave your chocolate. If we were to start using a bain-marie for this, it would take a long time and we’re here to be quick.

These quantities make enough chocolate ganache for a 1lb loaf cake but would also do for a 23cm round cake.

Take 50g of dark chocolate and 50g of unsalted butter, chopped, and melt in the microwave. I do this in 30 second bursts on full power and I hover by the microwave, keeping a beady eye on what is going on. After each burst, I give the chocolate and butter a stir and decide whether or not it needs another full 30 seconds or not. I suggest the first time you do this, you check more often than you think. If you melt chocolate this way regularly enough you’ll get a feel for it – but a mid-melt stir or two remains essential.

Allow the chocolate and butter mix to cool slightly and then stir in one generous tablespoon of pure (NOT thickened!) cream. Give it a really good stir – the mixture will start to thicken and in no time it will be at the right consistency to spread on your cake.

There may even be a little left for a taste test of your own …