I made this terrine ages ago now and it’s taken me a long time to get around to writing it because I suspect this is going to be quite a lot of effort. Which is surprising, because making the terrine was actually very easy. When the title says “simple” I do mean it. Before this, I’d never made a terrine so I was a little apprehensive (especially as I was making it for a dinner party, so there was very little wriggle room!) but it turns out that this is perfect party food.
There are a couple of great things about terrine. Firstly, you have to make it in advance – thus guaranteeing that on the day of whatever event it is, you won’t be flapping around, trying to whip something up last minute. The finished product looks impressive and is easy to serve. And because terrines are so meaty and dense, unless you are entertaining a horde, you are more than likely to have leftovers for snacks and lunches. They are also relatively cheap.
This recipe is from Damien Pignolet’s French . Now with some terrine making expertise under my belt, I do feel that this is the type of dish that, with a little experience and commonsense, you can really make up as circumstances dictate.
You do really need some specialist kit though: a terrine dish (for this terrine, approximately 1.5L in capacity). And if your oven has a built in meat thermometer … well, even better.
The first thing to do is to place an order with your butcher. You will need: 12 rashers of bacon (if you can get streaky, so much the better), 400g pork shoulder, coarsely minced, 300g chicken mince, 300g pork back fat, coarsely minced, and 200g chicken livers.
Preheat the oven to 160°C and line the terrine dish with the bacon, making sure that it hangs over the sides (when you’ve filled the terrine dish you’re going to fold the bacon over the top). You don’t need to grease or oil the terrine dish in any way: the bacon and the terrine filling both provide plenty of fat!
To make the filling, combine your meats (roughly chop the chicken livers first!) and add about half a cup of cooked, chopped spinach. If you use frozen spinach for this you’ll save yourself a lot of time and hassle. You want to defrost and cook it off in a fry pan to get rid of the excess water: job done. Add 1 clove of finely chopped garlic, plenty of black pepper (ground), 50mL of Cognac (or Armagnac or brandy), ½ cup of chopped parsley, 4 sage leaves, finely chopped, and the leaves from 4 sprigs of fresh thyme.
And if there is ever a time to suck up the exorbitant cost of fresh herbs in the supermarket … it is now. Really, do not go substituting dried ones. You won’t have a good idea of the balance of flavours until it’s too late and the long, slow cook that the meat is about to enjoy really means you need to choose fresh.
Next you need to mix through ½ tsp of quatre épices. This is a blend of equal parts of white pepper, nutmeg, ground ginger and ground cloves. If you’re confident you’ll use this a lot, go ahead and make up a decent quantity. However, I knew that if I did that I’d have yet another jar in my spice drawer that would sit there … and sit there … and sit there. So I very much guestimated this one …
And finally you need to add the salt. Now don’t be scared here … you need 18g per kilo of meat. DON’T skimp on this. DO NOT skimp on this. Get the idea? Yes, it looks like a ton of salt but really, you do need to add it!
Once your meat mix is made up you need to leave it in the fridge, marinating, for at least a couple of hours. I left mine overnight.
When you’re ready to start assembling the terrine, remove the mix from the fridge, allow it to come up to room temperature (or thereabouts) and fry off a little in a fry pan. You eat this. Not for fun, but so you can check on the seasoning. Once you’re happy with the seasoning, start spooning the meat mix into the terrine dish.
Press the mix down firmly and make sure you push it out to the edges of the dish – you want to pack in as much as possible. In my case, I had quite a bit of meat mix left over – it works well fried up for breakfast.
When you’ve filled the terrine dish with the meat, place a rasher or two of bacon across the top of the terrine dish & fold over the bacon you left hanging over the edge.
Cover with the terrine lid (or use tin foil) and place in a roasting dish half filled with water (you want the water to come half way up the terrine dish) and bake in a 160°C oven for an hour. Then reduce the temperature to 140°C and cook until the juices run clear or the internal temperature hits 70-72°C. This is where an oven with a meat probe comes in handy: it gives you a good idea of how things are going. But this will take at least another hour. Remember you are dealing with a very dense meat mixture!
When the cooking has finished, remove from the oven and the water bath, remove the lid and cover with some baking paper before weighting the terrine. I used tins from the cupboard for this. Allow to cool with the weights in place. Once cool, refrigerate overnight.
See – you do need to begin this in advance!
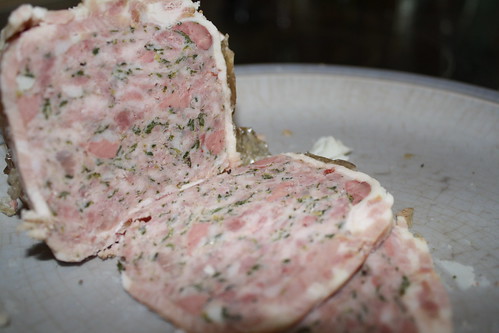
When you’re ready to serve, remove from the fridge a few hours in advance, run a knife around the edges of the terrine and upend the terrine dish on the serving platter. You’re unlikely to get lucky and have it come out straight away. But don’t worry – leave the terrine dish upended and over time the fat will warm up and eventually the terrine will just fall out. All you need to do is leave it alone.
Serve by slicing into fine or generous portions, with good bread, and plenty of pickle. We used a green tomato pickle, but your favourite will work well!
And to drink? Well, we opted for a Grüner Veltiner, but a dry Riesling would also work a treat.