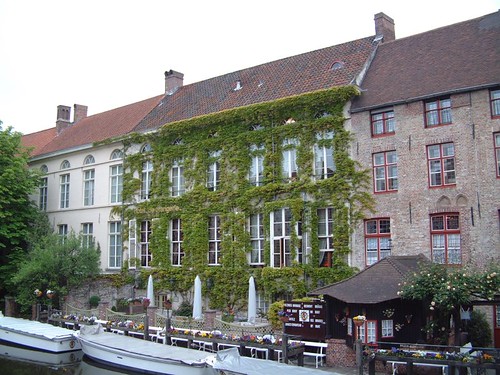
Canal Scene in Bruges – the Hôtel l’Orangerie is on my bucket list
Although I have only been to Belgium twice it is one of my favourite countries. At one stage I even had a grand plan to put life on hold for a brief period of time and make a comprehensive tour of Belgium’s breweries. That never got off the ground (for which I am sure my liver is thankful).
Belgian cuisine is not really that widely known. Yes, here in Adelaide we do have the Belgian Beer Café where you can try both mussels and this dish, waterzooi. The BBC serves a seafood based waterzooi, and while it may be more traditional, you’re more likely to find chicken waterzooi in modern Flanders. Indeed the waterzooi I enjoyed in Bruges was chicken (it followed a very traditional Belgian dish you won’t find at the BBC – eel in green sauce).

So when I borrowed Tolarno Bistro: The Life, Times and Recipes of a Remarkable Restaurant from the library (that’s a whole other story) and I was flicking through it for something to cook for dinner. I spotted the waterzooi recipe and the decision was made.
But it would be remiss of me to not give the book a review too. Tolarno Bistro was, apparently, something of a Melbourne institution which closed in 2006, after over 40 years of service to St Kilda’s dining public. The original owners were Georges and Mirka Mora and in those 40 odd years it had just three owners – the last being Iain Hewitson (now ‘as seen on tv’), who took over in 1990 with his then wife.
This book, written by Hewitson and journalist Bob Hart, is more than just a recipe book. In fact, perhaps it is more appropriate to say that it is a memoir of the restaurant first and foremost, but a memoir liberally sprinkled with recipes.
Tolarno Bistro was a French restaurant so the recipes are not heavy on the innovation front. Anyone who is already in possession of a generous collection of cookbooks will find that Tolarno Bistro duplicates, in a fashion, a lot of material. Personally, it’s not a book I’d rush out and buy simply because of that – but I am most definitely not the target market. If you ever ate at, or were even one of the couples who married at, Tolarno Bistro then the book is for you.
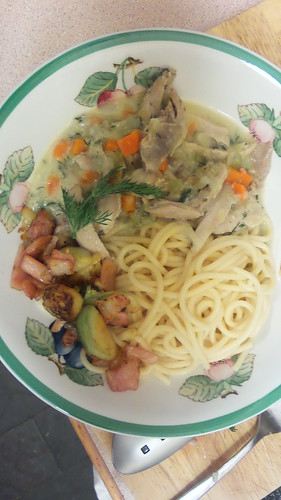
While this waterzooi is based on that found in Tolarno Bistro, I added carrot (for some much needed colour and extra vegetables) and cut back on the cream/sauce component. The waterzooi I ate in Belgium, after a hefty entrée of eel, had been overwhelmingly saucy and rich. I served with brussel sprouts and bacon.
The quantities given will serve 2, with some left overs for smaller members of the family to enjoy the next day.
Ingredients
- 4 chicken thighs (skinless)
- 6-10 whole black peppercorns
- 2 bay leaves
- 2 thick slices of lemon
- chicken stock (if bought, choose low fat)
- unsalted butter
- 1 onion, finely chopped
- 2 leeks, cut into thin rounds
- 1 celery stalk, diced
- 1 large carrot, peeled and diced
- 1 tbsp plain flour
- cream
- fresh chervil
- 1 egg yolk
- to serve: fresh pasta
Instructions
- Place the chicken thighs in a saucepan with the peppercorns, bay leaves, lemon and chicken stock and simmer gently for approximately 20 minutes, or until the chicken is just cooked.
- Remove the chicken (keep the stock) and allow it to cool slightly and then slice.
- In a separate pan, heat a generous knob of butter and gently fry off the onion, leeks, celery and carrot.
- Once the vegetables have softened, stir in the plain flour and cook (stirring) for a couple of minutes. Then add a generous ladle or two of the stock left over from cooking the chicken, and approximately 2 tbsp cream.
- At this stage, you really just want to get the sauce to the right consistency and richness for you. More stock and the sauce will be thinner but more of it. More cream and it will be richer.
- When ready to serve, stir through the chicken (if necessary, cook for a little while to ensure it's heated through) and some chopped chervil.
- Just before serving, remove the pan from the heat, beat the egg yolk in a separate dish, and then stir through the sauce to thicken.
- Serve on hot plates with fresh pasta.