Every now and then I have a good trawl through all the recipes I have tagged in delicious but have not yet cooked. In some ways it’s a depressing exercise as I tag faster than I’ll ever cook and I have a feeling that in 20 years time I’ll still be finding recipes I tagged in 2006 and haven’t made yet …
The ‘cake’ and ‘baking’ tags offer a particularly happy hunting ground and so I came across the basis for the following recipe. The blog is now defunct (or, as it describes itself, “in a coma”) but thanks to blogger it’s still a resource for all and hungry.
Of course, the first thing I had to get my head around was the fact that the recipe was all in American measurements. ¼ cup of butter – really? Am I supposed to melt the butter and measure it that way? What is wrong with saying 2 oz or 200 grams or whatever it is that you actually mean? In desperation, I whinged to my American friends on Facebook. The responses were generally along the lines that no, they had no idea why sticks and cups are considered sane units of measurement. One said that in America sticks of butter have the cup markings on the package (in much the same way that our packaging has marks at 50g intervals) but that didn’t, to my mind, resolve the issue of accuracy. I know that when I cut the butter at the 50g mark it is invariably anywhere between 45g and 55g once I get it on the scales. And in the age of cheap, digital scales why not use a unit of measurement that makes sense for non-liquid ingredients?
Goodness – I feel quite stressed now!
So I printed the recipe out, sat down with the internet and worked out conversions as best I could. Keeping in mind that I personally often find American recipes a little sweet, I did some massaging and came up with MY vanilla jam cake recipe. It looks like the original, but the recipe is for those of you who don’t have access to sticks of butter readily marked out into cup measurements!
A couple of pro tips. Grease your pan well – if any jam escapes it will be sticky, sticky, sticky! Ensure you have at least a third of the batter in the tin before you add the jam. The jam runs the risk of sinking and escaping and causing more sticky, sticky, sticky. And finally – if jam does escape and your cake comes out looking a little butchered (er, yes, that would be me!) don’t start shovelling warm cake into your mouth. The jam will be fearsomely hot and you’ll end up regretting it.
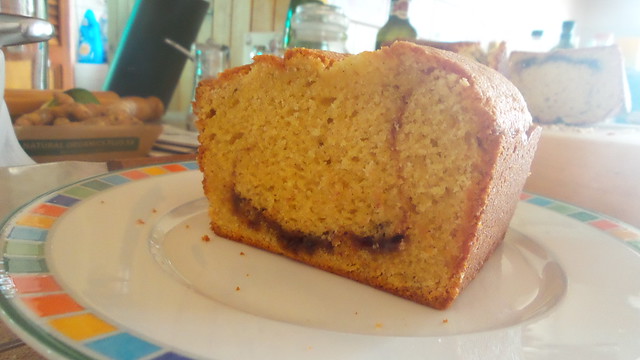
You don’t need to ice the cake and it keeps quite well for a day or two (that’s as long as it lasted …). The jam acts as internal icing and helps to keep the cake moist. It has a lovely vanilla flavour and gets plenty of plus points for being so easy to cook.
Ingredients
- ~ ⅓ cup of jam (your choice, I used strawberry as that's what we had open in the fridge)
- 200g self raising flour
- 150g golden caster sugar
- 50g unsalted butter
- 1 tsp vanilla paste
- 1 egg
- 180mL sour cream
Instructions
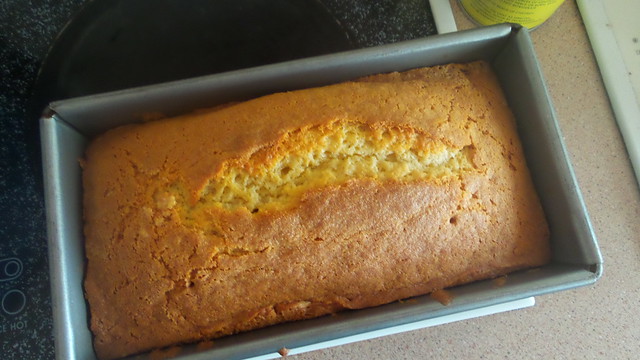
- Preheat oven to 180°C (160°C fan) and grease well a 1lb loaf tin (8" x 4").
- In the food processor, cream the butter and sugar and then add the flour, vanilla and egg. Finish with the sour cream.
- This makes a very thick batter.
- Spoon approximately ⅓ - ½ the batter into the loaf tin. Spoon the jam over the batter, but avoid the edges. If the jam is quite lumpy (or cold) it is a good idea to spoon it into a bowl and give it a bit of a beating before adding to the batter.
- Top with the remaining batter and place in the preheated oven.
- Cook for 40-45 minutes or until golden and cooked.
- Allow to cool in the tin briefly and then tip out onto a rack and allow to cool (remember, the jam will be very hot).
- Ice if desired.