Chocolate Bourbon Biscuit Recipe

20140728_103029

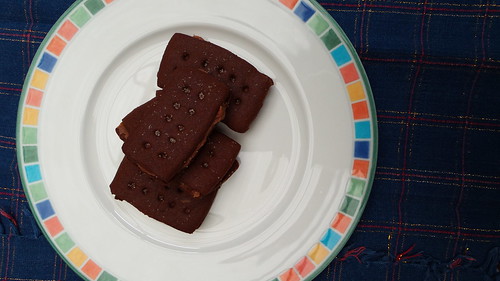
Something of an ongoing discussion in our household is whether the king of biscuits is the chocolate bourbon or the chocolate digestive. Now, obviously, all right thinking people know and understand that it is indeed the chocolate digestive. A quick vox pop on my personal Facebook page (I have plenty of English friends) even confirmed this fact.

But Andy maintains that the bourbon is king and when I saw this recipe I figured it would be worth giving them a crack. Especially as I am yet to spot the ‘real’ deal in shops here in Australia.

This is another recipe that I would definitely call store cupboard. If you’re a regular baker you’ll have everything to hand and even those who make more intermittent efforts will probably find that the only thing that it’s necessary to source is the golden syrup.

The biscuit dough is quick to make (especially if, like me, you throw everything in a food processor!) but actually cutting out the biscuits, cooking them, allowing them to cool and then sandwiching them together takes a little while. This is even more so the case if you have a three and a half year old assistant …

The dough does need to be kept cool. Even on a cold day in our cold kitchen, I found that by the time was on the last lot of biscuits the dough was becoming difficult to handle. If you’re operating in warmer conditions, definitely keep the dough you’re not using wrapped in cling film in the fridge.

Rolling out the biscuit dough between two sheets of cling film is a great idea – it makes turning the dough very easy to do and you don’t have to worry about the mess (either on the bench or on the biscuits) created by flour.

The biscuits keep well but do start to soften a bit once you fill them. If you’re making them ahead, don’t fill them until you need them. The buttercream filling can be made ahead too – you just need to remember to take it out of the fridge to soften a bit. I had quite a bit of filling left over, so obviously I was far too stingy … but it is absolutely delicious on toast!

Chocolate Bourbon Biscuit Recipe

Ingredients

  • 110g unsalted butter
  • 110g light brown sugar
  • 200g plain flour
  • 1 tsp bicarb
  • 40g cocoa
  • pinch of salt
  • ~ 3 tbsp golden syrup
  • 150g icing sugar
  • 5 tsp cocoa
  • 75g unsalted butter
  • ½ tsp vanilla extract
  • 3 tsp boiling water

Instructions

  1. Preheat the oven to 170°C (convention) and line a couple of baking sheets with baking paper.
  2. To make the biscuits, cream the butter and light brown sugar. Add the flour, cocoa, bicarb and salt. Then add 2 tbsp of the golden syrup. If the dough does not come together then add another teaspoon or so. Process well between any extra additions as you don't want to add too much. The exact amount you need will depend on weather conditions and your flour so it is likely to change every time you make the biscuits.
  3. Tip the dough out onto the bench and bring it together in a ball. Divide the ball into four and, if it's warm, refrigerate 3 pieces, wrapped in cling film.
  4. Roll each ball into a long sausage and place between two sheets of cling film and roll out until 2-3 mm thick. Cut into biscuits (apparently a bourbon is 6 cm x 3 cm so that's the size you're aiming for) and transfer onto the baking sheets. You'll probably need the help of a palette knife (or other broad bladed knife). Allow space between the biscuits.
  5. A bourbon has 10 indents in it - use the blunt end of a bamboo skewer to create two rows of five impressions and then bake for 10-12 minutes. The biscuits will still be soft on top but will move on the baking paper.
  6. Sprinkle a little caster sugar on each biscuit while hot and gently press in with the back of a spoon.
  7. Allow the biscuits 10-15 minutes cooling on the tray before transferring to a wire rack.
  8. To make the buttercream filling, sieve the icing sugar and cocoa (or process well in a food processor). This is important: failure to do this will result in gritty buttercream. Even if you're using a food processor you need to process the icing sugar and cocoa really well BEFORE you add the butter.
  9. Add the butter, vanilla extract and water and process until you have a smooth, fluffy cream.
  10. Sandwich the biscuits with the cream and serve.
  11. They keep perfectly well filled for a couple of days. After that they do go a little soft but still taste spot on!
https://eatingadelaide.com/chocolate-bourbon-biscuit-recipe/

Mary Berry’s Cornish Fairings

20140711_134317

Last Friday the small child and I were heading out for an afternoon play date so I decided that we should make something to take along. As there was no way I was going to the shops in the morning (in my defence, we’d been shopping on Thursday afternoon) I had to make do with what was in the house. So what follows is a genuine store cupboard recipe.

I first made Cornish fairings a few years ago but never blogged the recipe and, of course, couldn’t for the life of me remember which one I’d used. However, Mary Berry’s 100 Cakes and Bakes offered a recipe and one for which I had all the ingredients. I was a bit concerned because her biscuits looked nothing like Cornish fairings (in my opinion) should.

However, you can never really go wrong with a ginger biscuit, can you?

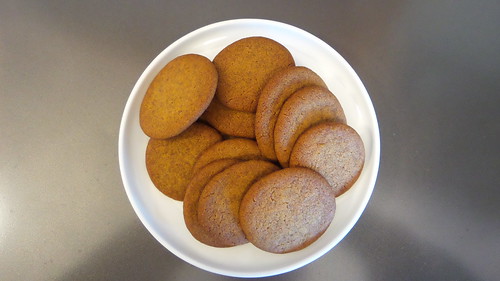
My biscuits turned out looking exactly like Berry’s, so a big tick there. However, I’ve done some research and have some ideas what needs to be done differently to get a much more distinctive cracking pattern on the biscuits. Disappointing, because last time I made them they were picture perfect … but it’s provided me with an excuse to make more.

These biscuits are full of ginger spice and are hard and crunchy, so they’re perfect for dunking. A big hit at home, with the small child demanding a biscuit for breakfast on Saturday.

Rest assured, he didn’t get it!

Mary Berry’s Cornish Fairings

Ingredients

  • 100g plain flour
  • ¼ tsp ground ginger
  • ¼ tsp allspice
  • ¼ tsp ground cinnamon
  • ½ tsp bicarbonate of soda
  • 50g butter (I used salted as that's what I had)
  • 50g caster sugar
  • 75g (roughly 2 generous tablespoons) golden syrup

Instructions

  1. Preheat oven to 160°C fan.
  2. Mix the dry ingredients with the butter until crumbly. Add the golden syrup (warmed, if it is very cold weather) and mix to a soft dough.
  3. Either divide into 24 or, using a teaspoon, scoop out small walnut sized portions, roll and gently flatten on a baking sheet (lined with baking paper).
  4. Cook for 10 minutes in the preheated oven, remove and tap the tray firmly on the bench before returning to the oven for a further 5 minutes.
  5. The biscuits should be golden.
  6. Cool on a wire rack and store in an airtight container. They will easily last 3-4 days.
https://eatingadelaide.com/mary-berrys-cornish-fairings/

Charmaine Solomon’s Lamb Doh Piaza

20140709_204017

On first moving to the UK I remember being amazed by the range of curries available in curry restaurants. I lived in Rochester, in Kent, and at least ten curry restaurants within walking distance of my flats. And every single one had at least one curry I hadn’t heard of before. Having (almost literally) grown up on a diet of rogan josh, vindaloo, butter chicken and raan, curries like jalfrezi, dhansak and phal seemed positively exotic.

I put in some hard yards and after serious research I had the distinctions under my belt and could negotiate my way around a menu in my sleep.

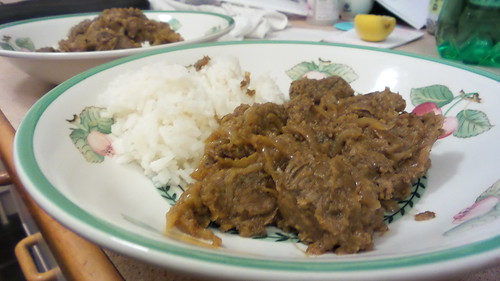
I’m pretty sure that a doh piaza was something with which I was not conversant before heading to the UK. The key thing with a doh piaza is that it’s all about the onions. Indeed, ‘doh piaza’ means ‘two onions’. As with all curries, a long slow cook is in order, so don’t try to whip this up after work. I made this on Monday for Wednesday night’s dinner. I kept aside the second batch of onions, ready to add (along with the garam masala) as the curry was heating up.

This is not a super spicy curry (I ate mine with plenty of hot lime pickle!) and it doesn’t have a scary list of spices so if you’re something of a curry novice, or don’t cook curries often, then this is a great recipe to have in your repertoire.

The basis for this recipe comes from Charmaine Solomon’s classic Complete Asian Cookbook and, perhaps less so than usual, I apologise for what is probably an uninspiring photo. But we all know curries are tough to photograph!


Charmaine Solomon’s Lamb Doh Piaza

Ingredients

  • 700g diced lamb
  • 500g onions
  • 3 large cloves garlic
  • chunk of fresh ginger, peeled
  • ~ 30g plain yoghurt
  • 1 heaped tsp chilli flakes (or substitute chilli powder - but always to taste)
  • half a packet of coriander, roots included
  • 1 tbsp ground coriander
  • 1 tsp cumin seeds
  • ghee
  • oil
  • 4 cardamom pods
  • ½ tsp garam masala

Instructions

  1. Heat some oil and ghee in a heavy based pan that has a lid.
  2. Finely slice half the onions and cook until golden. Then set aside.
  3. While cooking the onions, roughly chop the remaining onions and put in a food processor with the garlic, chopped ginger, yoghurt, chilli, fresh and ground coriander and cumin seeds. Process until smooth.
  4. Once the sliced onions have been browned, add the chopped lamb to the pan and brown. You may need to do this in batches. Set the meat aside.
  5. Add a little more ghee to the pan and then add the onion and spice mix. Cook, stirring frequently, until it darkens in colour and oil starts to appear at the edges. Be patient.
  6. Return the meat to the pan, add the cardamom and stir well. Turn the heat down to low, cover and cook slowly until the lamb is tender. Allow at least a couple of hours.
  7. When ready to serve, stir through the sliced fried onions and garam masala. Cook for a further fifteen minutes and then serve with rice (or naan).
https://eatingadelaide.com/charmaine-solomons-lamb-doh-piaza/