How To: Meringue

Mini Meringues

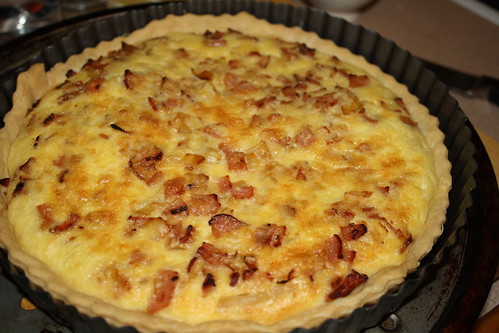
I’m surprised but it seems as though I’ve never posted a basic meringue recipe. This is very remiss of me, because, if you’re anything like me you’ll often find yourself with a rogue egg white that needs using up. Perhaps after you’ve made pastry for a quiche lorraine, for example!

Before a ‘recipe’ (such as it is) some notes on egg whites and meringue making in general.

Fresh is best. Don’t use an ancient egg, and don’t use an egg white that has been hanging around in the fridge for a week. However, egg whites freeze really well. If you don’t think you’ll be able to use it up quickly, simply put it in a clean container and freeze. Egg whites defrost quickly and they’re as good as new.

If you can use an egg white that’s at room temperature, that’s better still.

Fat is your (meringue’s) enemy. Freezing the egg white? Use a scrupulously clean container. Cracking it into a bowl or ramekin? Scrupulously clean. The bowl you’ll be beating it in? Scrupulously clean.

I cannot emphasise that enough. NO FAT.

The recipe below scales up easily and, with just two ingredients, there’s no excuse for not giving it a try.

The real question is … should a meringue be gooey in the centre or crisp the whole way through?!

Basic Meringue Recipe

Ingredients

  • 1 egg white
  • 55g caster sugar

Instructions

  1. Preheat your oven to 100°C (conventional). If you're in a bit of a hurry about 140°C is as hot as you want to go. If you are cranking up the temperature, you'll need to keep a close eye on the meringues to make sure they're not taking on too much colour.
  2. Alternatively, cook something like a cake and turn off the oven. Leave the meringues in as the oven cools - even overnight.
  3. Beat the egg white until quite stiff. The stiffer it is, the glossier and firmer your meringue mix will be and the easier it will be to manipulate.
  4. When the egg whites are stiff, add the caster sugar slowly while you continue to beat. If this is your first time making meringue, add the sugar a tablespoon at a time. Otherwise, use your cooking wisdom to guide you.
  5. Ensure the sugar is really well beaten into the egg white. The mix should be smooth and glossy and not at all grainy.
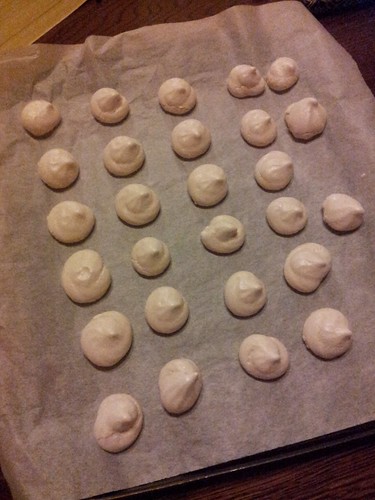
  6. If you wish to make mini meringues (the best type for cheeky tea time treats!), scope the mixture into a piping bag fitted with a wide, fluted nozzle. Pipe the meringues on to a baking tray lined with baking paper.
  7. Of course, you can make any shape or size you want: using a teaspoon or a tablespoon works just as well, even if the finished product isn't quite as dainty.
  8. Cook in the low oven until dried out and crisp.
https://eatingadelaide.com/meringue/

Quiche Lorraine

Quiche Lorrainecheck out that shrinking pastry … don’t let your toddler drive the food processor!

One of my slightly less hip hobbies is entering competitions. I caught the bug while living in the UK and I’d say that it’s rare a day goes by when I don’t enter at least one. It goes without saying that my favourite competitions to enter (and win) are those involving food or cooking.

One of my most recent wins was Australian Women’s Weekly Country Classics, through a Kambrook competition. The Women’s Weekly cookbooks are famous throughout the world and I think everyone (or everyone’s mum or grandma) has at least one of these at home.

I was keen to try it out as soon as possible and, after having a good read through, I settled on quiche lorraine. Now, people can get a bit het up over quiche lorraine because it is one of those foods that has been well loved and well adapted. If you think this version is not quite right please feel free to tell me (and the Women’s Weekly!) what is wrong!

My toddler helped me make the pastry for this and it ended up somewhat overworked (when I came to roll it out it was elastic rather than silky …) and so we had a bit of shrinkage. I used all the bacon and onion mixture but have about 500mL of cream filling left. I’m planning on making a rather luxe omelette with it, and grating through some courgette so I feel healthy …

The pastry was good: short, crumbly and I enjoyed the hint of lemon. The filling was excellent and this is such a storecupboard kind of dish, with a bit of practice it could easily be a mid-week lifesaver.

Overall, the Country Classics cookbook is filled with solid recipes that will stand a novice cook, in particular, in good stead. Quite of the few salad and sandwich ideas I’m looking forward to appropriating and adapting in future and you never know, one day I might even make use of the “camp fire” section …

Quiche Lorraine

Ingredients

  • Pastry
  • 260g plain flour
  • 150g cold unsalted butter, cubed
  • 1 egg yolk
  • 2 tsp lemon juice
  • iced water, as required
  • Filling
  • 1 medium onion, finely chopped
  • 200g bacon, finely chopped
  • 3 eggs
  • 300mL cream
  • 125mL milk
  • 90g grated cheese (Gruyère is 'traditional' but I used standard tasty cheese)

Instructions

  1. Make the pastry by combining the butter and flour in a food processor. When crumbly, add the egg yolk and the lemon juice, and then slowly add the water until there is just enough for the mix to come together. Knead lightly, wrap in cling film and refrigerate for ~ ½ hour.
  2. To make the filling, fry the onions and bacon until the onion starts to turn golden. Drain on kitchen towel.
  3. In a bowl (or large jug, if you have one) whisk the eggs, and add the milk and cream. Stir through the grated cheese.
  4. Line a 24cm deep, loose bottomed quiche dish, with the pastry. Bake blind, with baking beans, at 180°C fan (200°C conv) for 10 mins. Remove the beans and bake for another 10 or so minutes until golden.
  5. Spread the bacon and onion mix over the base. Pour over the cream filling (if you have made the filling in a bowl it is probably worthwhile pouring it into a jug for this!). Do this slowly to give the mix time to spread around, otherwise you'll end up overfilling.
  6. Bake at 160°C fan (180°C conv) for 30-35 minutes, until golden and set. I personally prefer just set: I think it makes for a creamier end product.
  7. Stand for 5 minutes in the tin, and then remove. Serve hot or warm with either salad or steamed vegetables.
  8. Tip 1: place the quiche dish on a baking tray BEFORE blind baking. This makes it much easier to get it in and out of the oven and if your filling does overflow, you only have a tray, not an oven, to clean.
  9. Tip 2: to remove the quiche from its tin, pop it on a mug as this will allow you to remove the outer ring of the pan easily. Using a fish slice or palette knife, you can then gently manoeuvre it on to a serving plate or cutting board.
https://eatingadelaide.com/quiche-lorraine/

Prawn and Pumpkin Curry

Untitled
curry – always ugly in a photo!

This recipe comes from the usually very reliable Curry. I chose this based purely on the fact that we had both pumpkin and prawns to use up. I was a bit concerned about both the lack of chilli and the coconut milk, as I know this is not one of Andy’s favourite ingredients.

But you never know, if you never give it a go. By our standards, this is a very mild curry. This would suit people who aren’t big on spice (whether that be chilli spice or just lots of different spices) and could easily be served as a vegetarian dish (or side) by omitting the prawns.

Personally I found it lacking in the heat department (rectified by some generous spoonfuls of a fearsome Chinese chilli chutney I have!). Also, as pumpkin doesn’t hold its shape well, if you overcook (like we did – the whole point of curry is cook ahead!) you end up with kind of a pumpkin sludge, rather than pumpkin. Finally, I used coconut cream, rather than milk because that is what was available. However, both coconut and pumpkin are very sweet and, without a serious spice backbone, for both Andy and me, this curry came out a little too sweet for our liking.

This is definitely a dish which has appeal but serve as part of a meal, rather than as the meal, and watch the cooking of the pumpkin.

A final note: I really recommend growing your own curry leaves. They’re fearsomely expensive here in Adelaide (if you can find/buy them at a supermarket) and a curry leaf plant is a very easy patio plant to deal with. No excuses!

Prawn and Pumpkin Curry

Ingredients

  • vegetable oil
  • ½ tsp black mustard seeds
  • cumin seeds (pinch, or to taste!)
  • curry leaves (10, or more if you love them)
  • inch piece of ginger, peeled and sliced finely
  • three dried Kashmiri chillis, broken in half
  • 1 large onion, sliced
  • 150g pumpkin, cut into chunks
  • ½ tsp turmeric
  • ½ tin coconut cream
  • 8 large green prawns, peeled & deveined, leave the tail section on for glamour, if you wish

Instructions

  1. Heat the oil in a wok and add the mustard and cumin seeds. When they start popping, add the curry leaves, ginger, chillis and onion. Cook over a low - medium heat until the onions start turning golden.
  2. Add the pumpkin and turmeric, stir, and add the coconut cream and add water to cover the pumpkin. Stir and bring to the boil. Cook, covered, until the pumpkin begins to soften.
  3. When you're ready to eat, reduce the heat, add the prawns and cook until they are done.
  4. Serve immediately. We served over egg noodles for a change, but rice would work just as well.
https://eatingadelaide.com/prawn-pumpkin-curry/