Cheese Twists

IMG_3882

Party season is yet again upon us (in our household, it starts early, thanks to the toddler’s December birthday) and it’s time to start thinking of nibbly things to have with drinks.

This is a super easy cheese twist recipe that you can make ahead and have stored in the freezer (uncooked) ready to go in case of expected or unexpected guests. It’s also versatile – experiment with your favourite cheeses or add in herbs or spices. I made these for a children’s party, so just stuck with cheese, but if I were to make them again I’d definitely add a sprinkle of cayenne pepper.

My approach is a slight variation on an Australian Women’s Weekly recipe. I think that folding the pastry onto itself makes it a lot easier to handle when it comes to twisting.

For freezing – freeze the twists on baking paper lined baking trays initially. Once frozen you can bag them up and then just cook straight from the freezer.

Perfect!

Cheese Twists

Ingredients

  • 2 sheets of puff pastry (frozen is fine, if you can find butter puff, that's great!)
  • ½ cup of grated parmesan
  • ½ cup of grated cheddar
  • 1 egg, lightly beaten
  • flour for the board

Instructions

  1. Preheat oven to 220°C (conventional, 200°C fan).
  2. Defrost the pastry. Lightly dust your worktop with flour and roll out the pastry a little, retaining the shape.
  3. Brush the entire sheet with the egg wash.
  4. Generously sprinkle half the sheet with the mixed cheeses. At this stage you could also sprinkle over some cayenne or paprika, or herbs.
  5. Fold the pastry over and press down.
  6. Slice width wise (that is, cut along the short edge).
  7. Take a piece and press down along its length and then twist, placing it on a baking paper lined baking tray.
  8. Repeat until all the pastry is used up.
  9. If freezing - freeze at this point. Otherwise, brush with egg wash and bake for 10-15 minutes until puffed and golden.
  10. Serve immediately.
https://eatingadelaide.com/cheese-twists/

Quiche Lorraine

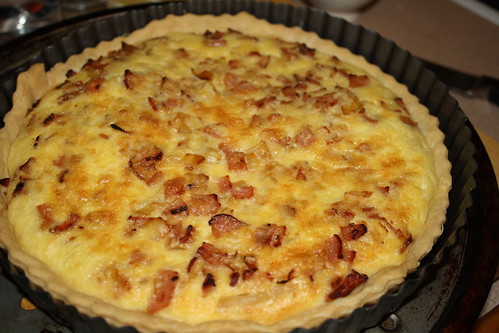
Quiche Lorrainecheck out that shrinking pastry … don’t let your toddler drive the food processor!

One of my slightly less hip hobbies is entering competitions. I caught the bug while living in the UK and I’d say that it’s rare a day goes by when I don’t enter at least one. It goes without saying that my favourite competitions to enter (and win) are those involving food or cooking.

One of my most recent wins was Australian Women’s Weekly Country Classics, through a Kambrook competition. The Women’s Weekly cookbooks are famous throughout the world and I think everyone (or everyone’s mum or grandma) has at least one of these at home.

I was keen to try it out as soon as possible and, after having a good read through, I settled on quiche lorraine. Now, people can get a bit het up over quiche lorraine because it is one of those foods that has been well loved and well adapted. If you think this version is not quite right please feel free to tell me (and the Women’s Weekly!) what is wrong!

My toddler helped me make the pastry for this and it ended up somewhat overworked (when I came to roll it out it was elastic rather than silky …) and so we had a bit of shrinkage. I used all the bacon and onion mixture but have about 500mL of cream filling left. I’m planning on making a rather luxe omelette with it, and grating through some courgette so I feel healthy …

The pastry was good: short, crumbly and I enjoyed the hint of lemon. The filling was excellent and this is such a storecupboard kind of dish, with a bit of practice it could easily be a mid-week lifesaver.

Overall, the Country Classics cookbook is filled with solid recipes that will stand a novice cook, in particular, in good stead. Quite of the few salad and sandwich ideas I’m looking forward to appropriating and adapting in future and you never know, one day I might even make use of the “camp fire” section …

Quiche Lorraine

Ingredients

  • Pastry
  • 260g plain flour
  • 150g cold unsalted butter, cubed
  • 1 egg yolk
  • 2 tsp lemon juice
  • iced water, as required
  • Filling
  • 1 medium onion, finely chopped
  • 200g bacon, finely chopped
  • 3 eggs
  • 300mL cream
  • 125mL milk
  • 90g grated cheese (Gruyère is 'traditional' but I used standard tasty cheese)

Instructions

  1. Make the pastry by combining the butter and flour in a food processor. When crumbly, add the egg yolk and the lemon juice, and then slowly add the water until there is just enough for the mix to come together. Knead lightly, wrap in cling film and refrigerate for ~ ½ hour.
  2. To make the filling, fry the onions and bacon until the onion starts to turn golden. Drain on kitchen towel.
  3. In a bowl (or large jug, if you have one) whisk the eggs, and add the milk and cream. Stir through the grated cheese.
  4. Line a 24cm deep, loose bottomed quiche dish, with the pastry. Bake blind, with baking beans, at 180°C fan (200°C conv) for 10 mins. Remove the beans and bake for another 10 or so minutes until golden.
  5. Spread the bacon and onion mix over the base. Pour over the cream filling (if you have made the filling in a bowl it is probably worthwhile pouring it into a jug for this!). Do this slowly to give the mix time to spread around, otherwise you'll end up overfilling.
  6. Bake at 160°C fan (180°C conv) for 30-35 minutes, until golden and set. I personally prefer just set: I think it makes for a creamier end product.
  7. Stand for 5 minutes in the tin, and then remove. Serve hot or warm with either salad or steamed vegetables.
  8. Tip 1: place the quiche dish on a baking tray BEFORE blind baking. This makes it much easier to get it in and out of the oven and if your filling does overflow, you only have a tray, not an oven, to clean.
  9. Tip 2: to remove the quiche from its tin, pop it on a mug as this will allow you to remove the outer ring of the pan easily. Using a fish slice or palette knife, you can then gently manoeuvre it on to a serving plate or cutting board.

https://eatingadelaide.com/quiche-lorraine/

Asparagus and Bacon Tart

IMG_1314

This is a quick midweek supper: supplement it with a salad and make sure you don’t eat it all as it’s delicious cold for lunch the next day!

Asparagus has a short season – this was beaten into me while living in England when everyone (well, everyone interested in food) goes a bit mental banging on about the 6 weeks of the year you can buy English asparagus.  Anyway, it’s asparagus season now in Australia and you can should be able to pick some young tender stalks up cheaply.

This is another proper storecupboard meal – once you have your asparagus everything else you’ll probably have hanging around the house.

Begin by making your pastry (or, grabbing some pre-made shortcrust from the freezer).  I always make shortcrust because, with the aid of a food processor, it’s so quick it’s a shame not to.

My basic recipe is 150g of plain flour, 75g cold, unsalted butter, 1 egg yolk (use the white to make meringues!), a pinch of salt and cold water to bring it all together.  Rest in the fridge, wrapped in clingfilm, for half an hour or so.  This makes enough pastry for  a 23cm (or so) tart tin.  If you have the will, bake it blind – it does really pay off with a nice crispy base!

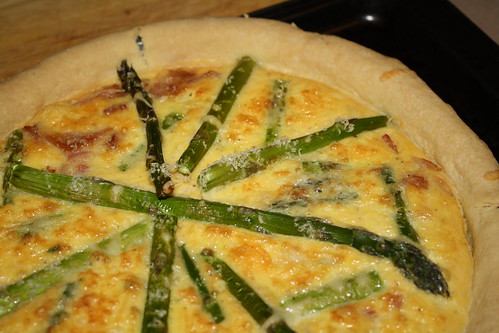
For the filling, chop and fry 2 rashers of bacon.  Spread this evenly over the base of the pastry case.  Now add your fresh, roughly chopped asparagus.  You might want to reserve 3 or 4 spears for decoration – you might not.  I used the best part of 2 bunches of young asparagus.

Whisk together 5 eggs, add a generous couple of tablespoons of thick cream, and season with pepper (no salt!).  Pour over the bacon and asparagus, top with some grated parmesan and some grated cheddar and bake in an oven preheated to 160°C fan (or 180°C normal) for about half an hour – until the egg is puffed up and the tart is golden.

You don’t need to serve this piping hot – as the warmer weather approaches, room temperature would be perfectly acceptable. The tart filling will sink back a bit as it cools, but it will still look – and tast – fantastic.