My previously blogged easy pork fillet recipe has been a popular page over the last month so let’s revisit this excellent cut of meat but cook it in a slightly different way.
This is another recipe I’ve had on my to do list for a couple of years, and it comes from the website of the UK version of Delicious. The choice was actually driven by the fact that I’d picked up a bulb of fennel for just 99c and so I was looking for a way to use it.
I love fennel when it’s handled as little as possible so the light warm salad that accompanies the pork fillet in this dish is a perfect way to showcase the vegetable. This was very much a recipe where the finished product is much greater than the sum of its parts, and it’s also a lot more sophisticated (in both appearance and taste) than it is work to put together.
We had a piece of pork fillet that was about 400g (yes, the original recipe says that will serve 4 – this served 2 + a toddler – perhaps our toddler eats a lot …). Leave the meat in one piece but trim off any sinew. In a bowl mix a small amount of olive oil with one fat, finely chopped clove of garlic and 2 tsp of fennel seeds. Season and add the pork fillet. Ensure the pork is well coated in the mix. I see no reason why you couldn’t do this in advance, but there’s no need to leave the meat marinating.
Heat a little oil in a frying pan and sear the pork on all sides (remember – the pan should be good and hot and no prodding and poking of the meat – it will come away from the pan, even if it’s not a non stick pan, when it’s good and ready). Transfer the pork to a small roasting dish and cook in an oven preheated to 200°C fan. I cooked the pork for 20 minutes, followed by 10 minutes resting time and it was almost spot on (if anything it was a touch over).
While the pork is cooking in the oven, wipe out the frying pan and prepare the salad. Using a mandolin (or slice finely) slice half a medium sized bulb of fennel, and then finely slice a small red apple (you want the red skin so it looks pretty!).
Toast a handful of pine nuts in a separate pan and mix them with the apple and fennel. Drizzle over some olive oil and lemon juice and add the mix to the pan you used for the pork. Warm over a gentle heat.
Finally make some creamed feta. Use 100g of feta (buy Australian!) and begin with 2 tbsp of cream. Because I used thick pure cream I actually had to add more. Season and whizzy up in a small food processor or using a stab mixer. Ideally you want it to be quite loose so you may want to add some milk if your cream is too thick.
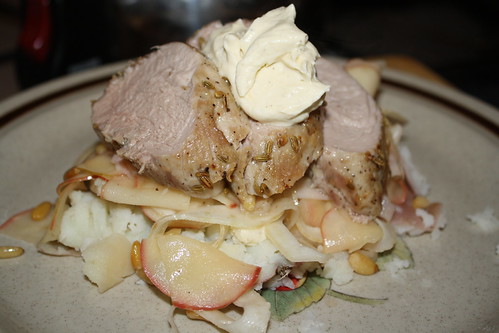
To serve, I boiled some potatoes, crushed them on warm plates, spooned over some creamed feta, topped with the apple and fennel mix and finish with the pork, with a bit more creamed feta.
This was absolutely delicious. The fennel seeds on the pork complemented the fennel in the salad and there was a good balance of flavours and textures (from a texture point of view it’s very important not to overdo the salad – you want it softened and warm but still with a bit of bite).
Definitely a recipe we’ll be using again and again.