Pecan Pie

A long weekend BBQ, some uncharacteristic (for Adelaide) rain and a request for pecan pie …

090320101172

BBQs I like.  They are an excuse to eat a lot of bread, meat and maybe dessert, and the whole salad thing is just an annoyance.  Having a BBQ at home is even better because I can make as much dessert as I want and know that there’s a good chance it will be eaten.

I had already spotted a pecan pie recipe in James Martin’s The Collection* so I knew exactly where to head.

This recipe is ridiculously easy … even more so if you choose to cheat and use ready shortcrust pastry or a pre-made pastry case.

I used James’s recipe for sweet shortcrust pastry – although I had to omit the ground almonds as I had none.

To make the pastry, take 225g plain flour, a pinch of salt, 2 tbsp of caster sugar and 115g of unsalted butter. Whizzy up in the food processor until it looks like small breadcrumbs. This won’t take very long. Then add one egg and just enough water to bring the pastry together. Allow to rest for at least 20 minutes in the fridge (wrapped in cling film). If you have a food processor this takes just seconds.

While the pastry is resting, make the filling. In a bowl, mix 350g of pecans, 55g of dark chocolate, grated (or chopped up, if you’re a bit lazy), 1 tsp of vanilla extract, a pinch or two of salt, 350mL of maple syrup (BEWARE! buy real maple syrup and not ‘maple flavoured syrup’) and 300g of caster sugar.

Beat 4 eggs in a separate bowl and then add to the nut mix. Finish everything off by adding 115g of melted unsalted butter.

If you have made your own pastry, bake it blind (10 minutes or so at 160°C with baking beans and another 10 minutes or so without, finish by brushing with beaten egg and sealing for 2 minutes – this stops the base going soggy), before adding the filling.

If you are using a ready made pastry case, all you now have to do is fill the case with the nut mix.

Whichever route you’re taking, bake at 160°C for about an hour. James Martin makes the point that it’s quite difficult to tell if the pie is cooked, so if you want to err on the side of caution, turn the oven down 20° and bake for an extra 10 minutes.

Allow to cool before serving.

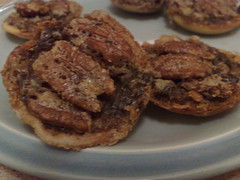
If you use a shallow tart dish you could well have a lot of filling left over. I made a pile of little pies – very cute, perfect for afternoon tea at work!

The pies are gorgeous – the chocolate adds a really subtle depth of flavour that works well with the vanilla and maple syrup.

This is such a simple but delicious pie I will definitely be making it again.

* The Collection is also available from Amazon US and Amazon UK.

Easy Chocolate Cake

301120091142

The world’s cookbooks (and the internet) are awash with recipes for complicated cakes that look stunning and will take a good couple of hours to put together.

Those cakes are fantastic for events where you might want to showcase some baking talent but they won’t do if you want a slice of cake to take for lunch, or if you need to whip up a cake quickly without a trip to the supermarket.

This cake fills that slot perfectly.  It’s quick and if you cook or bake regularly you should have the ingredients to hand.  The recipe comes from a friend of my grandmother and this was the first cake I ever made ‘on my own’.   It is my contribution to this month’s Family Recipes hosted by the Life and Loves of Grumpy’s Honeybunch.

I always bake the cake in a kugelhopf tin but I’m sure a 20cm springform tin would do just as well.

Preheat the oven to 180C bake and grease your tin well.

Cream 50g of butter and 1 cup of caster sugar.  When well combined, add 2 eggs and beat well.  Then add 1 1/2 cups of self raising flour and 2 tbsp of cocoa.  The mixture will be quite stiff.  Mix 1/2 tsp of baking powder (or bicarb) with 1/2 cup of milk and add to the batter.  Beat until combined and finish by beating in 2 tbsp of boiling water.

Pour into your cake tin and bake for about half an hour – the cake should be well risen and a skewer should come out clean.

Leave the cake to cool in the tin for 5 or so minutes before tipping out on a rack.  When the cake is completely cool ice with your favourite icing or just dust with icing sugar.

If you’re lazy (like me!) and use a food processor like a Magimix the whole process, including the cleaning up, will take under an hour.  To me, that is the perfect emergency cake!

Cupcakes for Cupcake Camp

Cupcake Camp is coming to Adelaide on Sunday 22 November.  This means it’s time for me to start practising baking (and decorating) cupcakes.  What a trial!

Since I like messing around with recipes, I dug out my 1920s Handbook for Bakers by Albert F Gerhard.  All the recipes are given in commercial quantities, in imperial, using 1920s American ingredients … so there’s quite a lot of work that needs to be done before hitting the kitchen.  I decided to start with the first cup cake recipe and scale down from 12 dozen to just … one.

The result was a cupcake recipe that made good cupcakes with a fine, moist crumb.  That said – there’s nothing outrageous about the recipe!

Preheat the oven to 180C (160C fan).

Cream 100g of caster sugar with 75g of unsalted butter.  Add 2 eggs and combine well before adding 175g of self raising flour.  Flavour with 1 tsp of vanilla essence and finish by adding 1 tsp of baking powder dissolved in 1/2 cup of milk.

When everything is well combined, spoon the mixture into cupcake cases and bake … until done.  I had a massive fail with the oven so I can’t actually tell you how long the baking took!  The recipe suggests you’ll need to bake for about 10 minutes – but after 10 minutes the cakes weren’t cooked.  The oven then turned itself off.  About 10 minutes later, perplexed by the cakes still not being cooked, I realised this and turned the oven back on.

So … if you don’t know how to operate your oven, baking will take about half an hour.  Still, it gave me plenty of time to do the dishes!

Vanilla Cupcakes with Chocolate Icing

Once cool, I iced the cakes with a simple chocolate icing and finished with chocolate sprinkles.

And there are now none left!