Potato Bread and How to Four Plait

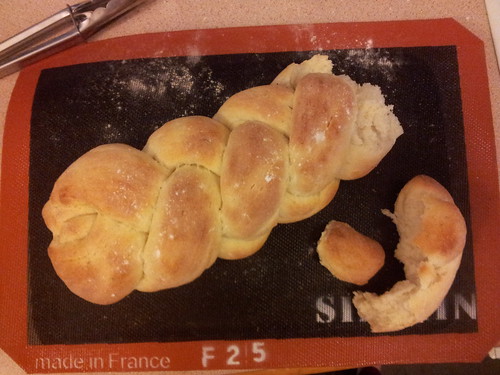
Untitled finished product

At present, we are feeling rather swamped in our crop of home grown Dutch Cream potatoes. So far it is not even a particularly prolific crop (there are still four plants in the ground about which I’m feeling very nervous) but it has produced more potatoes than we can reasonably eat and we are not in possession of a root cellar. If we were, it would be a wine cellar.

Fortunately, I’ve made potato bread before and I thought it would be an opportunity to kill a couple of birds with one stone. The toddler refuses to eat both potatoes and bread (the exceptions being chips in a pub and one type of milk roll that my mum makes). I originally thought that growing and digging up potatoes might enthuse him but it turns out that it has only enthused him in shouting about the “tatoes in the garden” and ferreting about in the soil.

Making the bread dough (using a recipe from The Big Book of Bread) with him was surprisingly difficult. He was excellent at ricing the potatoes but four hands in a mixing bowl (yep, we did this all by hand … the KitchenAid got a break!) made for a lot of flour on the bench and made it very difficult for me to judge how much water we needed to add. And a toddler can shove a surprising amount of part made bread dough in his mouth when you’re not looking. Apparently raw flour, raw dough and everything in between are ripe for ‘tasting’.

It’s surprising then that doing the four plait with his help was actually really easy. While Peppa Pig is inculcating my child with all manner of feminist socialist politics, she’s also taught him all about creating ‘wiggly worms’ so I was able to give him chunks of dough and let him loose.

So – the four plait. We were originally going to make rolls, as I figured that small hands might be able to work with simple knots. However, I decided that I also need to stretch myself just a bit. I enjoyed watching almost all of Masterchef Professionals (UK), including the bread skills test where Monica Galetti set four chefs the task of, amongst others, doing a four plait.

I’ve never done this before but having had long hair almost my entire life I am totally adept at a three plait (in hair, but not shabby when it comes to bread either). So when I say that I found this easy to do – you’ve got your caveat.

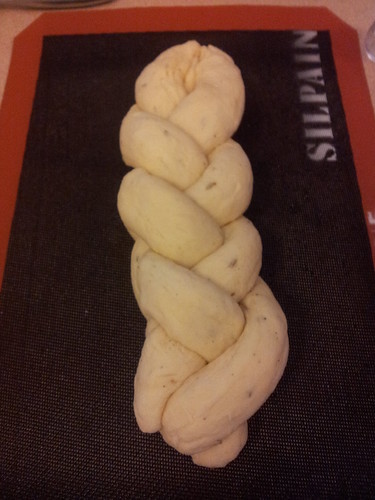
Untitled before

I had a look around the internet for written (rather than video) instructions because the thing with plaiting is that you need to know which strand to put where. The instructions at Alchemy in the Kitchen were exactly what I needed.

With plaiting you number the positions of the strands (left to right or right to left doesn’t matter) and then you follow a sequence. You’ll find variations on this but I followed the above which is:

4 over 2
1 over 3
2 over 3

rinse and repeat

You need to make your strands of dough tapered at the ends so that you can tuck them under and make a tidy loaf (note – not what I did!). And you need to keep your plaiting tight so you do need to do a bit of fiddling as you work. The “2 over 3” step is particularly counter intuitive. What this is doing is creating a spine for the rest of the plait to sit on. Keep this in mind and work tight and you’ll be fine!  Though perhaps not up to doing this in front of Monica Galetti …

However, your toddler might still refuse to eat bread and you’ll scoff the lot with plenty of butter in the space of a couple of days …

Potato Bread

Ingredients

  • ~ 350g potato, peeled, cubed, boiled, riced/mashed and cooled
  • 500g flour
  • 2 tsp (7g) dried yeast
  • 2 tsp salt (don't skimp)
  • 35g finely grated parmesan cheese (this doesn't need to be too precise, use more if using a not so strongly flavoured cheese)
  • 1 1/2 tsp fennel seeds (or other herb/seed of your choice - carraway would work well too)
  • freshly ground black pepper
  • ~ 200mL warm water

Instructions

  1. Mix the flour and potato together in a large bowl. Use your hands and incorporate so that the mix is crumbly.
  2. Add the yeast, salt, cheese, seeds and pepper and mix well.
  3. Slowly add the warm water. You may need more or less than the 200mL depending on your flour, so add about half and incorporate well before adding a little more as you need it. You need to bring all the ingredients together in a soft dough.
  4. Tip the dough out onto a lightly floured bench and give it a good keading, until the dough is soft and silky. Lightly grease the dough and return to its bowl. Cover the bowl and leave to rise until roughly doubled in size.
  5. Lightly knead again and, if doing a four plait, divide the dough into four equal portions and form these into ropes that are slightly tapered at both ends.
  6. Plait using the 4 over 2, 1 over 3, 2 over 3 approach. Do the plait on a slightly floured baking tray (or use a siplain (silicone) mat, which you can move onto a baking tray easily later).
  7. If not plaiting, shape into whatever shape you want. Or even make rolls.
  8. Cover and leave to roughly double again.
  9. Preheat oven to 180C fan (200C conventional) and cook for approximately half an hour. Bread should be risen, tanned in colour and should sound hollow when tapped on the base. If making rolls, you'll probably need about 15-20 minutes in the oven.
  10. Leave to cool on a wire rack and gobble down with lashings of butter!
https://eatingadelaide.com/potato-bread-four-plait/

Carrot Cake with Cream Cheese Icing

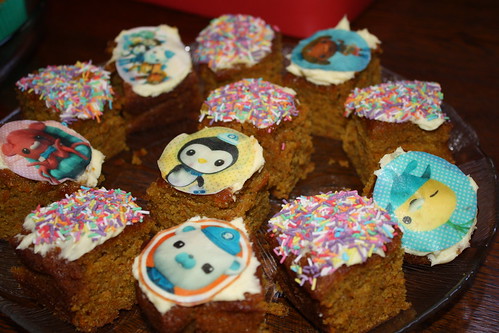
IMG_3877 the Octonauts cake toppers were sourced from an ebay shop based in Canada!

I’m still working my way through the toddler party recipes but I’m trying to intersperse them with things savoury so you don’t get a sugar overload.

This recipe comes from the BBC’s Good Food site. It is actually labelled as a frosted carrot squares, but what is the difference between a ‘square’, a ‘traybake’ and a ‘cake’? I also take issue with the use of the word ‘frosted’ because surely that is an Americanism both UK and Australian readers can do without … (and on this point, it would seem Google agrees with me!).

There are small tweaks and changes in my version – most noticeably the addition of ginger which I would definitely do again. I loved the subtle spice kick. This cake freezes (un-iced) beautifully and has a lovely moist, almost sticky, crumb.

Unlike many carrot cake recipes, this one contains no nuts so is ideal if you need to avoid them, for whatever reason.

Andy, the resident carrot cake expert, did complain that it wasn’t quite coarse enough in texture. I suspect that’s the lack of nuts, but, really, who cares when there’s a tasty cake on offer?!

Carrot Cake with Cream Cheese Icing

Ingredients

    Cake
  • 200g carrots, peeled and grated - I used my food processor's grating disc
  • 175g soft brown sugar
  • 200g self raising flour
  • 1 tsp bicarb
  • 1 tsp ground cinnamon
  • 1 tsp ground ginger
  • zest of one orange
  • 2 eggs
  • 150mL neutral flavoured vegetable oil (I used canola)
  • Icing
  • 50g softened unsalted butter
  • 75g icing sugar, sieved
  • 200g cream cheese, at room temperature

Instructions

  1. Preheat oven to 160°C fan (180°C conventional).
  2. Grease and line with baking paper an 18cm square baking tin/dish.
  3. Having grated the carrots (either by hand, or with the help of a food processor!), tip them into the bowl of a stand mixer.
  4. For this recipe, you don't want to cut up the carrots too finely - it will make the cake too wet and with too smooth a texture. If you don't have a stand mixer, either work by hand or use a cake beater. Don't work in a food processor for this one!
  5. Add the sugar, flour, bicarb, spices and orange zest and mix slowly.
  6. Add the eggs one at a time.
  7. Finally, add the oil and mix well. Ensure everything is combined but don't over beat.
  8. Spoon the cake mix into the prepared tin and bake for around 30 minutes or until cooked. In my case (cooking in my oven at 160°C fan) I checked at 30 minutes and ended up cooking for 40 minutes in total.
  9. Remove from oven and allow to cool in tin for about 10 minutes and then turn onto rack.
  10. If freezing, freeze, well wrapped, when completely cool.
  11. To make the icing, mix the butter and icing sugar together, and then add the cream cheese. You are best off if you can do this with some kind of mechanical beater (stand mixer, in my case) because cream cheese, even at room temperature, is stiff and difficult to work with. Using a beater/mixer will result in a much smoother and more manageable icing.
  12. I cut the cake then iced, but you could ice first and then cut. Coloured sprinkles are a fun addition too.
https://eatingadelaide.com/carrot-cake-cream-cheese-icing/

Mary Berry’s Chocolate Brownies

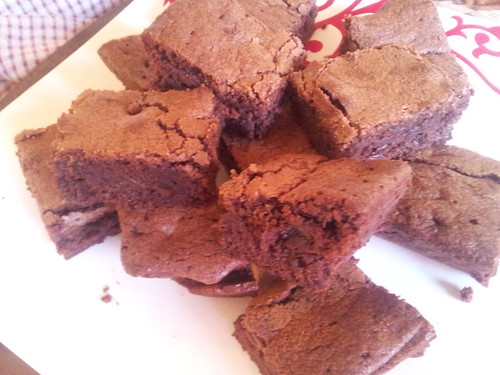
Untitled

A while back I bought a copy of Mary Berry’s 100 Sweet Treats and Puds (I bought it from Clouston and Hall but they no longer have it).

Mary Berry is a UK baking icon and co-hosts the original Great British Bake Off. I hope she’s not offended by me saying she’s a very grandmotherly type. Both my grandmas were pretty good cooks and I certainly didn’t go short of sweet and savoury treats. But if you didn’t have a grandma who baked then one episode of Bake Off and you’d probably be interested in adopting Mary Berry.

I spent quite a bit of time reading through the book deciding what to cook first. A reasonably impromptu Father’s Day lunch saw me volunteer desserts and, realising I was short of time, I decided on the brownies because they looked really easy.

It turned out that time was even more of the essence than I’d realised because, on the morning of lunch, with brownies yet to make and the other dessert to assemble, one of our neighbours popped his head over the fence and the already tight schedule was thrown out of whack!

These brownies taste great with a deep chocolate flavour, are slightly squishy and fudgy and are really easy. If you’re not confident melting chocolate, you want a store cupboard alternative or you want a quick recipe (you still need 40 minutes baking time though!) then this is the recipe for you.

A couple of notes: don’t be freaked out by what feel like unconventional quantities of ingredients. Hold your nerve! Mary Berry’s original recipe uses 375g caster sugar but I had only 300g left and topped up with dark brown sugar. This is always a result in brownies and adds extra richness.

Mary Berry’s Chocolate Brownies

Ingredients

  • 275g unsalted butter (slightly softened if you working by hand or using a stand mixer)
  • 300g caster sugar
  • 75g dark brown sugar
  • 4 eggs
  • 75g cocoa powder
  • 100g self raising flour
  • 100g dark chocolate chips

Instructions

  1. Preheat oven to 160°C fan and line a roasting tin (30cm x 23 cm) with baking paper.
  2. Combine the butter and sugars then add the eggs. Mix in the cocoa powder and self raising flour and finish by stirring in the chocolate chips.
  3. The mixture will be very thick. Spoon it into the baking dish, smooth it out and bake for 40-45 minutes. The cake should be set and a skewer should come out clean but you also don't want to over bake because otherwise the brownies won't be squidgy.
  4. Leave to cool in the tin (if appropriately squidgy it will collapse a little) before cutting into 24 squares and serving.
https://eatingadelaide.com/mary-berrys-chocolate-brownies/