How to Drive the new GLAD Packaging


Cling film (saran wrap/whatever you want to call it) is, I have found, one of those kitchen essentials which is NOT worth economising on. Over the years I have tried various supermarket own brands of the stuff and found them to lack the all important stretch-and-stick ability.

Because I can’t save money on brand I save money by buying the biggest, fattest roll which offers me best bang for buck (or, indeed, fewest cents per metre). So I’ve just brought home a 60m packet of GLAD cling film.

And what do I discover? In an attempt to increase ‘safety and convenience’ the cutting strip has moved. It now perches on the lid. You can still cut your fingers but as a bonus, as soon as you place any pressure on it (you know, to cut off some cling film), the strip and lid tear thus making it even tougher to use next time.

The GLAD facebook page is full of people complaining about this … and GLAD is managing to come up with a stock response, time after time. For some reason, GLAD isn’t taking a hammering on twitter.

Anyway, over the next couple of days we’re all going to be using plenty of cling film so here’s a short video about how to try to manage …

And yes, while I’ve been toying with the ideas of videos for a while, I envisaged that my debut may involve some makeup, no chicken cooking in the background and not wearing a nearly 20 year old t shirt. That’s what you get for doing these things on a whim, solo, on Christmas Eve!

Merry Christmas!

How To: Meringue

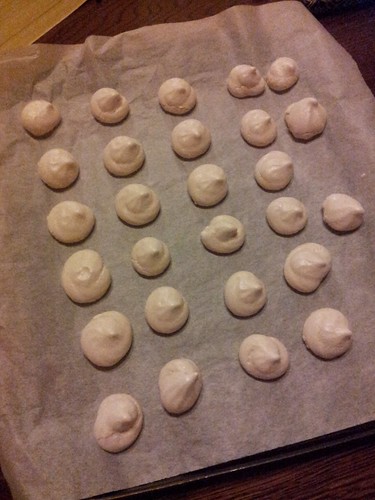
Mini Meringues

I’m surprised but it seems as though I’ve never posted a basic meringue recipe. This is very remiss of me, because, if you’re anything like me you’ll often find yourself with a rogue egg white that needs using up. Perhaps after you’ve made pastry for a quiche lorraine, for example!

Before a ‘recipe’ (such as it is) some notes on egg whites and meringue making in general.

Fresh is best. Don’t use an ancient egg, and don’t use an egg white that has been hanging around in the fridge for a week. However, egg whites freeze really well. If you don’t think you’ll be able to use it up quickly, simply put it in a clean container and freeze. Egg whites defrost quickly and they’re as good as new.

If you can use an egg white that’s at room temperature, that’s better still.

Fat is your (meringue’s) enemy. Freezing the egg white? Use a scrupulously clean container. Cracking it into a bowl or ramekin? Scrupulously clean. The bowl you’ll be beating it in? Scrupulously clean.

I cannot emphasise that enough. NO FAT.

The recipe below scales up easily and, with just two ingredients, there’s no excuse for not giving it a try.

The real question is … should a meringue be gooey in the centre or crisp the whole way through?!

Basic Meringue Recipe

Ingredients

  • 1 egg white
  • 55g caster sugar

Instructions

  1. Preheat your oven to 100°C (conventional). If you're in a bit of a hurry about 140°C is as hot as you want to go. If you are cranking up the temperature, you'll need to keep a close eye on the meringues to make sure they're not taking on too much colour.
  2. Alternatively, cook something like a cake and turn off the oven. Leave the meringues in as the oven cools - even overnight.
  3. Beat the egg white until quite stiff. The stiffer it is, the glossier and firmer your meringue mix will be and the easier it will be to manipulate.
  4. When the egg whites are stiff, add the caster sugar slowly while you continue to beat. If this is your first time making meringue, add the sugar a tablespoon at a time. Otherwise, use your cooking wisdom to guide you.
  5. Ensure the sugar is really well beaten into the egg white. The mix should be smooth and glossy and not at all grainy.
  6. If you wish to make mini meringues (the best type for cheeky tea time treats!), scope the mixture into a piping bag fitted with a wide, fluted nozzle. Pipe the meringues on to a baking tray lined with baking paper.
  7. Of course, you can make any shape or size you want: using a teaspoon or a tablespoon works just as well, even if the finished product isn't quite as dainty.
  8. Cook in the low oven until dried out and crisp.
https://eatingadelaide.com/meringue/

How To: Roast a Leg of Lamb

Roast Leg of Lamb

I was recently lucky enough to buy half a Dorper lamb, freshly butchered and delivered into my hot little hands from its farm on Hindmarsh Island.

We haven’t had something as simple as a roast leg of lamb for AGES so it was time to crack out the meat probe. Not too much time needed to be spent googling the right temperature. My parents have just acquired an oven with meat probe and had handily cooked a leg of lamb a couple of weeks prior. They cooked to 74°C which, by mum’s standards, was perfect. We opted to cook to 71°C as we like our meat a little pinker.

If you don’t have a meat thermometer then you should really buy one, because otherwise you have to do all sorts of complicated calculations regarding weight, oven temperature and whether or not you have a bone in the meat. I can’t help you with that!

However, what I can help you with is prepping the meat.

Our family tried and tested approach is to stud the meat with garlic and rosemary. If you’re inclined, you can also add anchovy to that mix, but on this occasion I went with just garlic and rosemary.

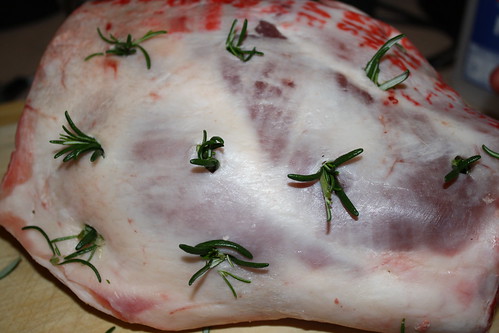
Take a small, sharp knife and plunge it into the lamb flesh to create little pockets. You can see from the photo that you want quite a few. The more you have the more the meat will be infused with the flavours of garlic and rosemary.

Now, thinly slice a clove of garlic. You need slivers of garlic so that they’ll melt into the meat as it cooks and when you eat it you’ll get the garlic flavour throughout rather than big bursts of garlic. Stuff the slivers of garlic right into the pockets – no garlic should be sticking out because if it does, it will get burnt and taste bitter.

Next stuff in little slices of anchovy (if using) and finish with small sprigs of rosemary, say a cm or two in length. The rosemary can stick out.

Do this all over the lamb (including underneath).

Then you’re ready to roast! There’s no need do anything fancy like you would do with pork (for crackling) or a fillet of beef. Just straight into the oven until done.

Make sure you rest the meat, covered – at least 20 minutes. Once the meat is out of the oven is the point at which we start doing most of the vegetables (roasted ones excepted).

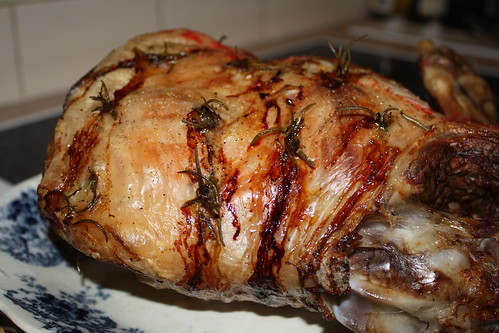
Roast Leg of Lamb

Serve on hot plates, with roasted and steamed vegetables and plenty of gravy (make sure you add the juices from the rested meat to the gravy!).

Perfect for a Sunday dinner but good enough to be special occasion food.