Custard

Apple Crumble & Custard
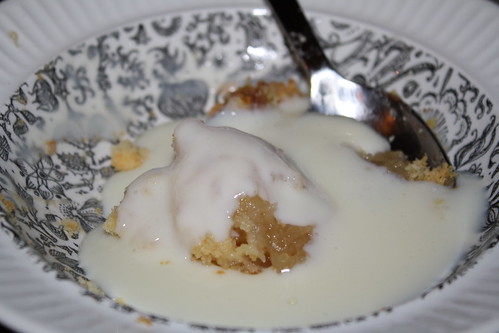
apple crumble drowned in custard

I would have been perfectly happy to have cream with our apple crumble, but Andy was not and as I had a brand new milk pan that needed trying out, custard seemed like it was on the cards.

A lot of people seem to think that custard is hard or difficult or scary. Well, it’s not though if you approach anything with that attitude, why then, yes it will be.

This recipe is a James Tanner one that I first discovered in 2006 but the original link no longer works. It is super easy – no separating of eggs or anything. All you need is a heat proof bowl, a pan and a whisk.

Begin by beating 2 eggs with 55g of caster sugar. When this is pale and creamy, heat ½ pint (that’s 285 mL) of milk (full cream, naturally) to just on boiling (this is called ‘scalding’ the milk, if you want to be technical) and then slowly pour the hot milk onto the eggs and sugar, whisking all the time. You need to keep on whisking otherwise the heat of the milk will scramble your eggs.

Return the mix to the pan, on a lower heat, and continue to beat or stir until the custard reaches the right consistency for you. I find this takes about 15 minutes. Two tips here: do make the effort to hang around doing the stirring and most certainly do NOT crank the heat up and wander away. Secondly, ensure that your stirring or whisking gets into the corners of the pan – if you don’t work your way around the pan solidly you’ll end up with lumps of cooked egg in your custard!

If you’re not planning on using your custard straight away, cut a circle of baking paper (a cartouche) and cover the custard with that. You can then gently reheat it when you’re ready.

You’ll note that homemade custard is distinctly paler in colour than anything commercial or made from a packet. Eggs, milk and cream is never going to come out bright yellow.

And, if you wish to jazz your custard up, you can infuse flavour when you scald the milk. Pop in a split vanilla bean, or a crushed cardamom pod or two, for example.

All too easy – and to be honest, not actually that unhealthy either!

How to: microwave pappadums

Pappadums

A couple of weeks ago I posted a list of microwave food hacks.

It’s not right to post them without testing them out.  Let’s start at the bottom of the list:  microwaving pappadums.

Traditionally pappadums are cooked in hot oil.  You take the little chickpea based wafers, you take a ton of superheated peanut oil and you give them a quick blast.  In theory, this isn’t fattening because the oil is so hot that the pappadum doesn’t actually absorb any.

If you’ve ever eaten a pappadum you know that that’s a fair bit of rubbish!

We’ve long been fans of microwaving pappadums (you do, literally, just pop the pappadum in the microwave on some kitchen towel and give it a quick blast on high on both sides) but while they’re tasty they’re only a pale approximation of the real thing.

So when I read that you could brush your pappadum with oil (or melted ghee) before microwaving for a more ‘authentic’ finish I had to give it a go.

I brushed both sides of the pappadum with peanut oil before placing on kitchen towel and microwaving on high.  With the oil on the pappadum needed longer than usual (that is, without) but it still needed rotating and flipping.

Combining this extra cooking time with the bother of brushing the things with oil … was it all worth it?

No.

The pappadums didn’t expand the way they do in hot oil – they just stayed small and the microwaving clearly didn’t get the oil nearly hot enough, so they ended up covered with a slick of grease.  It was really the worst of both worlds:  the oiliness of a pappadum cooked in not hot enough oil combined with the slight raw flour taste you get when you microwave them.

So in future, we’ll be spending the time perfecting our frying technique (get the oil super hot!) when we’ve got time, or using the microwave (without oil) when we’re in a hurry.

How To Make Chocolate Ganache

ganache

Very often I don’t bother icing cakes because I am lazy. Making icing takes time, putting it on the cake takes time (and it takes even more time if you want it to all look pretty) and actually, washing up from the icing making takes time and effort.

However, most cakes are actually better if you do bother. And it might come as a surprise to know that making a chocolate ganache is much quicker than messing around with icing sugar.

Firstly, you have to commit yourself to paying a little bit of attention because you are going to microwave your chocolate. If we were to start using a bain-marie for this, it would take a long time and we’re here to be quick.

These quantities make enough chocolate ganache for a 1lb loaf cake but would also do for a 23cm round cake.

Take 50g of dark chocolate and 50g of unsalted butter, chopped, and melt in the microwave. I do this in 30 second bursts on full power and I hover by the microwave, keeping a beady eye on what is going on. After each burst, I give the chocolate and butter a stir and decide whether or not it needs another full 30 seconds or not. I suggest the first time you do this, you check more often than you think. If you melt chocolate this way regularly enough you’ll get a feel for it – but a mid-melt stir or two remains essential.

Allow the chocolate and butter mix to cool slightly and then stir in one generous tablespoon of pure (NOT thickened!) cream. Give it a really good stir – the mixture will start to thicken and in no time it will be at the right consistency to spread on your cake.

There may even be a little left for a taste test of your own …