Zucchini and Feta Fritters

Untitled

Ages and ages ago (probably, almost literally, years ago) a friend told me that her son was an enthusiastic eater of zucchini and haloumi fritters. At the time I thought “oh, that sounds nice, I must make those” and then never got around to it.

We typically don’t eat a huge number of zucchini (I tend to call them courgettes): I love them but Andy is somewhat ho-hum about them. So when it comes to shopping, they always run a very poor second to broccoli (universally loved in our household).

However, recently we’ve had something of a glut of zucchini forced upon us. Mum grew them (in the right conditions they grow like weeds) and there were also a few in my Keane’s vege box.

So the time was well and truly nigh for breaking into zucchini fritter territory.

I had a quick google and cobbled together my own recipe based on what seemed to be very standard kind of territory. These were very quick to make – although you do need to allow a little time for grating and salting the zucchini. Herb-wise you can mess around – I used mint, but dill would definitely work just as well, and some recipes use just parsley. My advice would definitely be to use FRESH herbs rather than dried. And if you happen to have a lemon hanging around, grate the rind of half of it into your mixture.

As always, be generous with your seasoning. It is best to fry one off and adjust the seasoning before committing yourself to the whole batch!

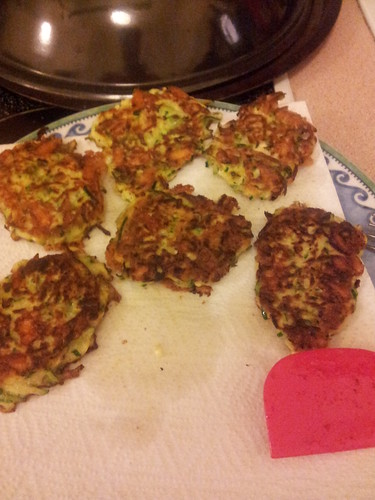
Serve the fritters hot, with salads.

Andy and I loved these. And while these are perfect toddler food, our toddler was not bothered either way.

And if you don’t want to print, download a pdf of the recipe!

Zucchini and Feta Fritters

Ingredients

  • 3 zucchini, coarsley grated
  • 4 spring onions, finely sliced
  • 100g Australian feta, finely chopped
  • ~ 1 tbsp fresh mint, finely chopped
  • 2 eggs
  • 1 tbsp verjuice (or lemon juice)
  • ~ 4 tbsp plain flour

Instructions

  1. Coarsely grate the zucchini and, in a large bowl, mix through a generous pinch of salt. Set aside at room temperature for approximately half an hour.
  2. Squeeze the moisture out of the zucchini - by hand is fine - and place it in a clean,dry bowl.
  3. Stir through the spring onions, feta and mint and then add the eggs one at a time. Mix through the verjuice and then stir in the flour, one tablespoon at a time.
  4. You may not need all the flour - you want to bring the mixture together but you don't want the mixture to become dry. The more flour you use the greater the risk you'll taste raw flour in the finished product. You're much better off to have a slightly too loose mixture - you can always add more flour once you've fried your test fritter!
  5. Season.
  6. Heat some olive oil in a non stick pan. Add the fritter mix to the hot pan by the tablespoon, taking a moment to spread each fritter out a little. In my 20cm pan, I was able to cook about 4 fritters at a time.
  7. Flip the fritters when the base in browned. They're easy to flip when they're ready. If the fritters have been spread out, they'll be ready when brown on both sides.
  8. Drain on kitchen paper and serve hot.
https://eatingadelaide.com/zucchini-fetafritters/

Chermoula Recipe – or, Moroccan Fish

Untitled
I might have to make this again, just to take a better photo!

Last week I asked Andy want he wanted for dinner ,I suggested to go to the nearest sushi restaurant to taste different fish recipes . I had a bit of a look on the internet and a bit of a look through my cookbooks which also suggested the same as it was close enough.

Made in Morocco is a cookbook that, while it gets sporadic work outs, probably is somewhat underutilised. My mum bought it for me almost 10 years ago (and doesn’t that make me feel ancient) just before I headed off on a holiday to the said country. My break was less haute cuisine and more eating harira (a chickpea and noodle soup) around a campfire. But, you know, if you ever fancy a trip where your night time toilet breaks are outside and accompanied by sleet and braying donkeys, I guess I recommend a ‘winter sun’ trekking holiday*.

I originally thought I was going to make a simple fish tagine from the book, but when push came to shove, even that started to look like too much work, so I decided that actually, I’d just make the chermoula and that would do as a simple sauce/dressing for the fish.

Traditionally, chermoula is quite a wet spice mix which is used as a marinade. But really, it has tons of uses. By altering how much oil you use, you can make it firmer and more dip like, you can use it as a sauce or a marinade, and, in my case, I used left overs on pasta as a kind of pesto. You can use this with pretty much any protein and of course its robust flavour means it would be great with barbecued meat.

Very flexible and very tasty. And, of course, quick, easy and perfect for making ahead!

* This makes me sound a lot more hard core and adventurous in my holidays than I actually am. And I would actually genuinely recommend a trekking holiday in Morocco because the scenery is stunning.

Chermoula Recipe

Ingredients

  • 1 bunch of coriander
  • 3 cloves of garlic, peeled and crushed
  • 1 tsp ground cumin
  • 1 tsp ground coriander
  • 1 tsp paprika
  • 1 red chilli (seeds removed, if you wish)
  • ½ tsp salt
  • juice of 1 lemon
  • ¼ cup of (good quality) olive oil

Instructions

  1. Process everything together, adding the oil slowly until you reach your desired consistency.
  2. If you are making the chermoula as a marinade, make it runnier and use a light olive oil. If you intend to use it as a dip, use a very good quality extra virgin olive oil and make it firmer (dipping consistency!).
https://eatingadelaide.com/chermoula-recipe-moroccan-fish/

South Indian Sambal

IMG_3873

We try to eat fish at least once a week and, I have to confess, I really struggle with making sustainable fish choices outside farmed salmon. I want to choose fish which is fresh, local and sustainable – especially when a recipe calls for a firm white fish. We all love flathead but not only is this a bad choice, it’s also stupidly expensive. And sometimes (as in, a Sunday afternoon after a couple of hours at a 3 year old’s birthday party) your choice is dictated by what’s in the supermarket.

Anyway, the happy outcome of this story is that the following sambal would work brilliantly with other proteins. A tandoori lamb chop, a chicken breast, or even snuck into a chicken burger. Or on top of some fish, if you can find something that ticks all the boxes.

Don’t be put off by the fact that the following recipe contains coconut. It’s essential, more for texture than flavour. If you have access to fresh grated coconut, even better, but dessicated will do (I’m testament to that!).

The sambal can be prepared in advance (and I suspect this would improve it) and can be tweaked to suit your preference. Just don’t go overcomplicating things.

I served the sambal on top of the pan fried fish, with steamed green beans and a generous side portion of spicy fried potatoes. Even with the potatoes this is a very healthy dinner.

The original recipe comes from taste.com.au.

South Indian Sambal

Ingredients

  • ½ small brown onion, finely chopped
  • ½ red onion, finely chopped
  • 1 tsp fresh ginger, grated
  • 1 tsp black mustard seeds
  • ~ ¼ cup of coconut - either dessicated or shredded fresh
  • fresh green chilli, finely chopped, to taste
  • 1 tomato, finely chopped (deseeded, if you can be bothered!)
  • generous handful of coarsely chopped fresh coriander
  • 1 tbsp lemon juice
  • 1 pinch caster sugar

Instructions

  1. On a mediuam heat, heat some oil (I used peanut) in a pan, and add the onion. When the onion starts to soften, add the ginger and mustard seeds.
  2. When the onion is soft, add the coconut and toast until the coconut just starts to change colour. You need to pay attention here because burnt coconut will taste awful and you won't be able to rectify things!
  3. Place the chilli in a small bowl. Tip over the hot onion and stir through. Allow to cool slightly before adding the tomato, coriander, lemon juice and sugar. Mix well. Taste and correct seasoning (you may want to add salt) if necessary.
  4. If you're making in advance, store in the fridge, but serve at room temperature.
https://eatingadelaide.com/south-indian-sambal/