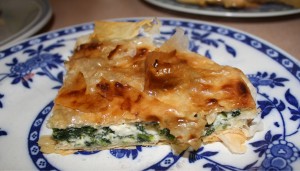
Jamie Oliver’s Feta and Spinach Pie

Feta & Spinach Pie

It’s been some pretty horrid weather in Adelaide recently – cold (especially when you don’t have central heating) and wet (yep – the washing’s been hanging on the line for about a week) so what was in order for Sunday night supper was something quick and HOT.

There was another constraint: the huge pile of feta cheese in our fridge that had been bought to make a Greek salad to take to a BBQ that we subsequently couldn’t attend.

Salad out of the question, the natural mate of feta is spinach and I remembered seeing Jamie Oliver do a feta and spinach pie as part of his 30 Minute Meals.

My approach took quite a significant departure from his – mainly because we had less spinach and I suspect a considerably larger pan. As a side note, never ever buy Woolworths Own Brand frozen spinach: not only is it from China but our packet was mostly stalk. It really irritates me that I’m yet to locate an Australian grown frozen spinach. If you know of one, let me know!

Preheat the oven to 200°C.

In a pan, toast off a generous handful of pinenuts – pay attention to them and don’t let them burn!

In a bowl, whisk 4 eggs before adding about 200g of crumbled (or finely diced) feta. If you buy your feta from the supermarket you will most likely find that the deli counter sells a selection and you can buy Australian feta much much more cheaply than you’ll buy anything that’s prepackaged. At our supermarket, the deli product is also much better than the packaged stuff, so it’s a win all round.

Add the pine nuts, a pinch of oregano, a pinch of cayenne pepper, a grating of nutmeg, black pepper to taste and a glug of olive oil (if you want to measure, probably about 1tbsp). Finish by adding the zest of about half a lemon. Don’t miss the lemon zest!

Cook the spinach off in a pan. If you’re using frozen spinach (I used a 250g pack) you want to cook the water out, and if you’re using fresh, you want to wilt it so it’s soft. Allow the spinach to cool a little and then stir into the egg mix.

The bit I really like about this recipe is Jamie’s approach to the filo pastry. You know how working with filo can be a real bore … keep it covered with a damp towel, melt butter and brush the sheets and generally spend all afternoon faffing about. None of that with Jamie (well, we’d hardly expect that, would we?).

Take a large sheet of baking paper, sprinkle it with olive oil and then rub the oil all over it. Layer the baking paper with your filo pastry, rubbing olive oil between the layers (do this with your hands – it is so much quicker than trying to use a brush). Now, overall you want at least three layers of pastry but you’re likely to have to overlap sheets to cover the whole of the paper. Try to keep the overlapping to a sensible minimum though – you don’t want 6 (or even 9) sheets of pastry in some parts and only three in others.

When the baking paper is covered, pick the whole lot up and put it in a large, high sided frying pan. There should be a generous overhang. Pour the egg mixture in to the pastry case and fold the overhanging pastry away from the paper and across the top of your pie. You don’t need to fold it neatly – allow it to finish with bits of pastry sticking up: that looks kind of cool.

Now, cook the pie for a few minutes on the stove so that the bottom starts to cook and crisp up. Literally, we are talking about a few minutes here … don’t do what I did, which was wander off and start doing other things, because the pastry can (and will!) start to burn quite easily. Then put the pan in the oven to finish cooking – it will take about 20 minutes and the pastry should turn golden.

Because the pie is cooked on baking paper, it will be easy to slide off on to a plate. However, if, like me, you need to do some surgery on the base, it’s just as easy to flip the pie over. Fortunately, the layers of filo pastry and a palette knife meant I could remove the burnt bits easily, leaving us with a very tasty dinner. Had the base been shortcrust there’s no way I could have rescued our dinner!

Andy rightly pointed out that this would be brilliant made in smaller pans for an entrée and I think you could definitely do something canapé sized using something like a minced pie tin.

The most important thing though is not to skip on the lemon zest – this noticeably lifts the flavour of the whole dish. With all the cheese and egg having a little something cut through that richness is just perfect.

Kersbrook Hill Shiraz 2005

Kersbrook Hill Shiraz

Our household has been submerged in a fug of early winter colds for about 3 weeks – at one point, all three of us were ill at the same time which was fun. Needless to say, this put a significant dampener on our enthusiasm for eating out, cooking and drinking. I kid you not but at one point I felt so rough that I didn’t even eat any of the chocolate cake that was in the house!

So, yesterday, I was quite thrilled to come across a random piece of paper with a tasting note on it …

Our local bottle shop is a pretty stock standard affair: there’s plenty of cask wines, a walk in beer fridge, a range of cheap wines (usually on some kind of deal) in the west facing window (don’t get me started on how wrong that is) … Fortunately, the staff are enthusiastic, friendly and helpful and the shop stocks a tiny selection of wines from boutique South Australian wineries. I picked up the Kersbrook Hill Shiraz because I had been impressed by their Riesling and the wine was marked down from $24.99 a bottle to $16.

Kersbrook Hill, which describes itself as an “ultra premium five star winery” makes use of the contract wine making services of Ben Jeanneret, of Jeanneret in Clare. So that explains why the Riesling is so good. I’m not sure whether it was him or Harry Dickinson who made this single vineyard Shiraz – but whoever made it clearly knew what they were doing.

The wine still looks young and there’s very concentrated, almost preserved, black fruit aromas accompanied by black pepper and even star anise. On the palate the wine is a lot spicier again, with black pepper dominant and plenty of ripe, full black fruit. The wine has lovely weight, with very soft tannins and some acidity. I did feel that the wine was just the slightest bit too hot, suggesting that the alcohol was just a tiny bit unbalanced – but that’s also a very common criticism of mine, so I wouldn’t give that too much weight.

The Kersbrook Hill tasting notes suggest drinking with with veal or white meat. I think you’d want to be careful taking this route – ensure you have some reasonably big flavours in your sauce because the wine could swamp a delicate dish. We drank some last night with spaghetti bolognese – the wine having made an appearance in the sauce – and it was a good match.

Even if I’d paid $25 for this wine I would have been happy, so $16 represents something of a bargain. Of course, now I’ve paid $16 for it, I’d probably blanch at paying full tote odds. But that’s just me!

Naan Bread

IMG_0841

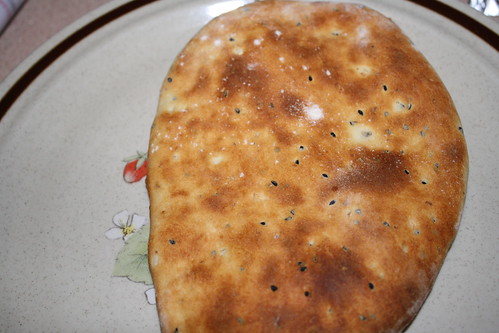
This is my go-to naan bread recipe that I use whenever I need a flatbread.  It doesn’t have to go with a curry and they’re quick enough to put together for any mid-week meal.  This recipe comes from The Big Book of Bread which I won a few years ago through the excellent Baking Mad website. This is an English site run by the Allinson flour people but it’s a great resource and worth checking out wherever you are.

Take 300g of strong white flour and add 1½ tsp of dried yeast and 1 tsp of salt. If making this by hand, make a well in the centre and add the wet ingredients. If you’re using a stand mixer, you can get away with just dumping everything in the bowl! Add 4 tbsp of natural yoghurt, 1 tbsp of neutral vegetable oil (the recipe specifies sunflower but we rarely have this at home so I often use peanut oil – you just don’t want anything with a strong flavour so leave your best extra virgin olive oil in the cupboard …). Mix this together and blend in 125mL of warm milk to make a soft dough.

I usually add a 1 tsp of nigella (kalonji) seeds to the mix too. Or you can sprinkle them over the naan before baking. Or you can add a clove of crushed garlic, a teaspoon of ground coriander … you get the idea.

When the dough has come together and been kneaded (by either you or the machine) leave the dough for an hour or so to rise.

Preheat your oven and your baking trays to HOT (I usually go for 220°C fan, the recipe specifies 230°C convection). Make sure you preheat the baking trays – it helps the naan cook more quickly and prevents them from sticking.

Punch down the risen dough, knead it and divide it in to four. Roll out and stretch each quarter into a tear drop shape. The recipe specifies leaving the naan, covered, for 15 minutes. I rarely do that because by the time I finish rolling them out and getting them on trays I figure that’s rest enough. If you’re organised enough, brush the naan with melted butter or ghee before baking.

Baking for 10 minutes – the naan will be puffed up and golden. Wrap them in a clean tea towel and serve.

The naan will keep til the next day but they are better eaten straight away. They are just such an improvement on the shop bought ones that you’ll never go back!