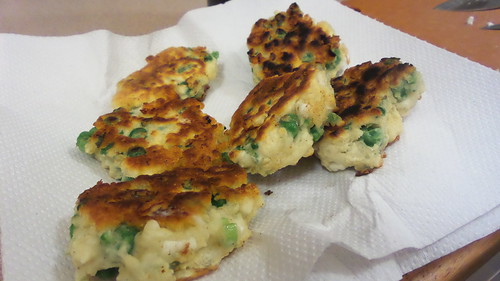
Waterzooi: Flemish Stewed Chicken

The Orangerie, Bruges
Canal Scene in Bruges – the Hôtel l’Orangerie is on my bucket list

Although I have only been to Belgium twice it is one of my favourite countries. At one stage I even had a grand plan to put life on hold for a brief period of time and make a comprehensive tour of Belgium’s breweries. That never got off the ground (for which I am sure my liver is thankful).

Belgian cuisine is not really that widely known. Yes, here in Adelaide we do have the Belgian Beer Café where you can try both mussels and this dish, waterzooi. The BBC serves a seafood based waterzooi, and while it may be more traditional, you’re more likely to find chicken waterzooi in modern Flanders. Indeed the waterzooi I enjoyed in Bruges was chicken (it followed a very traditional Belgian dish you won’t find at the BBC – eel in green sauce).

20140807_092144

So when I borrowed Tolarno Bistro: The Life, Times and Recipes of a Remarkable Restaurant from the library (that’s a whole other story) and I was flicking through it for something to cook for dinner.  I spotted the waterzooi recipe and the decision was made.

But it would be remiss of me to not give the book a review too. Tolarno Bistro was, apparently, something of a Melbourne institution which closed in 2006, after over 40 years of service to St Kilda’s dining public. The original owners were Georges and Mirka Mora and in those 40 odd years it had just three owners – the last being Iain Hewitson (now ‘as seen on tv’), who took over in 1990 with his then wife.

This book, written by Hewitson and journalist Bob Hart, is more than just a recipe book. In fact, perhaps it is more appropriate to say that it is a memoir of the restaurant first and foremost, but a memoir liberally sprinkled with recipes.

Tolarno Bistro was a French restaurant so the recipes are not heavy on the innovation front. Anyone who is already in possession of a generous collection of cookbooks will find that Tolarno Bistro duplicates, in a fashion, a lot of material. Personally, it’s not a book I’d rush out and buy simply because of that – but I am most definitely not the target market. If you ever ate at, or were even one of the couples who married at, Tolarno Bistro then the book is for you.

20140718_205838

While this waterzooi is based on that found in Tolarno Bistro, I added carrot (for some much needed colour and extra vegetables) and cut back on the cream/sauce component. The waterzooi I ate in Belgium, after a hefty entrée of eel, had been overwhelmingly saucy and rich.  I served with brussel sprouts and bacon.

The quantities given will serve 2, with some left overs for smaller members of the family to enjoy the next day.

Waterzooi: Flemish Stewed Chicken

Ingredients

  • 4 chicken thighs (skinless)
  • 6-10 whole black peppercorns
  • 2 bay leaves
  • 2 thick slices of lemon
  • chicken stock (if bought, choose low fat)
  • unsalted butter
  • 1 onion, finely chopped
  • 2 leeks, cut into thin rounds
  • 1 celery stalk, diced
  • 1 large carrot, peeled and diced
  • 1 tbsp plain flour
  • cream
  • fresh chervil
  • 1 egg yolk
  • to serve: fresh pasta

Instructions

  1. Place the chicken thighs in a saucepan with the peppercorns, bay leaves, lemon and chicken stock and simmer gently for approximately 20 minutes, or until the chicken is just cooked.
  2. Remove the chicken (keep the stock) and allow it to cool slightly and then slice.
  3. In a separate pan, heat a generous knob of butter and gently fry off the onion, leeks, celery and carrot.
  4. Once the vegetables have softened, stir in the plain flour and cook (stirring) for a couple of minutes. Then add a generous ladle or two of the stock left over from cooking the chicken, and approximately 2 tbsp cream.
  5. At this stage, you really just want to get the sauce to the right consistency and richness for you. More stock and the sauce will be thinner but more of it. More cream and it will be richer.
  6. When ready to serve, stir through the chicken (if necessary, cook for a little while to ensure it's heated through) and some chopped chervil.
  7. Just before serving, remove the pan from the heat, beat the egg yolk in a separate dish, and then stir through the sauce to thicken.
  8. Serve on hot plates with fresh pasta.
https://eatingadelaide.com/waterzooi-flemish-stewed-chicken/


Two Ingredient Pizza Dough

2 ingredient pizza dough

The idea of a two ingredient pizza dough recipe has been floating around the internet for a while. This hit my inbox at some stage and while I noted it, I never really thought there was anything wrong with my existing pizza dough recipe.

We had pizza a week or so ago and had some mozzarella hanging around in the fridge, so I was determined to use it up before it needed binning.  Unfortunately, inspiration was a bit thin on the ground at the end of last week so … pizza it was. However, given that we always have yoghurt in the fridge I thought maybe it would be worth a bit of an experiment.

I don’t know where the two ingredient dough originated but kidspot seems to stake an early claim. However, by both my standards and those of many of the commenters, the recipe given is really rather deficient.

  • Serving size? 1 pizza base. Because there’s some kind of universal standard for pizza bases …
  • Greek or natural yoghurt is given in the list of ingredients … but the recipe creator says in the comments she hasn’t tried with natural yoghurt …
  • There are a ton of complaints about the ratios
  • There’s no cooking temperature
  • There’s no cooking time

And that’s before I complain about the fact that the flour quantity is given in cups, rather than grams.

I’m all for playing fast and loose with recipes but I suspect that had you never made pizza dough before you’d be facing an uphill battle with this one!

The following recipe makes a thin crust for a 30cm diameter pizza tray. We find that this is perfect for dinner for the two of us (the small child won’t touch pizza on account of the bread component).

Of course, the really important part of all of this is … how did it taste? While it was OK it was … just OK. While it was a thin and crispy base it had a slight but discernible taste of raw flour and the texture was slightly too crumbly (for want of a better word). The dough is also very soft which makes it difficult to work with.

I can see the appeal in this dough – no yeast and no rising time. But with dried yeast so readily available and the rising time for pizza dough less crucial (and, indeed, for ease of dinner prep I made this dough in the afternoon so there was no advantage to me at all there) I’m not sure that the compromise in taste, texture and easily workable dough is worth it.

We’ll be returning to our standard recipe.  Yes, it’s 4 ingredients but so worth it!


Two Ingredient Pizza Dough

Ingredients

  • 200g self raising flour + extra for kneading
  • ¾ cup plain yoghurt (I used Paris Creek B-D Yoghurt)

Instructions

  1. Preheat oven to 250°C fan (or as hot as it will go).
  2. Mix the flour and yoghurt until they come together in a soft dough.
  3. Knead well on well floured board and roll out to fit 30cm pizza pan (greased with olive oil).
  4. Top with your favourite toppings - we use a base of tomato paste, oregano and chilli flakes, topped with mozzarella, bacon, red onion, hot salami and capsicum (for example).
  5. Bake for 10 minutes and serve immediately.
https://eatingadelaide.com/two-ingredient-pizza-dough/

Chocolate Bourbon Biscuit Recipe

20140728_103029

Something of an ongoing discussion in our household is whether the king of biscuits is the chocolate bourbon or the chocolate digestive. Now, obviously, all right thinking people know and understand that it is indeed the chocolate digestive. A quick vox pop on my personal Facebook page (I have plenty of English friends) even confirmed this fact.

But Andy maintains that the bourbon is king and when I saw this recipe I figured it would be worth giving them a crack. Especially as I am yet to spot the ‘real’ deal in shops here in Australia.

This is another recipe that I would definitely call store cupboard. If you’re a regular baker you’ll have everything to hand and even those who make more intermittent efforts will probably find that the only thing that it’s necessary to source is the golden syrup.

The biscuit dough is quick to make (especially if, like me, you throw everything in a food processor!) but actually cutting out the biscuits, cooking them, allowing them to cool and then sandwiching them together takes a little while. This is even more so the case if you have a three and a half year old assistant …

The dough does need to be kept cool. Even on a cold day in our cold kitchen, I found that by the time was on the last lot of biscuits the dough was becoming difficult to handle. If you’re operating in warmer conditions, definitely keep the dough you’re not using wrapped in cling film in the fridge.

Rolling out the biscuit dough between two sheets of cling film is a great idea – it makes turning the dough very easy to do and you don’t have to worry about the mess (either on the bench or on the biscuits) created by flour.

The biscuits keep well but do start to soften a bit once you fill them. If you’re making them ahead, don’t fill them until you need them. The buttercream filling can be made ahead too – you just need to remember to take it out of the fridge to soften a bit. I had quite a bit of filling left over, so obviously I was far too stingy … but it is absolutely delicious on toast!

Chocolate Bourbon Biscuit Recipe

Ingredients

  • 110g unsalted butter
  • 110g light brown sugar
  • 200g plain flour
  • 1 tsp bicarb
  • 40g cocoa
  • pinch of salt
  • ~ 3 tbsp golden syrup
  • 150g icing sugar
  • 5 tsp cocoa
  • 75g unsalted butter
  • ½ tsp vanilla extract
  • 3 tsp boiling water

Instructions

  1. Preheat the oven to 170°C (convention) and line a couple of baking sheets with baking paper.
  2. To make the biscuits, cream the butter and light brown sugar. Add the flour, cocoa, bicarb and salt. Then add 2 tbsp of the golden syrup. If the dough does not come together then add another teaspoon or so. Process well between any extra additions as you don't want to add too much. The exact amount you need will depend on weather conditions and your flour so it is likely to change every time you make the biscuits.
  3. Tip the dough out onto the bench and bring it together in a ball. Divide the ball into four and, if it's warm, refrigerate 3 pieces, wrapped in cling film.
  4. Roll each ball into a long sausage and place between two sheets of cling film and roll out until 2-3 mm thick. Cut into biscuits (apparently a bourbon is 6 cm x 3 cm so that's the size you're aiming for) and transfer onto the baking sheets. You'll probably need the help of a palette knife (or other broad bladed knife). Allow space between the biscuits.
  5. A bourbon has 10 indents in it - use the blunt end of a bamboo skewer to create two rows of five impressions and then bake for 10-12 minutes. The biscuits will still be soft on top but will move on the baking paper.
  6. Sprinkle a little caster sugar on each biscuit while hot and gently press in with the back of a spoon.
  7. Allow the biscuits 10-15 minutes cooling on the tray before transferring to a wire rack.
  8. To make the buttercream filling, sieve the icing sugar and cocoa (or process well in a food processor). This is important: failure to do this will result in gritty buttercream. Even if you're using a food processor you need to process the icing sugar and cocoa really well BEFORE you add the butter.
  9. Add the butter, vanilla extract and water and process until you have a smooth, fluffy cream.
  10. Sandwich the biscuits with the cream and serve.
  11. They keep perfectly well filled for a couple of days. After that they do go a little soft but still taste spot on!
https://eatingadelaide.com/chocolate-bourbon-biscuit-recipe/