Warm Middle Eastern Salad with Wallaby

Untitled

Disclaimer: Lenah Game sent me a voucher for the wallaby.

A while back I won The Blue Ducks, a book unpromisingly subtitled “Delicious Food, the Importance of Community and the Joy of Surfing”. Well, delicious food and community I can get on board with … but surfing … meh, I wasn’t so sure.

I read through it with very low expectations but came away very impressed and keen to try out, at the very least, the fennel ice cream (that still hasn’t happened). And then, the book was buried under all manner of picture books and Octonauts paraphernalia.

But the planets aligned, as last week Lenah Game got in touch and asked if I wanted to try some Tasmanian wallaby, newly available in South Australia. It had never occurred to me that wallaby would be edible and that I might be able to buy it but, given the opportunity to put a new meat on my plate, I was all for it.

Lenah wallaby is wild and humanely and sustainably harvested. Unlike sheep and cows, it’s a lot kinder to the Australian environment and Lenah Game makes sure that as much of the animal as possible is used. Wallabies don’t produce methane and require a LOT less water than cows and sheep do. Not only is the wallaby a very environmentally friendly thing to eat it is also super healthy. Like many game and wild meats, it’s very low in fat so you can feel virtuous all round.

So we were sitting on the sofa, doing our meal planning, scratching our heads over one meal when I dug out The Three Ducks and spotted a middle eastern lamb salad. It used lamb fillet and I remembered that Lenah produced wallaby fillet and … the rest is history.

The bonus here is that wallaby fillet (at roughly $30 a kilo) is markedly cheaper than lamb fillet. We bought two packets of fillet (both around 350-400g) and this served us for dinner, Andy for lunch and the toddler for dinner the next day. For two people and one meal you could easily get away with one packet.

Don’t over cook the wallaby – medium rare is about as cooked as you want to go – and allow it to rest. Lenah also notes that you need to cut the fillets diagonally across the grain. As the meat is vacuum packed, it will repay you opening it and ‘decanting’ it into a bowl for a bit of a rest prior to cooking.

We both loved the meat – it’s not gamey at all and don’t imagine it’s like kangaroo – it’s a lot more subtle. We’ll definitely be buying more in future … I can’t wait for some cold weather to try out the shanks.

Lenah Game wallaby is available from Foodland IGA supermarkets at Golden Grove, Hallett Cove, Littlehampton and Seaford and should be available in even more stores soon.

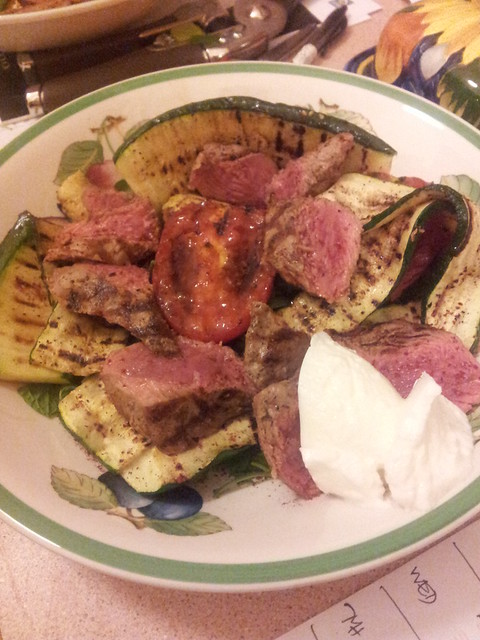
Warm Middle Eastern Salad with Wallaby

Ingredients

  • 350g approx wallaby fillet
  • 2 tsp ground cumin
  • salt and pepper
  • 2 zucchini
  • ½ red onion, finely sliced
  • ½ cup coriander, chopped
  • ½ cup mint, chopped
  • 2 tomatoes, halved.
  • 2 tsp sumac
  • plain yoghurt

Instructions

  1. Heat a griddle pan and put the oven on its warm setting.
  2. Slice the zucchini lengthwise. If you have a mandoline, use this on the second thickest setting.
  3. Grill the zucchini and place in a bowl in the oven.
  4. Season the wallaby fillet with the cumin, salt and pepper. Griddle in a very hot pan in small batches. You'll only need a couple of minutes each side. Place the wallaby on a plate and rest in the oven.
  5. Grill the tomato.
  6. Mix the onion, coriander, mint and zucchini. Top with the tomatoes and the wallaby, sliced diagonally.
  7. Finish with a spoonful or two of yoghurt and dust with sumac. You can either toss the salad in the bowl or spoon it into a flat bread to make a very Australian kebab.
https://eatingadelaide.com/warm-middle-eastern-salad-wallaby/

Very Easy Vanilla Ice Cream

Vanilla ice cream (crop)

Here in Adelaide we sweltered through much of summer. As much as many of us might have complained about the above 40°C days, people were similarly disappointed that we didn’t crack our all time record temperature. I was pretty grateful that that was a record we missed – 46°C is plenty hot enough, thank you very much.

And while temperatures have dropped, and we’re enjoying some almost wintery days, we still have some moderately warm weather ahead of us – and, of course, our friends in the northern hemisphere are all looking forward to summer proper.

So all of that is justification for just now posting a super simple vanilla ice cream recipe. I first made this back in February to take along to a 4 year old’s birthday party. Funnily enough – there weren’t a great many photo opportunities at that event and, despite making a second batch, I’ve done a really rubbish job of attempting to photograph it. However, I’m willing to bet that pretty much everyone and anyone reading this page knows what vanilla ice cream looks like and doesn’t need eighteen perfectly shot images to remind them!

The great thing about this ice cream is that it is egg free which means that it’s custard free. This means that it is zero hassle to make and anyone who avoids eggs can eat it.

The original recipe comes from the Cuisinart manual that came with my mum’s ice cream maker. This recipe suggests that you will need to whisk the milk and sugar for just a couple of minutes. This is complete nonsense. You really need to whisk the milk and sugar until the sugar has completely dissolved (otherwise you’ll have gritty ice cream – yuck!) and in my experience that probably takes a good 10-15 minutes.

As always with ice cream, making it on a stinking hot day is never a good idea – especially if your ice cream maker relies on a frozen insert.

This is one of the easiest ice cream recipes I’ve come across and, being vanilla, is an absolute crowd pleaser.

Very Easy Vanilla Ice Cream

Ingredients

  • 1 cup (250mL) full cream milk, cold
  • ¾ caster sugar
  • 2 cups (500mL) cream (pure cream is best but thickened cream will do), cold
  • 1-2 tsp vanilla paste to taste

Instructions

  1. Beat the milk and sugar until the sugar is dissolved.
  2. Thoroughly mix through the cream and vanilla paste. If you choose to use a stand mixer, keep the speed on low so that you don't heat the mixture.
  3. Churn in your ice cream maker according to instructions then place in container in freezer for at least a couple of hours.
  4. Makes about a litre.
https://eatingadelaide.com/easy-vanilla-ice-cream/

Beef and Stout Pie

Untitled

Friday was Pi Day. The humour in this is limited – if you write dates in the American format it was 3/14, and pi (the mathematical constant) approximates to 3.14 (if you’re dealing with 2 decimal places). The connection between all of this and pies is tenuous at best.

But we’ve also had a burst of relatively cool weather in Adelaide so for starters I’m more than happy to consider switching on things that generate substantial heat. And I’m also happy to consider eating pie. A hot, home made pie for dinner is definitely cold weather food.

I found this pie recipe on the MiNDFOOD website and tweaked it a little, not least of all because pies have pastry on both the bottom and the top!

Green peppercorns are a great ingredient to cook with: they add bursts of pepperiness along with a hint of sharpness. Just make sure you rinse them first (they will come in brine). You do need to factor in plenty of time for both cooking and cooling the pie filling. You can’t rush the beef being tender and, especially if you are doing a pie properly, you need the filling to be cool because if you hit the pastry with hot pie filling you’ll end up with the dreaded soggy bottom!

We used our piemaker for this and bought pastry (both shortcrust and puff – yes, sometimes dinner just has to happen!) so once the pie filling was complete the actual pie could be be assembled and on the table in about half an hour (20 minutes of that was cooking time). If I were serving this to others, I would bother to at least make my own shortcrust, use individual pie dishes and cook them in the oven. At least … that’s what I tell myself!

Beef and Stout Pie

Beef and Stout Pie

Ingredients

  • ~ 800 g diced blade steak (or any other cut of beef which works for long slow cooks)
  • 2 onions, very roughly chopped
  • 2 cloves of garlic, finely minced
  • 2 tbsp plain flour
  • 250 mL stout
  • 375 mL beef stock
  • a few sprigs of fresh thyme
  • 125 mL cream
  • 1 (generous) tbsp green peppercorns, drained and rinsed
  • pastry (for a piemaker)
  • 1 sheet of shortcrust pastry, defrosted
  • 1 sheet of puff pastry, defrosted

Instructions

  1. Preheat oven to 140°C (fan, or 160°C conv).
  2. Heat some olive oil in an ovenproof casserole dish and brown the beef in batches.
  3. Set the beef aside and turn down the heat. Add the onion and garlic and soften. Stir often.
  4. Return the beef to the pan and sprinkle over the flour, mixing well. Allow this to cook for a minute or two, before adding the stout, stock and thyme.
  5. Bring to the boil and then take off the heat and put, covered, in the preheated oven. Cook for about an hour and a half until the beef is meltingly tender.
  6. If the gravy is still a little thin, return to the stove and remove the lid - but keep a close eye on it and don't over thicken. It should be no more than the consistency of a thin cream.
  7. Allow to cool a little before adding the cream and pepper corns and set aside to cool fully. The cooling and the addition of the cream will thicken the gravy further.
  8. If using a pie maker, preheat and cut the base (shortcrust) pastry. Line the pie maker, fill (take care not to over fill!) and top with the puff pastry. Cook for the recommended time (in our case 20 minutes) and serve immediately.
https://eatingadelaide.com/beef-stout-pie/