Prawn Fajitas

Untitled

As you might know, we’re big fans of Mexican food in this household. Chilli is a big draw card but, in addition, the dishes are usually quick to make and very fresh and full of both vegetables and crunch. We’ll often have our chicken quesadillas as a quick, mid week dinner.

Last night I had prawns defrosted and ready to go and no opportunity to head to the shops (yes, thanks to Mr Sleepy Toddler again) so dinner had to be magicked up with whatever we could get from our local shop (excellent for basics, not so excellent for anything too exotic).

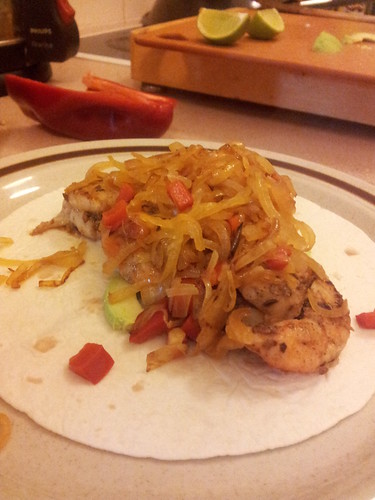
The first recipe that popped up in my delicious feed was prawn fajitas, from The Family Kitchen (link now lost to the ethernet I’m afraid). Excellent idea! We (naturally) had to do some tweaking (seriously, who puts together a Mexican recipe with NO CHILLI in it?) but in under half an hour* we had a very tasty meal ready to go.

We wouldn’t normally add fennel seeds to a Mexican dish but the combination of crunch and aniseed flavour was a big win. And, of course, if you don’t have prawns, substitute protein of your choice.

Definitely a dish we’ll be doing again!

The following recipe serves two.

* Add on time if you’re needing to peel your prawns!

Easy Prawn Fajitas

Ingredients

  • neutral flavoured oil for frying
  • half a red capsicum, finely chopped
  • 1 brown onion, finely sliced
  • 1 clove of garlic, crushed
  • 1 tsp fennel seeds
  • 1 tsp paprika
  • 1 tsp ground coriander
  • chilli flakes to taste
  • 10 prawns, peeled and deveined
  • lime
  • half an avocado
  • plain yoghurt
  • tortillas

Instructions

  1. Begin by heating some oil in a frying pan and frying the onion, garlic and capsicum until soft and the onion has started to caramelise. Set aside.
  2. In the same pan, heat some more oil and add the spices. Fry briefly and add the prawns. Cook until the prawns are done. Finish with a generous squeeze of lime.
  3. Take a tortilla, spread with a spoonful of the yoghurt, top with prawns, onion mix and avocado.
  4. Wrap, serve and eat!
  5. If you want you can add lettuce, tomato, raw red onion or even a salsa. Or perhaps just a green salad on the side.
https://eatingadelaide.com/prawn-fajitas/

Salmon en Papillote

Untitled

We eat a reasonable amount of salmon. I’m quite conscious of the fact we should eat more fish and everyone in the household likes salmon. Australian farmed salmon is also quite readily available, so if I find myself buying fish at the supermarket (which I prefer not to do) it’s often the ONLY fresh, Australian option on offer.

My plan last week had been to visit the fishmonger and buy some gar or whiting and have it simply pan fried. Unfortunately, a small child who slept for ages and announced “not going out, not go to shops, stay home” put paid to that plan. Salmon it was. And skinless at that!

I was wondering how to jazz it up a bit and remembered that we haven’t done ‘en papillote’ for ages (indeed, if at all since moving back to Australia). ‘en papillote’ is method of cooking where, whatever you are cooking is wrapped first in baking paper and then in tin foil and then cooked in the oven. The protein is effectively steamed, so it’s a very healthy way of cooking and it also means that the protein stays very moist.

Of course, just a bit of fish cooked in its own steam is likely to be a bit dull, so it’s up to you to add a few bits and pieces, a few flavourings that you like.

Salmon, being quite fatty and rich, can stand up to strong flavours, but if you were working with a more delicately flavoured fish (such as whiting, or even flathead) you might opt for a simple topping of a lemon slice or two and some dill, along with a tiny drizzle of olive oil. Also choose your toppings with an eye on cooking time. If you want to include carrot, for example, you’ll have to chop it extremely finely, and prefer spring onion to onion. Salmon only takes about 12 minutes to cook in the oven, but a fish like gar or whiting will take even less time so chop finely or leave more substantial vegetables for side dishes.

This is not really a cooking technique that needs mastering. Understand flavours that work and that you like, and all that is left to do is ensure the parcels are well sealed – you want to trap the steam!

Asian Style Salmon en Papillote

Ingredients

  • a piece of salmon
  • a few drops of sesame oil
  • a teaspoon of soy sauce
  • very finely sliced ginger, to taste
  • crushed garlic, to taste
  • finely slice chilli, to taste
  • 1 spring onion, finely chopped

Instructions

  1. Preheat your oven to 200°C/180°C fan.
  2. Spread out a large piece of tin foil on the bench and place a slightly smaller piece of baking paper on top of it. The baking paper should be large enough to wrap the piece of salmon quite loosely.
  3. Place the salmon on the baking paper and fold up the edges of the tin foil to create a makeshift tray (to prevent toppings for going everywhere).
  4. Top the salmon with the ginger, garlic, chilli and spring onion and sprinkle over the sesame oil and soy sauce.
  5. Wrap the salmon loosely in the baking paper, forming a sort of envelope. Wrap that parcel in the tin foil, ensuring a tight seal.
  6. Place on a baking tray or in a roasting dish and cook in the preheated oven for approximately 12 minutes. This is a pretty forgiving method of cooking but don't leave the salmon in the oven too long!
  7. Remove from the oven, open the package and serve the salmon on some stir fried soba noodles, and pour the sauce from the package over the top.
  8. Garnish with coriander if you wish.
https://eatingadelaide.com/salmon-en-papillote/

Mary Berry’s Chocolate Brownies

Untitled

A while back I bought a copy of Mary Berry’s 100 Sweet Treats and Puds (I bought it from Clouston and Hall but they no longer have it).

Mary Berry is a UK baking icon and co-hosts the original Great British Bake Off. I hope she’s not offended by me saying she’s a very grandmotherly type. Both my grandmas were pretty good cooks and I certainly didn’t go short of sweet and savoury treats. But if you didn’t have a grandma who baked then one episode of Bake Off and you’d probably be interested in adopting Mary Berry.

I spent quite a bit of time reading through the book deciding what to cook first. A reasonably impromptu Father’s Day lunch saw me volunteer desserts and, realising I was short of time, I decided on the brownies because they looked really easy.

It turned out that time was even more of the essence than I’d realised because, on the morning of lunch, with brownies yet to make and the other dessert to assemble, one of our neighbours popped his head over the fence and the already tight schedule was thrown out of whack!

These brownies taste great with a deep chocolate flavour, are slightly squishy and fudgy and are really easy. If you’re not confident melting chocolate, you want a store cupboard alternative or you want a quick recipe (you still need 40 minutes baking time though!) then this is the recipe for you.

A couple of notes: don’t be freaked out by what feel like unconventional quantities of ingredients. Hold your nerve! Mary Berry’s original recipe uses 375g caster sugar but I had only 300g left and topped up with dark brown sugar. This is always a result in brownies and adds extra richness.

Mary Berry’s Chocolate Brownies

Ingredients

  • 275g unsalted butter (slightly softened if you working by hand or using a stand mixer)
  • 300g caster sugar
  • 75g dark brown sugar
  • 4 eggs
  • 75g cocoa powder
  • 100g self raising flour
  • 100g dark chocolate chips

Instructions

  1. Preheat oven to 160°C fan and line a roasting tin (30cm x 23 cm) with baking paper.
  2. Combine the butter and sugars then add the eggs. Mix in the cocoa powder and self raising flour and finish by stirring in the chocolate chips.
  3. The mixture will be very thick. Spoon it into the baking dish, smooth it out and bake for 40-45 minutes. The cake should be set and a skewer should come out clean but you also don't want to over bake because otherwise the brownies won't be squidgy.
  4. Leave to cool in the tin (if appropriately squidgy it will collapse a little) before cutting into 24 squares and serving.
https://eatingadelaide.com/mary-berrys-chocolate-brownies/