Marshmallow

Just sitting down to write about #marshmallow ...

Without thinking about it too much, earlier this year I signed up for The Sweet Swap. This is a fund raising blogging event, where bloggers make something sweet and send it off to mystery matches, Kris Kringle style.

And then I did think about it and I realised that I never really make anything that I might be able to send through the post.

Panic!

So I’ve been thinking about sweets more than normal and the rejects (from the point of view of The Sweet Swap) may appear here as posts over the next couple of weeks. I start with marshmallow: I actually asked Andy if he would prefer marshmallow or sweet x and he chose marshmallow. I hate marshmallow so I was really cooking blind here.

I knew there was a recipe in James Martin’s Desserts so I dug it out, had a read, and realised it shouldn’t be too hard.

The big thing with marshmallow is that you need to be careful with the sugar temperature when you add the gelatine. Apparently gelatine loses its setting properties above 130°C, so you need to make sure the sugar is below that (naturally, you also don’t want the sugar to be taking on any colour).

The little bit of faff with a thermometer aside, this was super easy* to put together. And as the small eating machine that is our toddler grows bigger, I’m sure having sweets like this in my repertoire won’t be time wasted!

Andy rated the marshmallow very highly – but you’ll have to take his word for it, because I still hate the stuff!!!

* Super easy if you have some experience in the kitchen. If you genuinely consider yourself a novice, perhaps don’t start here!

Marshmallow

Ingredients

  • 227g caster sugar
  • ½ tbsp liquid glucose
  • 100 mL water
  • 4½ sheets gelatine (platinum strength)
  • 70mL cold water
  • 1 egg white
  • splash of vanilla extract
  • red food colouring (optional)
  • corn flour & icing sugar for dusting
  • a sugar thermometer is essential

Instructions

  1. Begin by putting the sugar, liquid glucose and water in a saucepan. Choose a reasonably heavy bottomed one because you need to have some control over the heat. Bring to the boil and cook until it reaches 127°C.
  2. I found that I hit the 110°C mark quite quickly but it took a while after that to hit the 127, so you do have a little time on your hands.
  3. While the sugar mix is boiling: soak the gelatine in the cold water and beat the egg white until stiff.
  4. When the syrup comes to temperature, remove from the heat and slide in the gelatine and its water. Take care as it may spit and obviously it's very hot! Gently stir to dissolve the gelatine.
  5. Start beating the egg white again and slowly pour in the hot syrup and gelatine mix.
  6. The mixture will thicken quickly and will be like super glossy, super thick meringue. Add the vanilla extract (and food colouring, if using) and continue beating for a good 5+ minutes. You're waiting for the mixture to both cool and become extremely thick.
  7. It's ready when it clings to the whisk, holds its shape and is really almost the texture and consistency of foam.
  8. Using a hot sugar mix like this (the process is not dissimilar to Italian meringue) means that the marshmallow is extremely stable so you don't have to rush to get things done.
  9. Lightly grease (using a flavourless oil!) a baking tray or dish. I used a ~ 20 x 27 cm baking dish. Dust the base with a mixture of sifted cornflour and icing sugar.
  10. Spoon in the marshmallow: this should be hard work because the mixture is so stiff. Spread it evenly throughout the dish as best you can and level with a palette knife (wet and/or hot may help).
  11. Put in the fridge for a minimum of one hour to set.
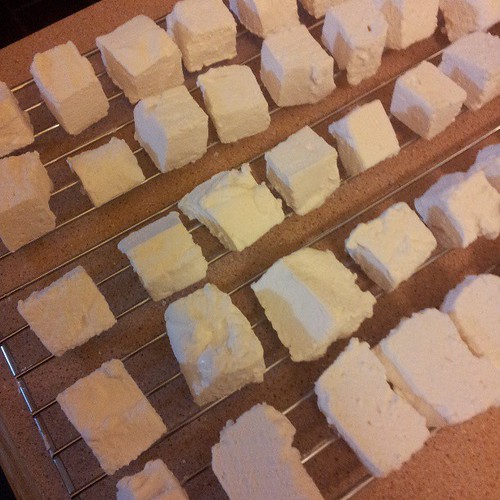
  12. Dust your work surface with sifted icing sugar and cornflour. Tip the marshmallow out and cut into bit size pieces. Roll each piece in the icing sugar/cornflour mix and set on a rack to dry out.
  13. Store in an airtight box.
https://eatingadelaide.com/marshmallow-recipe/

Chicken, Ricotta and Lemon Pie

IMG_3236

If you are trying to be healthy, filo pastry is an excellent way of having pastry and feeling virtuous – all at once. It IS a pain to work with – no matter how beatific TV chefs look while they’re using it, cheerfully advising to cover it with a damp tea towel. Generally I find we open a packet, don’t use it quickly enough and it becomes a troublesome flaky and yet in patches gooey horrid mess.

I suppose the moral of that story is to use it more often.

The recipe I posted for Jamie Oliver’s spinach and feta filo pie is one of the most popular on this site. And as popular as it is in our household, variety is always the spice of life.

This pie will not only help use up that pesky filo, but contains meat (chicken), so it satisfies those who aren’t keen on a high vegetarian meal count!

It received a thumbs up from all and so will definitely be on the menu again.

Chicken, Ricotta and Lemon Pie

Chicken, Ricotta and Lemon Pie

Ingredients

  • 1 packet chicken thigh fillets (there are usually 6 in a packet and ~ 500g)
  • 250g frozen spinach
  • garlic (to taste) - I used a couple of cloves
  • chopped rosemary or thyme (fresh is best, but use dried thyme as a substitute, dried rosemary is horrible)
  • zest of 1 lemon
  • 6 eggs
  • 100g ricotta
  • filo pastry
  • olive oil

Instructions

  1. Defrost spinach in microwave and then dry fry in a hot frying pan, to evaporate the water. Set aside.
  2. Preheat oven to 220C (conv, 200C fan).
  3. Chop chicken into bite size pieces and place it in a bowl with some olive oil, the chopped garlic and chopped herbs. Season with salt and pepper. If you have time, set aside for half an hour.
  4. Heat a large, oven proof frying pan. Brown the chicken: do this in two or three patches so the pan stays hot and the chicken takes colour. Remove the chicken from the pan and set aside in a clean bowl.
  5. Wipe the pan out with a paper towel. Working quickly, brush the pan with olive oil and start layering the filo. Brush each layer of filo with olive oil. You will need about 6 or 7 layers. If you have the filo overhanging the pan you can fold it over the filling to make a pastry lid.
  6. Add the chicken to the pan, reserving the juices.
  7. To the juices add the lemon zest and eggs. And then beat in the spinach.
  8. Pour this mix over the chicken and scatter over the ricotta.
  9. Fold over any overhanging pastry.
  10. Cook on a medium heat on the stove for a few minutes before placing in the hot oven.
  11. Bake until filling is set. This took about 40 minutes (in our normally very fast oven). If the filo pastry starts to brown, cover lightly with either baking paper or tin foil.
  12. When the filling is set, remove from the oven, cover and set aside for 10 minutes. This makes it much easier to remove the pie from the pan.
https://eatingadelaide.com/chicken-ricotta-lemon-pie/

Product Review: Masha and a Recipe for Batata Vada

Batata Vada

Disclaimer: I was sent the Masha to review.

So, I think we all know that I love my kitchen gadgets. I blame working in small electrical in a local department store while at university. I’d come home with all manner of toys and I’m adamant that there’s plenty of room in my kitchen for more time saving goodies.

When it comes to mashed potatoes I am pretty picky. They have to be hot, hot, hot, laden with butter (and cream) and pepper and totally smooth. Now mashed potatoes are not something where there’s too much room for time saving. Despite the fact that you will often see people on cooking shows on tv throw the cooked potatoes into a food processor this is a MASSIVE no no. Cutting the potato messes with the starch and produces a gluey, claggy mess. So any time saving device needs to address this.

Now a good way of ensuring very smooth mashed potato is to use a potato ricer. This is something you should always use for potatoes for gnocchi but when making mash just a single pass through the ricer results in a slightly grainy finished product (no matter how much fat you through at it!). Multiple passes through the ricer obviously take more time, but also require more containers (and hence washing up). Mashing using a traditional masher takes ages, is inconsistent in its results and requires a lot of elbow grease.

So enter the Masha. A kitchen gadget which claims to produce perfectly smooth mash, in seconds, without over processing the starches.  Rather than chopping, it has a blunt blade and a perforated cage.  The blade pushes the potato through the cage, thus extruding (I love that word!) it, rather than chopping it.  In many ways it’s like a turbo charged ricer.

I boiled up about 5 or 6 potatoes (we are, after all, only 2 and the toddler pretty much refuses to eat mash), cut into small cubes to cook quickly. I drained them, returned them to the pan over the heat for a quick dry off and then took them off the heat and plugged in the Masha.

I am not joking when I say that I was gobsmacked by how fast the Masha did the job. For someone who usually spends at least 10 minutes ensuring that every lump is well and truly gone from the mash (yes, I might be a little OCD), the fact that I had a pan full of seriously smooth creamy potatoes in less than 30 seconds was a whole new experience.

Because I was making the mash for the following recipe, I hadn’t added any fat, so I had a bit of a prod, poke and taste and decided that maybe there was just a touch of the slightly elastic about the potatoes. Interestingly, this disappeared as the potatoes cooled and, after I gave them a good beating with a wooden spoon, they were really quite light and fluffy. Might be something worth keeping in mind. Andy felt sure that had I anointed them with a ton of butter and cream I would never have noticed.

The Masha is very easy to clean. The plastic blade is easy to take off and, provided you give it a rinse straight away (cold, dried mashed potato is second only to cold, dried out Weetbix in its concreting properties) the Masha cleans easily. I also loved the fact that the main unit has a green light which stays on while the unit is plugged in and powered. While it was somewhat startling to walk into a dark kitchen and be greeted by a glowing green light it was a brilliant reminder to unplug the Masha and put it away.

Naturally, the Masha can be used to mash anything that needs mashing. I guess where I’d advise caution is if you’re producing something where you want some texture as I imagine it would be very easy to over mash. Naturally, if you are someone who makes mash often, or needs to make it in large quantities, I’d suggest that the investment in a Masha is going to be more than worth it.

As a parent, I note that the one of the Masha’s suggested uses is for baby food. The amount of time that parents are advised to give their babies completely smooth purees is very limited. Lumps are very important for little people as they need to learn to chew, so don’t go crazy over mashing, just because you have a new toy!

Batata Vada

To make something a bit more interesting out of our mash, I decided to try my hand at making my own version of batata vada, an Indian street snack. This is basically mashed potato, battered and deep fried. Serve immediately – super hot, with plenty of salt. If you’re organised, some mint chutney on the side would be great. These are much quicker to make than pakoras. And of course, you should use my recipe as a starting point: just use the spices you love in the quantities you love!

Batata Vada

Yield: 12-18

Ingredients

    Potato Mix
  • 5-6 potatoes, peeled, cubed, cooked and well mashed
  • 2-3 tbsp ghee (use unsalted butter or a neutral cooking oil as a substitute)
  • 10-20 curry leaves
  • 1 tsp cumin seeds
  • 1 tsp ground coriander
  • 1 tsp black mustard seeds
  • 1 tsp garam masala
  • 1 red chilli, finely chopped
  • salt
  • Batter
  • ½ cup besan flour (gram flour, chickpea flour)
  • ½ tsp turmeric
  • pinch bicarb
  • salt
  • cold water
  • Oil for frying.

Instructions

    Potatoes
  1. In a small pan, heat the ghee. When it is melted and hot add the curry leaves, cumin seeds, coriander and black mustard seeds and fry until the mustard seeds start to pop, everything is sizzling and the aromas are all being released.
  2. Stir this mixture into the potato. Combine well.
  3. Add the garam masala and chilli to the potato mix and add salt to taste. If you want to jazz the potato mix up even further, add a generous teaspoon or so of your favourite (homemade, of course!) curry powder.
  4. Don't go too crazy with the flavourings, as they will intensify on frying.
  5. Batter
  6. Mix the besan flour, turmeric, salt and bicarb together in a bowl. While whisking, add cold water slowly to create a batter of medium thickness. You want a batter which is thicker than crêpe batter but not as thick as fish and chip batter. You will probably need between ½ and 1 cup of water. Better to have the batter too thick initially and thin it down as you go.
  7. Heat the oil.
  8. Take a tablespoon of the potato mixture, roll it into a ball, flatten it slightly and dip into the batter. Ensure the potato patty is well covered. Place it in the oil and cook until the batter is puffed and golden.
  9. If the batter is too thin you'll have gaps in it and it will go soggy quite quickly. You'll also find it goes soggy if you don't cook it for long enough. Generally you need to do a little bit of experimenting but this gives you the opportunity to adjust the seasoning or spicing of the finished product!
  10. Drain the batata vada on kitchen towel and serve immediately.
https://eatingadelaide.com/product-review-masha-recipe-batata-vada/