Cheese and Chive Damper

Cheese & Chive Damper

The cooking (and subsequent recipe-blogging) hiatus induced by the kitchen reno has taken a little while to sort itself out. No sooner was the kitchen vaguely finished than summer meant no one felt like eating, let alone cooking. All the while, recipes were piling up – stashed on the internet or literally, piling up as piles of paper on the new kitchen benches …

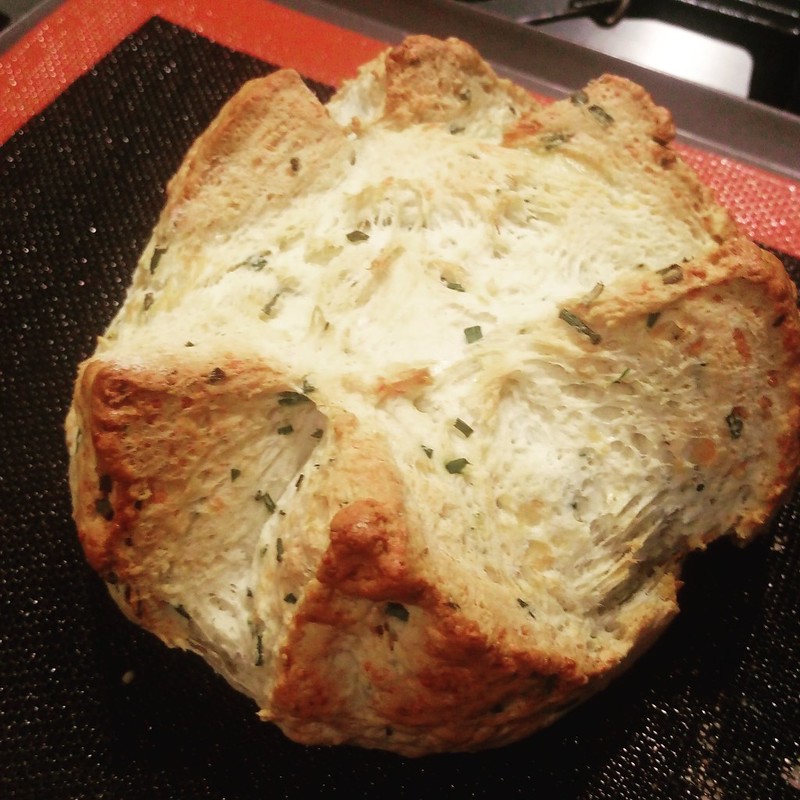
So it’s more than time to try, and write about, something new. This recipe was cut from a That’s Life and I’m guessing it was around Australia Day as it’s called ‘Chive and Cheese Aussie Damper’. I suspect that ‘Aussie Damper’ is something of an oxymoron, given that damper is uniquely Australian. For those playing along overseas, damper is basically a soda bread and/or like a gigantic savoury scone. Historically, it was made by swagmen in a campfire and these days it is made by intrepid campers in a camp oven.

Or you can just make it in an oven. Like making scones, the trick is to use a light hand and not over-mix or over-knead your dough. One problem I find with breads like this (and scones) is that raising agents (the most common being bicarb which you add to plain flour), can leave a slightly metallic after-taste. In this bread, that is reduced somewhat (but not entirely) by the addition of cheese and chives. I’ve just had a look at the SR flour I used and it has four different raising agents in it – I wonder if I would have been better off using a plain flour and adding baking powder to it …

The other thing with damper is that it really doesn’t keep that well. Think about how well scones keep – they don’t. Damper is similar – eat it straight from the oven with lashings of butter. Unlike leavened bread, it is quite dense but it’s not chewy.

We probably won’t make this again – as Andy said – there are nicer breads to be made! However, if you want a quick bread to knock up and serve to a hungry group you could do far worse. Obviously, if you’re camping it’s definitely worth giving this a go!

(Oh, and if you’re wondering, the silicone mat I use is a silpain – I love it!).

Cheese and Chive Damper

Ingredients

  • 230g self-raising flour
  • 25g unsalted butter, cubed
  • 50g grated cheese (I used a standard tasty/cheddar)
  • chopped fresh chives - at least 2tbsp but to taste really
  • 3/4 cup milk

Instructions

  1. Preheat oven to 160C fan. I used a silpain mat but if you don't have one, line a baking tray with baking paper.
  2. Sift the flour and a pinch of salt into a bowl, add the butter and, using your fingers, rub the butter in until the mixture is like very fine breadcrumbs. No big lumps of butter!
  3. Add the cheese and chives and lightly mix through with your fingers. You want it well combined but you don't want to compact the cheese!
  4. Season - I added pepper but didn't worry about salt as you can sort that out with the butter later!
  5. Make a well in the centre of the mix and add the milk. Using a knife, mix to a soft dough and then tip out on to a lightly floured bench for a quick knead. Shape into a round and transfer to tray.
  6. Using a serrated knife, divide the damper into 6 portions (cut 1cm or so deep).
  7. Brush with milk and bake for 35 minutes or until tapping the base sounds hollow. I checked after 30 minutes and returned to the oven for another 5.
  8. Serve warm with lots of butter!
https://eatingadelaide.com/cheese-chive-damper/

Smoked Salmon and Asparagus Tart

20161103_205734

I suspect that the year might be reaching its end when it comes to pastry making. The weather is slowly but surely actually warming up and we’re getting more than one day of blue sky and sunshine in a row.

Dealing with pastry in hot weather is a bit of a nightmare – not to mention that you then need to turn on your oven – so I’m going to have to get some baking out of my system sooner rather than later.

Thanks to having some hot-smoked salmon and some asparagus very fortuitously hanging around in the fridge (the salmon had been marked down and I’d forgotten to put the asparagus in something else) this tart (or quiche) was an easy dinner option. Thanks to having a trusty food processor, I even put in the effort to make my pastry. And thanks to having a new and as yet unused tin I even put in the effort to blind-bake. Something I frequently neglect.

You can’t really go wrong with tarts – bung in some kind of filling you like, top with eggs and cream and the job’s done. You’re going to like it (they’re like omelettes or frittatas but with a bit more faff on account of the pastry). With this recipe, do not look at the inclusion of the mozzarella, think it’s a bit weird and be tempted to omit it (or was that just me?) – it definitely adds to the richness of the finished product. And load up with as much dill as you can handle … because, well, it’s just delicious!

For us, this served three. We ate half and then shared a third quarter, leaving the final quarter for Master 5’s dinner the following day.

Smoked Salmon and Asparagus Tart

Ingredients

    Pastry
  • 150g plain flour
  • 75g unsalted butter
  • 1 egg yolk
  • Tart
  • Bunch of asparagus, chopped into chunks and steamed
  • hot-smoked salmon - as much as you can afford or have left over
  • 4 spring onions, finely sliced
  • 2 tbsp (or even more) finely chopped dill
  • 100g mozzarella, shredded/grated
  • 6 eggs (yes, really)
  • ¼ cup cream
  • pepper to season

Instructions

  1. To make the pastry, process the flour, butter and a pinch of salt together until crumbs form. Add the egg yolk and process again, before adding a little cold water so that it comes together. Wrap in clingfilm and refrigerate for about half an hour.
  2. Preheat oven to 170°C fan.
  3. To blind bake, grease a 23 cm tart tin, roll out the pastry and line the tin then prick the base with a fork. Cover with a piece of baking paper and fill with baking beans. Bake for 15 minutes, then remove the baking paper and beans and bake for another 5-10 so that the bottom is golden too.
  4. Allow to cool.
  5. When you're ready for dinner, flake the hot-smoked salmon over the base of the tart, follow it with the asparagus, dill, spring onions and mozzarella.
  6. Beat together the eggs and cream and season with pepper. Pour into the tart and then bake for 25-35 minutes until just set.
  7. Serve with a salad and feel virtuous, as you'll be getting tons of your 5-a-day.
https://eatingadelaide.com/smoked-salmon-asparagus-tart/

Mary Berry’s Sachertorte (sort of)

Sachertorte
Sachertorte

Great British Bake Off has returned for viewers in the UK, so I figure it is fitting to roll out another Mary Berry recipe. My write up of Mary Berry’s chocolate brownies remains, month after month, one of the most viewed pages on this blog.

So when I spotted Mary Berry’s Simple Cakes from the library I figured it was time to test out another one of her usually fool-proof recipes.

The very first recipe in the book is Sachertorte. Not a cake I’ve ever made before but one I’ve been privileged enough to eat in its birthplace, the Hotel Sacher in Vienna. Created in 1832 for Austrian royalty (let’s observe modern country borders for now), it is a cake which now boasts its own national day (5 December, for anyone who needs an excuse to eat cake).

This version of Sachertorte doesn’t quite match up with various ‘original’ Sachertorte recipes that you can find on the internet, as it contains no flour. But I like this, as it means that this cake is suitable for coeliacs! The cake itself is actually also dairy free (the ganache is not) so for anyone dealing with dietary requirements, it might suit.

Somehow, when making this cake I managed to not follow the recipe – not on purpose. I ignore recipes all the time on purpose. But baking, cakes – generally I’m an obedient cook. I read the recipe multiple times before commencing and I don’t stuff up.

Only when making this, I did stuff up. I managed to reduce the chocolate but a full 100g. And guess what? It was absolutely fine.

So the recipe that follows is not Mary Berry’s, though it owes a great debt to her. And, due to the reduced quantity of chocolate, I declare it a health cake (or something).

Purists will also note that I used blackberry jam and you are supposed to use apricot. My choice, like that of any good cook, was driven by what was open and immediately to hand.

Also – because the cake is almond based it is reasonably dense but also retains its moisture well. So it will keep well for a few days, providing you don’t eat it.

Mary Berry’s Sachertorte (sort of)

Ingredients

  • 165g dark chocolate (or 265 if you are actually following the recipe)
  • 6 eggs, 5 separated
  • 215g caster sugar
  • 150g ground almonds
  • about 4 tbsp jam of your choice (you can get away with less)
  • 150g dark chocolate
  • 150mL cream

Instructions

  1. Grease a 23cm springform tin and base line with baking paper. Pre-heat oven to 160°C fan (180 conv).
  2. Melt chocolate in the microwave and allow to cool slightly.
  3. Whisk the 5 egg whites to soft peaks (Berry describes this as 'stiff but not dry'). As I have just one bowl for my stand mixer, I then (gently!) tipped the whisked whites into a separate bowl so I could keep on using the stand mixer bowl. No need to clean if you do the egg whites first.
  4. Next, whisk the 5 egg yolks, the extra egg and the sugar until thick and pale. It should be thick enough that it leaves a trail when you lift the whisk from the bowl.
  5. Whisk in the almonds, chocolate and 1 tbsp of the whisked egg whites. The mixture will be quite stiff but make sure it's well combined before moving on.
  6. Gently fold the egg whites into the mix. Ensure it is well combined but don't beat - you don't want to knock out air.
  7. Turn into your cake pan and bake for 40-45 minutes until the a crust forms on the top and the cake starts to shrink away from the edges of the pan. For my cake in my oven, this took the 45 minutes. As I used the 'wrong' amount of chocolate, you will have to use your own judgement here!
  8. Cool the cake in its pan for 10 minutes or so then tip out onto a rack covered with a clean tea towel. I liked this trick - especially good for more fragile cakes.
  9. Leave it to cool completely. I did this much late Saturday afternoon and proceeded the following day.
  10. When ready to finish, heat your jam (gently - it's high in sugar content and this can go wrong easily!) and then brush over the top of the cake. As I only have a very coarse silicone brush, I actually just used a spoon to spread it around.
  11. For the ganache, melt the cream and chocolate in the microwave and allow to cool and thicken. Spread on the cake - you can see from the picture that it's a nice thick covering, but make sure you include the sides too.
  12. If you are keen, you can pipe the word 'Sacher' on the cake. I am not that keen.
  13. Serve with cream. And because the cake is almond based, it is lovely and moist - so if you are especially health-conscious, you can skip the cream.
https://eatingadelaide.com/mary-berrys-sachertorte/