Even I’m starting to lose track of which chocolate brownie recipe I’m up to now … but here’s yet another one! I’m slowly making a dent on all those bookmarks …
I’ve also decided that at some point I need to start collating some statistics about the different ratios of ingredients and the outcome in the finished product because then I should be able to give you, the reader, some insight into what type of brownie recipe you need to follow to achieve a certain outcome.
Today’s recipe comes to us from Leite’s Culinaria, where they are grandly titled “Robert’s Absolute Best Brownies”. I am always a little sceptical of “best” or “best ever” because that’s the type of thing that’s in the eye of the beholder. But yes, these were pretty good.
The recipe provides imperial measurements for the chocolate and butter and, as my scales do both, I used imperial rather than converting to metric. I tried converting the cup measures for the dry ingredients to metric (because I think weighing ingredients is the only way to go) but the conversions I found for the sugar seemed way off, so I resorted to cup measures.
The original recipe is very enthusiastic about beating everything by hand, but that doesn’t happen in this household. If you have a stand mixer, grab the flat beater and let’s start!
Preheat the oven to 175°C (not fan) and base line a baking dish (8″x8″ – so slightly smaller than I use for many of my brownie baking adventures).
Melt 8 oz of unsalted butter with 3 oz of dark chocolate. I did this in the microwave but you can always use a bain-marie. Tip the smooth melted mixture into your stand mixer and beat in ¾ cup of caster sugar (Andy felt these brownies were a bit on the sweet side so you may like to reduce that) and 1 tsp of vanilla extract.
I’m not convinced that the vanilla extract adds anything so feel free to leave it out. Personally, I’m heading towards omitting it from chocolate brownie recipes in future – it seems unnecessary, having almost no effect on the finished product and I think it’s detrimental to the taste of the batter pre-cooking.
When the chocolate, butter and sugar mixture is smooth, add 2 eggs, one at a time, beating between each. Then add ¼ cup of plain flour and beat like crazy. The original recipe says to beat vigorously for 1 full minute. I let the KitchenAid do its thing until the mixture was quite pale, light and mousse like.
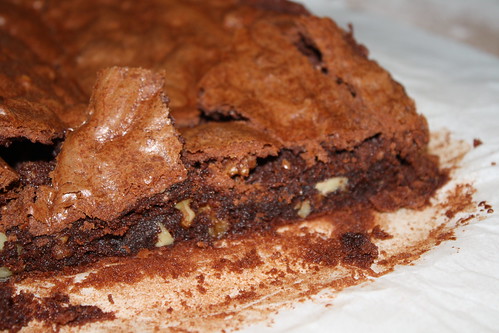
Finally, take a cup of walnuts (or other nut of choice), roughly chop them and stir them through the batter. You’re best off doing this bit by hand, irrespective of how you’ve got to this point!
Tip the batter into the prepared baking dish and you’re done – into the oven. The recipe states 30 minutes but that was nowhere near long enough for my baking dish/oven. Perhaps my dish was a little smaller so the brownie mix was deeper as I ended up baking them for about 45 minutes. You want the mixture to be cooked but you don’t want it to be dry: there still should be some moisture on the tooth pick.
Allow to cool and then cut, serve with cream and eat!
This brownie had an excellent crust – really crispy (and crumbly – what a mess it made cutting it up) with a lovely squidgy middle. Of course, with so much chocolate and so little flour it was really chocolatey too. I agree with Andy that the sugar could be reduced slightly and I see no reason why the filling would need to be restricted to nuts – I’m a big fan of chopped up chocolates in brownies!
The finished product is very reminiscent of the last lot of brownies, and you can check out the full collection here.
If you’re after something chocolate but NOT a brownie, check out Jamie Oliver’s chocolate pudding recipe.