Chettinad Fried Chicken

IMG_1975

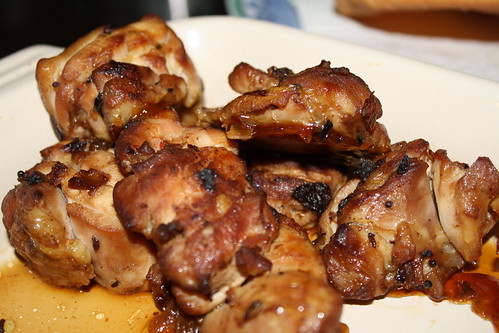
There is a restaurant review in the works but today I’m running short of time so here is an excellent chicken recipe that you might find useful over the long break. This is an Indian recipe (Chettinad is a region in Tamil Nadu, in southern India) but it’s a really welcome change to a big saucy curry. It stands on its own perfectly well, but if you are putting together a curry extravaganza, then this is a pleasant contrast to sauce rich dishes. It’s also fab because it doesn’t require 3000 different spices, carefully roasted and ground.

I got this recipe from my mum and I’m pretty sure it did originally come out of a cookbook – I’m sure she’ll let us all know which one!

Begin by taking about 1kg of chicken (I use skinned thigh fillets cut into large cubes) and rub it with about 1 tsp of salt and a generous sprinkle of turmeric. Set aside.

Prepare some salted water – 3 tbsp of water with ¼ tsp of salt. Ensure the salt dissolves in the water.

Heat some peanut (or other flavourless oil) in a wok and ½ tsp of mustard seeds, ½ tsp of fennel seeds, and 5 whole dried hot red chillis. Keep the chillis whole – this does keep the heat of the dish under control. If you have it, also add 1-2 tablespoons of skinned urad dahl. If you don’t have it – don’t bother seeking it out. You could also add some curry leaves.

When the spices are crackling and starting to darken add a finely chopped onion and cook until brown (that’s brown – not burnt – don’t get impatient and whack the heat up!).

Add the chicken to the onion and stir fry, sprinkling on some salted water as you go. Keep adding the water. You want to have used up all the water by the time you finish cooking BUT you must sprinkle the water in, so you don’t end up stewing your meat.

It’s best if you can cook the chicken all in one batch but realistically that might not happen. Just be aware that the longer you have the heat on the chillis the more likely they are to start breaking down and the hotter the finished product will become. If you do want to keep some of this dish mild then reserve some cooked chicken from the first batch.

When the chicken is cooked and the salted water is used up, remove the chicken (and onion and spices, of course) from the wok and serve. You don’t need to serve straight away – this dish is perfect to prepare in advance. Once cooked, put everything into an oven proof dish, cover with tin foil and reheat (with the tin foil on) when you are ready to serve.

Best eaten with pappadums, raita, naan … and don’t worry about having too much – there’s very rarely any left over!

Corn and Spinach Muffins

IMG_1977

Personally, I am not really into savoury muffins at all. However, what I am very much into at the moment is food that is portable, self contained and freezer friendly. This means that, with minimal planning, I always have something I can feed to the Eating Machine (that’s the baby) at relatively short notice.

So I now love savoury muffins because I can pack all manner of stuff into them and they take only a morning to defrost.

I’ve been doing quite a lot of experimenting and have found that many recipes end up being a little heavy. However, this recipe, cribbed from the back of a pack of Coles own brand frozen corn*, produced light muffins that froze well.

The recipe claimed it would make 12. Coles’ home economists must make giant muffins because I halved the recipe and ended up with 9 regular muffins.

Another good thing about muffins is that they don’t require the use of the food processor (so you can make them while babies are asleep without any fear of waking them!) – and in fact it’s imperative to keep your mixing as light and as minimal as possible. Overwork the batter and then you will indeed get heavy muffins.

Perfectly good while still warm, but even better when frozen and thrown in the nappy bag when heading out for a coffee!

* Please note that this was AUSTRALIAN corn. Always check your frozen veggies for country of origin – you could well be shocked – and don’t forget to buy Australian.

You can either print this recipe, or download the pdf. And if your little ones are enjoying this recipe, please share it with your friends!

Corn and Spinach Muffins

Ingredients

    dry ingredients
  • 1 cup self raising flour
  • ½ cup frozen corn kernels (straight from the freezer)
  • ½ cup spinach (again, from the freezer, but you'll need to defrost so you can mix)
  • ½ cup grated cheese
  • small handful of chopped sun dried tomatoes
  • salt & pepper to taste
  • wet ingredients
  • 1 egg, beaten
  • ½ cup plain yoghurt
  • ¼ cup light olive oil

Instructions

  1. Preheat the oven to 180° fan and lightly grease your muffin pan.
  2. Mix the dry ingredients and wet ingredients in separate bowls and then mix the wet ingredients into the dry.
  3. Don't over work - mix until they are just combined.
  4. Spoon into the muffin tray and bake for 15-20 minutes, or until golden.
https://eatingadelaide.com/corn-spinach-muffins/

Pakoras

pakoras

When buying kitchen gadgets we generally adopt the approach of buying a cheap, entry level model first up to see if we actually use the toy, with the intention that if we hammer it and it breaks, we buy a better one and if we never use it we’ve not parted with two much cash. Invariably what happens is that the cheap model lasts and lasts and lasts. That’s what happened with our espresso machine and also our deep fat fryer.

We’d been talking about buying a fryer for ages before we actually bought one. We use it more than we thought, but not as much as we feared: we’ve not turned into little deep fried dumplings ourselves!

One of the things we’d like to perfect is the pakora. I’m a huge fan of chickpeas in all their forms – but turned into batter and deep fried? What could be better?

You barely need a recipe for pakora batter – it’s just chickpea (also known as besan) flour with spices and some water. As chickpea flour is gluten free, this recipe is suitable for coeliacs (and anyone avoiding gluten for whatever reason).

But here we go. I based my approach around the recipe on India Snacks (probably a site I should visit more).

Take 150g of chickpea flour and add: the juice of one lemon, ⅓ tsp baking powder, ½ tsp ground chillis (or chilli powder – and obviously this is ‘to taste’ – you could leave it out altogether), ½ tsp turmeric, 1 tsp garam masala, 2 tsp ground coriander and a generous ½ tsp of salt. Mix all these dry ingredients together well before adding a generous tablespoon of melted ghee and finishing the batter with enough cold water to make … a batter.

Set it aside to rest for as long as you are able (batters are always better if you can leave them overnight).

You want the batter to be reasonably thick because it needs to support all those vegetables you’re going to put in it. We added plenty of spinach, some finely sliced onion and some grated potato (if you’re using potato, don’t grate it too finally and make sure you get the excess water out before adding it to your batter). Because I’m lazy it all went in the same bowl, but there’s no reason it has to. You could use cauliflower or broccoli florets, slices of aubergine, mushrooms, even chicken goujons. Really – anything that will taste good battered and fried!

Heat your oil to 180°C and fry spoonfuls of your mix until golden and cooked through. Drain on kitchen paper and serve. In my case – serve with plenty of hot lime pickle, but raita and mint chutney are also popular. This mix made more than enough for two greedy piggies for dinner.

This is really easy but I don’t recommend doing this on a school night – with fried foods like this you simply can’t be in a hurry to get them on the table. Because you’re cooking in batches (and quite likely quite small batches) you could well feel like you’ve been in the kitchen for hours. Best off saving this for a lazy weekend lunch or dinner when you don’t feel on a schedule.

And while they might be deep fried – pakoras do contain plenty of vegetables, so they’re healthy too!