Crispy Parmesan Pork

Crispy parmesan pork

Apologies for the colour issues in this photo! I’ll stop taking pictures with a camera phone!

Another foray into a rogue cooking magazine, another quick supper.

This time it’s the April 2011 UK Delicious, brought as a present by my best mate when she visited for a couple of weeks earlier in the year. The recipe comes from the “Shortcut suppers” section, which makes use of various store cupboard standbys and ready made bits and pieces.

This recipe is so simple I’d suggest that only the laziest of cooks would need to resort to store bought mash or sauce.

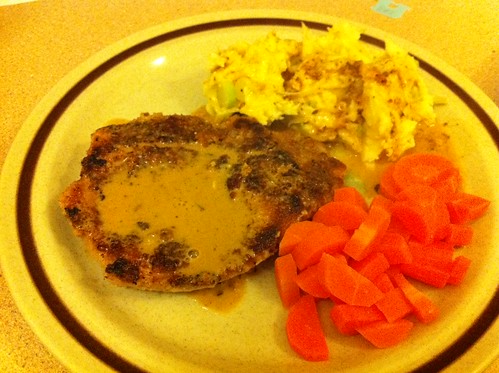
Now, the recipe calls for “pork loin medallions”. I wasn’t sure what this translated to in Australian (although I have found Australian recipes using the same terminology), but my butcher sells what he calls “pork schnitzels” which are vaguely round, reasonable thin pieces of pork (they’ve not been put through the tenderiser or crumbed). Basically, you’re looking for a piece of meat that will cook quickly, that is lean and is without bone.

To cook the pork, dip the medallions in egg and then crumb with a mixture of breadcrumbs, finely grated parmesan cheese, pepper and herb of your choice (sage, thyme or oregano will all work well). Pan fry (in plenty of hot oil) until cooked and the topping is golden and crispy.

Remove the meat from the pan and keep warm.

As there’s no Waitrose for any of us to nip to for the cider and mustard sauce you have to make your own. Fortunately, this isn’t difficult: remove the pork from the pan and deglaze with either dry cider or white wine. Add a teaspoon of grainy or Dijon mustard (I prefer grainy, as I find Dijon can be a little too vinaigery), stir well and finish with some cream. Allow it to thicken a little and … sauce done!

Serve with a quick colcannon. In advance, pan fry a finely sliced leek and some finely sliced white cabbage until soft. Make mash your usual way and mix through the greens. This is great way of making mash a bit more interesting, as well as getting a few extra veggies on your plate.

All too easy and this makes an interesting meal out of relatively simple ingredients. Just remembering to add some parmesan cheese to breadcrumbs is enough to jazz up pretty much anything you end up crumbing in future!

Chicken and Green Onion Fried Rice

chicken & green onion rice

I’ve recently had a shuffle around of my cookery magazine collection which has been a great opportunity to try out some new recipes. Looking for something relatively quick for a mid week supper, I came across this recipe in the March 2003 Australian Gourmet Traveller.

This is really a slightly glorified fried rice dish but, as is always the case with these things, it’s a pleasant change to follow a recipe and not dump absolutely everything from the spice drawer in the dish!

I adapted the method a little, so that I could prep the chicken in advance and, when it came time to eat, I just cooked the rice and dealt with the vegetables.

Begin by making the marinade for the chicken. In a pan, heat some peanut oil (any flavourless oil will do) and half an onion, thinly sliced. Cook until the onion is soft. Then add some chicken stock. Now, following the recipe, this would be 50mL of chicken stock. However, we have a tendency to buy stock in the 1L containers and not use it which is rather wasteful so instead I bought some sachets of stock paste and I just used one sachet.

Add your chicken stock of choice, followed by a generous teaspoon of ginger paste, chilli to taste (I used chilli flakes, but finely sliced fresh chilli would be lovely), 50mL of white wine vinegar, 1 tsp of caster sugar and ⅛ cup of soy sauce (this is about 30mL, if you prefer). Give this all a stir and bring to the boil. Once boiling, remove from the heat and allow to cool.

There are two approaches to cooking the chicken. I pan fried my chicken breast in one piece which I think was a mistake because it was so huge. Being huge, it was also very uneven in thickness. Of course, had a chopped it into bite size chunks first, I’d have run the risk of over cooking the chunks. So it’s up to you – season your chicken breast and pan fry until cooked and golden. This is the only bit where the chicken gets cooked so you do need to make sure it’s done properly.

Once the chicken is cooked, if it’s in one piece, allow to cool for a few minutes before chopping into bite size chunks. Add the chicken to the onion marinade, coat well and allow to stand for at least an hour.

When you’re ready to eat, cook your rice. Heat a little oil in a wok and fry coarsely sliced spring onions (a whole bunch). As the spring onions start to take on some colour, add the leaves from two bok choy and fry until they start to wilt. Finish by adding the chicken and onion mixture (include the marinade) and mix through the rice.

Ensure everything is hot and serve.

This was great – perfect food as the weather starts changing (in either hemisphere). You may need to adjust the sugar/vinegar balance. I’m naturally very miserly with sugar in recipes and Andy felt that a touch extra sugar would have helped balance out the tartness of the vinegar much better. I’m inclined to agree and so I suggest that you taste the marinade and adjust as you see fit.

To drink – serve with Riesling. If you’ve been generous with the chilli a slightly off dry Riesling would be perfect. My current favourite is the Greywacke, from New Zealand.

Two Tone Cheesecake

two tone cheesecake

I recently entered the Bikko’s Bake Off competition that was being run by Robern Menz.  I was very disappointed not to be one of the two lucky winners who will enjoying a day out with Robern Menz.  Congratulations to the choc mint cheesecake brownie and the dark chocolate salted caramel slice!

But everything has a silver lining and, in this case, it means I have a recipe all typed up and ready to go!  I was really happy with my photograph, too – quite a departure from my normal woeful efforts.

My creation was a two tone cheesecake:  chocolate and vanilla.  This was a bit of a departure from my usual cheesecake recipe, because I didn’t buy quite enough cream cheese.  However, I think this mix is better and it retains its two massive plus points:   no gelatine, so suitable for vegetarians and no eggs so suitable for those who don’t eat eggs.*

As it was a Bikko’s competition, my creation had to include Bikko’s, so I used milk chocolate ones in the base, and a layer of dark chocolate ones through the centre of the cake.

This is a set cheesecake so you do need to start it a little ahead of when you want to eat it!

Start with the base.

Grease and baseline a 23cm springform tin.

Coarsely crush 125g of milk chocolate Bikko’s and 50g of your favourite cheesecake base biscuits (I used gingernuts).

In a heavy bottomed frying pan, gently dry toast 80g of rolled oats.  Watch them carefully and as they start to brown, add 100g of unsalted butter (cubed, rather than in one big lump).  When the butter has melted, add the crushed Bikko’s and biscuits and stir for a little so the chocolate on the Bikko’s starts to melt too.

Gently press the mixture into the base of the tin.  The more firmly you compact down the biscuit base the harder it’s going to be and, while you want it to hold together, you don’t want people to be breaking their teeth.  I find that the quantities given above provide exactly the right amount for the base.

Place the tin in the fridge and start work on your filling.

I put the chocolate filling on the bottom, so that’s next.  Beat 300g cream cheese with 50g of sour cream until smooth (if you have a stand mixer, use this – the colder the cream cheese is the longer it will take to get it smooth but it’s worth it).  Mix in 75g of caster sugar.

Melt 100g of best quality dark chocolate (either in a bain-marie or in the microwave), allow it to cool slightly and stir into the cream cheese mix.

Whisk 150mL of cream (reasonably firm peaks, but not butter!) and fold this into the cream cheese mix.

Spread this mix over the cooled and set biscuit base.  Level it off and cover with 125g of dark chocolate Bikko’s, lightly pressing them into the mix.  Return to the fridge to set (at least an hour).

Now make the vanilla mix.  This is essentially the same as the chocolate mix but use 1tsp of vanilla bean paste instead of the 100g of chocolate.  Spread this mix evenly over the Bikko’s layer and return the cake to the fridge to set (again, another hour at least).

When ready to serve, grate over dark chocolate and job’s a good’un.

*Note that if you want to make the whole cheesecake egg free you need to choose your biscuits carefully.  Anzac biscuits (homemade) are an excellent egg free base material.