Ottolenghi’s Baby Spinach Salad

2015-11-19_08-38-49

Today, for the first time this ‘summer’ (it’s not actually summer yet), the mercury topped 40°C. Tomorrow’s 35 seems almost chilly by comparison (cough, splutter).

So it would seem that salad season is well and truly upon us.

I would love to pretend that we routinely eat interesting salads but … woooah, that is so not true. We throw some lettuce, tomato and cucumber on a plate. Maybe there’s also avocado or spring onions. And if I’ve thought ahead and been able to track down both Australian feta and olives then they’ll be on the plate too. I don’t like dressing, so that doesn’t even get a look in.

And you know what? I actually LIKE salad.

Anyway, my slender repertoire now has an extension.

A friend organised a ‘cookbook club afternoon’ (for want of a more pithy term). A book was chosen (Ottolenghi’s Jerusalem) and we were all to select different recipes and then come together and share our creations.

Circumstances meant I knew I was going to pushed for time so I picked a salad (it turned out that this was horrendously lazy when compared with other efforts …). In haste I chose the baby spinach and date salad. It ticked all my boxes – easy to shop for, quick to make. Job done.

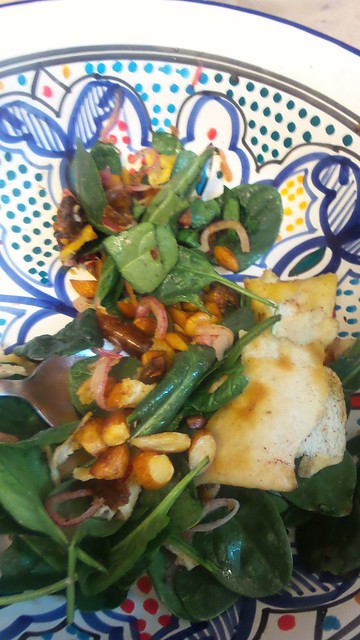
Come Sunday morning I was able to throw this together, keeping aside the dressing to stir through at the last minute. While I was concerned about the sweetness of the dates, they worked really well and the vinegar and onion helped offset the sweetness. The almonds, of course, added crunch.

You can easily make this in advance – not too much because the pita won’t retain its crispness – but it’s definitely a ‘prep first thing in the morning’ kind of dish. And it tastes really good too!

Ottolenghi’s Baby Spinach Salad

Ingredients

  • ½ red onion, very finely sliced
  • 100g pitted dates, quartered lengthwise
  • 1 tbsp white wine vinegar
  • 30g unsalted butter
  • 2 tbsp olive oil
  • 100g pita bread, torn into generous bite sized pieces
  • 75g almonds, roughly chopped
  • 2 tsp sumac
  • ½ tsp chilli flakes (or to taste, but don't go crazy)
  • 150g baby spinach leaves
  • 2 tbsp lemon juice

Instructions

  1. Place the sliced onion, dates and vinegar in a small bowl and leave for about 15-20 minutes.
  2. Heat the butter and 1tbsp oil in a pan and add the pita bread and nuts. Toast until the almonds take on colour and the pita gets all lovely and crispy. Remove from the heat and stir through the sumac and chilli.
  3. Drain any remaining vinegar from the onion and dates (in my case, there was pretty much none).
  4. Toss the spinach with the dates and onion and pita and almond mix.
  5. When ready to serve, pour over the remaining 1tbsp of oil and lemon juice (I actually shook them together) and season to taste.
  6. Serve immediately.
https://eatingadelaide.com/ottolenghis-baby-spinach-salad/

Chocolate Chip Biscuits (or Cookies, if you must)

20150925_132940

For some reason, we are not big chocolate chip biscuit makers in this household. This does not mean that we are not enthusiastic consumers of said comestible. I LOVE them and when the mid-morning or mid-afternoon hunger pangs hit at work I’ll often nip next door to the café and buy one.

I suspect the lack of home production stems more from the fact that we rarely have biscuits in the household full stop. However, last Friday afternoon Master 4 and I were off to a play date and I asked him what he wanted to take. Cue a search for a quick, simple chocolate chip biscuit recipe that wouldn’t require multiple trips to the shops.

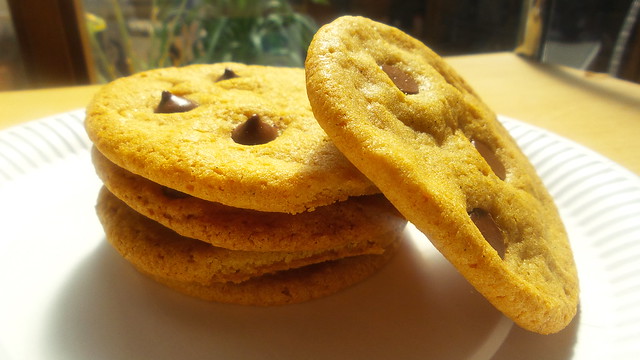
Luckily (as always) UK’s Delicious came to the rescue with this recipe. For anyone cooking with a child, it’s easy (OK – we do have a stand mixer!) and they will love eating the mixture, shaping the biscuits and pressing in the chocolate chips. As you can see from the photo, four chocolate chips per biscuit is woefully inadequate!

These biscuits strike, for me at least, the right balance between crispy and chewy. I think that that’s down to the combination of caster and light brown sugars. Make sure you use a good quality vanilla essence as the flavour does really shine through (especially if you are mean on the choc chip count and also if the biscuits last a couple of days). If you’re going to beef up the chocolate content, then you could probably omit the vanilla altogether.

We’ve really enjoyed eating these and as they were super quick to do I’m sure they’ll be making more regular appearances in our kitchen.

Chocolate Chip Biscuits

Ingredients

  • 100g unsalted butter, softened
  • 100g caster sugar
  • 100g light brown sugar
  • 1 egg
  • 1 tsp vanilla bean paste (or good quality extract, or omit altogether)
  • 165g plain flour
  • ¼ tsp salt
  • ½ tsp bicarb
  • chocolate chips - as many as you want!

Instructions

  1. Preheat your oven to 150°C fan (170°C conv) and line two baking trays with baking paper.
  2. Cream the butter and sugars until pale. Add in the egg then the vanilla, flour, salt and bicarb. Mix until well combined and smooth.
  3. Take a tablespoon and form large walnut sized balls of biscuit mixture. Place them on the baking trays - well spaced as they spread a lot (they are easy to separate so don't be too worried about them joining up during baking) and press in choc chips. Four per biscuit looks like a lot when they're a ball but looks like nothing once they're cooked - so be generous rather than mean.
  4. Bake for 15 minutes - the biscuits will spread and start to pick up a hint of brown at the edges. Depending on your oven you may want to keep an eye on them from the 10-12 minute mark. In my oven - 15 minutes was perfect.
  5. The recipe will make between 16 and 20 biscuits. The biscuits do end up quite large but they are also quite flat so they are not like the biscuits you get in cafes that are often as big as your head.
  6. Remove from the oven and allow to cool ever so slightly before carefully moving on to racks to cool completely.
  7. Eat!
https://eatingadelaide.com/chocolate-chip-biscuits-cookies/

Hedgehog Slice

20150726_165137

Our local library invariably has a small display of books that are for sale. These are either former library books or (I am guessing) they are books that people have donated that the library has chosen not to add to its collection. That’s the only way I can explain why some have barcodes and some don’t. The books are always insanely cheap (20c for a paperback) and while the number and range available varies widely, it is always worth spending a minute or two perusing.

A month or so ago I picked up Basics to Brilliance: Slices Recipes, put together by Family Circle and published only a few years ago. For some reason, I have it in my head that now that Master 4 is at pre-school (and soon to be at school) slices should be a part of my repertoire. I don’t know why I think that – I’m not the type of parent who includes sweet treats in a lunch box and we certainly don’t have cake and friends all the time at home.

I’ve spent quite a lot of time poring over this book and even managed to induce some cookbook envy in at least one friend. Even though the book was only published in 2007 the recipes definitely have a slightly old fashioned feel to them. I’m not sure that had this book been produced in the 70s or 80s it would have been much different.

And that is a good thing – there’s a reason why classics are classics. Some things just work and taste good. And don’t need trend driven labels attached to them.

Last weekend we were heading to my cousin’s house for my aunt’s birthday celebrations and we were planning on taking a plate of charcuterie with us. However, a quick check meant my cousin requested something sweet and, on very limited time, I consulted the book and found the hedgehog slice.

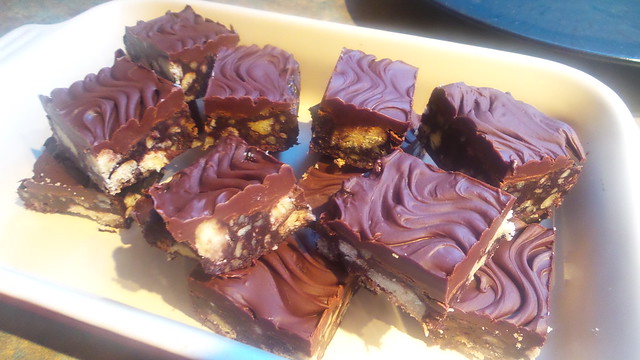
Many slice recipes are a bit time consuming because you have to deal with layers. Not so the hedgehog and it has the bonus of being a refrigerator cake – no oven and perfect if you are wanting an activity to do with a small child. If you are really pushed for time then you can skip the ganache topping.

Hedgehog Slice

Ingredients

    hedgehog
  • 125g unsalted butter
  • ½ cup caster sugar
  • 125g plain, sweet biscuits (I used a plain shortbread)
  • 1 cup walnuts
  • ½ cup coca powder
  • 1 egg
  • ganache
  • 125g dark chocolate
  • 30g unsalted butter

Instructions

  1. Line a 20cm square tin with foil. If you only have a larger tin - don't worry. The hedgehog mixture is very thick and will stay in one part of the tin.
  2. In a pan, heat the butter and sugar until the butter is melted and the sugar dissolved.
  3. Lightly crush the biscuits. Put them in a freezer bag and give them a gentle beating with a rolling pin.
  4. Chop the walnuts. I did this in the food processor - you want them reasonably chunky so with a knife would be fine.
  5. Lightly beat the egg.
  6. Once the sugar has completely dissolved, reduce the heat to low and add the biscuits, cocoa and walnuts. Stir well and then remove from the heat.
  7. Allow to cool a little and then mix the egg through thoroughly.
  8. Pour into your pan and flatten off. Put in the fridge to set.
  9. Once the hedgehog is set (this will only take half an hour to an hour), make the ganache. Melt the chocolate and butter together (in the microwave for speed and ease) until smooth, allow to cool and thicken slightly and then spread over the hedgehog.
  10. Using a fork, create a wavy pattern if desired.
  11. Refrigerate again. When ready to serve, cut into squares. It should make around 16-20 pieces.
  12. Best served straight from the fridge.
https://eatingadelaide.com/hedgehog-slice/