Almond Biscuits

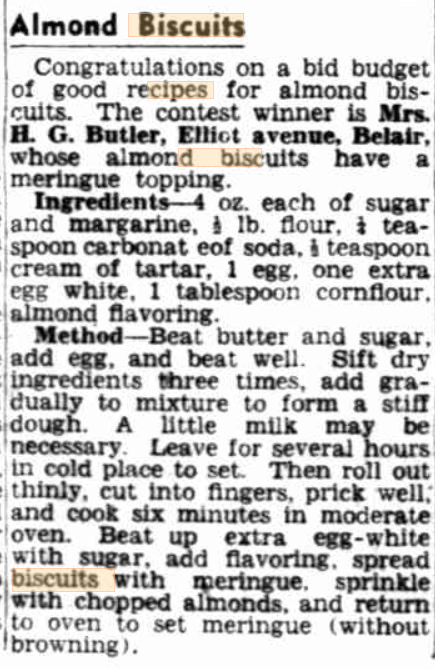
This recipe, found on trove, is a 1947 offering from a Mrs HG Butler of Elliot Avenue, Belair*. It was published in the News on 21 Oct 1947 in the Lend-a-Hand Club section. Apparently a shout-out had been made for almond biscuits and this recipe was deemed the winner.

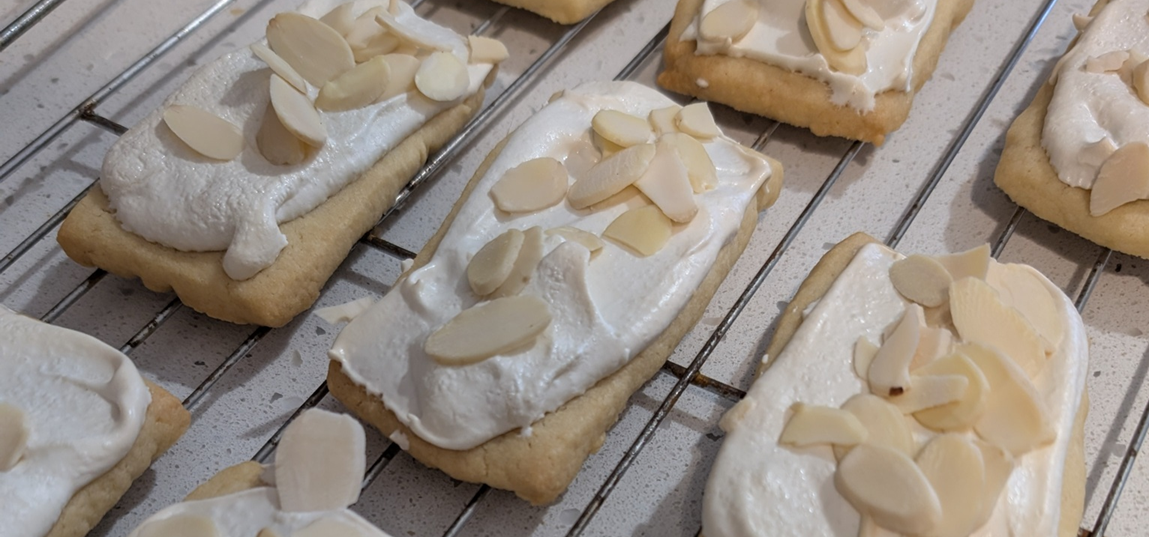
These are something a little different, as the biscuits have a meringue topping. I was sceptical about how well these might keep but it turns out they keep extremely well – although it was only tested for a couple of days in our house … I liked that the biscuits themselves weren’t too sweet and don’t worry about the apparent plainness of the biscuit, because the topping more than compensates.

Being the 1940s, Mrs Butler naturally uses imperial (gasp!) measures and her recipe writing assumes more about the reader than a modern recipe. To that end, I noted what I did so that I can provide you with a more approachable (I hope!) recipe. These are definitely worth a try and, of course, you could top with any nut of your choosing – whether chopped or flaked (l used flaked almonds as I had some).

The cornflour in the meringue was a new one for me (not for the whole rest of the internet apparently) – it helps stabilise the meringue. If you are using the meringue straight away there may be little point.

Serving Size:
About 15 biscuits
Time:
30 mins + chilling time
Difficulty:
Easy

Ingredients

  • 110g caster sugar
  • 110g unsalted butter
  • 220g plain flour
  • 1/4 tsp bicarb
  • 1/2 tsp cream of tartar
  • 1 egg
  • 2 tbsp milk
  • 1 extra egg white
  • 55g caster sugar
  • 1 tbsp cornflour
  • almond essence/flavouring
  • flaked almonds or chopped/flaked nut of your choice

Directions

  1. Cream butter and sugar. This is beating them together to a smooth paste.
  2. Sift the flour, bicarb and cream of tartar. If you are making this all by hand, then sift 3x, but if you’re using a stand mixer or food processor you can get away with one sift (or, indeed, one).
  3. Beat the dry ingredients with the creamed butter and sugar and add the egg.
  4. If the mixture is very stiff, add the milk as needed. The dough should be quite firm though.
  5. Wrap the dough in floured cling film and put in the fridge for at least half an hour. You need to tread the fine ground between chilling so the biscuits are easy to cut and not over chilling so the dough is difficult to roll out. A good alternative is to roll into a cylinder as you can then slice off biscuits.
  6. Preheat oven to 160C fan bake. Line a baking tray with baking paper.
  7. Once the dough is chilled, roll out thinly and cut into biscuits. I cut into roughly 8cm x 5cm biscuits and it made 15. You do want the biscuits to be quite thin.
  8. Bake the biscuits for 10-15 minutes. Keep an eye on them – you don’t want them to burn and you need to accept some wriggle room here based on how thinly you’ve rolled them and your oven’s idiosyncrasies.
  9. While the biscuits are baking, make the meringue. Whisk the egg white to soft peaks and then slowly whisk in the caster sugar, 1 tbsp at a time, ensuring it is well combined before adding the next. The mixture should be stiff and glossy. Add the cornflour (still whisking) and a little almond extract – no more than a splash! (Almond extract is super potent – so we are literally talking 1/4 tsp no more, otherwise your meringue will taste like marzipan.
  10. Turn the oven down to 120C.
  11. Spread the meringue on the cooled biscuits and top with the nuts and return to the oven to set the meringue. This may take up to 15 minutes and again, depending on your oven, you might want to keep an eye on things as you don’t want the meringue to pick up much/if any colour.

* If you’re interested, a search of trove for butler “elliot avenue” belair shows that Mr & Mrs HG Butler were married in in 1921 in the Glanville Methodist Church.

Giuseppe dell’Anno’s Focaccia Genovese

This from Giuseppe’s Italian Bakes: Over 60 Classic Cakes, Desserts and Savoury Bakes. Giuseppe was fab on Great British Bake Off so I hoped to make far more than the one recipe I managed from this book. Maybe I’ll revisit it again at some time …

The recipe is spread out across multiple pages in the book so to save on space in my recipe folder I (loosely) write out the recipe below. The result was delicious but much thinner and crispier than you will be used to if you buy commercially available focaccia. I’m trying to get to the bottom of this – do I use the wrong size pan? Are commercial focaccia just a pale imitation of the real thing?

I made a half portion.

Dissolve 1/4 tbsp honey in 180g of tepid water in a jug. Put 300g flour and 2 tsp yeast in the bowl of a stand mixer and, with the mixer on a low speed very slowly pour in the honey/water mix. Once all the water is added add 1 tbsp olive oil and mix until the dough comes together. Sprinkle over 1tsp of salt and continue mixing for 10-15 minutes until you have a very smooth dough.

Flour the bench, tip the dough from the bowl onto the bench and cover with the bowl for 15 minutes.

Flatten the dough into a rectangle about 30×15 cm and envelope fold. Oil a 25x40cm tin (shallow is fine) and then push the dough into the tin. It will not, at this stage, cover the base. Cover and allow to prove for 50 minutes.

Now spread it further … you should now be able to cover the surface of the tin. Smooth the top with your hands, sprinkle with 1tsp of salt. Prove for 40 minutes.

In a glass jar, shake together 30g olive oil and 50g water to form an emulsion.

Lightly dust the focaccia with flour then dimple using half the length of your fingers (that is – deep dimples, not little finger tip ones). Pour over the emulsion – spread over with your hands – and leave to prove for another 50 minutes.

Pre-heat oven to 240C (dell’Anno doesn’t specify if this is fan or not … so I went 220C fan) – he does specify a lower shelf, so it may well be a good option to use a pastry bake/pizza option if you have one. Bake for 15 minutes.

When done, place on rack to cool and brush with a little extra olive oil while still hot for extra shine.

Best eaten immediately.

I do like his con cipolle option – he cuts onions into slices 3-4 mm thick, mixes with a little olive oil and microwaves for 1-2 minutes before spreading on focaccia (at the emulsion stage).

Delicious indeed, but not thick and fluffy!

Danny’s Cookbook: Danny’s Bread

The next cookbook off the shelf (and, in this case, next bread) is Danny’s Cookbook, which was given to me by my in-laws as a Christmas present in 2012 and … um … hasn’t been used.

This looks to be a (slick) self-published effort, written by Danny Moisan who was head chef (patron etc etc) at Danny’s at the Harbour View, St Aubin, Jersey. The restaurant seems to be no longer extant, which I guess is what happens if you take the best part of 10 years to use a cookbook. My in-laws pre-pre-covid used to visit Jersey for an annual holiday and, I believe had eaten at the restaurant.

On to the recipe … obviously bread baking being the order of the day (although I do like the look of the ‘wasabi potatoes’ recipe on the next page). This bread, unlike the brioche, is short work which I made even shorter work of by using the stand mixer. You’ll spend more time prepping the bits and bobs than doing anything else.

But here is where we hit a problem. The recipe (for 8 servings) uses a WHOPPING 2.5kg of flour. If you make bread as often as I do … some bells start ringing. One loaf is normally around 500g of flour … maybe the good people of Jersey really really like their bread.

We reduced the recipe by 5 to work with the more familiar 500g of flour. But then we hit weird things like 2/5 of a carrot and TWO (I kid you not) olives. So then I took the base recipe and took some liberties. As it was, I felt the flavour was still underpowered. In terms of general bread qualities, it was fine. It had a nice even crumb that was tight enough to make a sandwich out of, and it toasted well. But after the variety of ingredients that went into it I was left thinking … shouldn’t there be something more?!

Will I make this again? No. Will I make loaves of bread that incorporate rosemary, garlic, sun-dried tomatoes and olives (in varying combinations)? Definitely. Even though this was pretty good bread (and absolutely out-performed the brioche), the number of inclusions means I won’t revisit it as a plain bread because it would be just too hard.

Which leads me to conclude that it’s a good recipe but something got messed up in the translation from restaurant volumes to home volumes …

Perhaps if you make it & bump the up flavours you can let us all know.

A loaf of bread.

Danny’s Bread – heavily adapted

Serving Size:
8
Time:
1.5-2 hours
Difficulty:
Easy (but faffy)

Ingredients

  • 1.5 tsp dried yeast
  • 200mL water
  • 5g sugar
  • half a carrot – peeled & grated
  • 20g sun-dried tomatoes, cut into strips
  • 1 clove of garlic, crushed
  • 10 black olives, sliced
  • 1 tbsp fresh rosemary, chopped
  • 1/2 tsp salt
  • olive oil

Directions

  1. Mix the water, dried yeast and a bit of sugar in a small bowl (ramekin, cup …) and leave to activate.
  2. Put all the dry ingredients plus a healthy splash of the olive oil (so basically everything bar the yeast/water mix) in the bowl of a stand mixer and lightly mix together.
  3. Add the yeast & water mix and mix to a dough. You may need a little extra water.
  4. Knead the dough by hand for five or so minutes – until you have a springy, elastic dough.
  5. Return to the stand mixer bowl, cover and leave to prove for 30 minutes. It should roughly double in size.
  6. Tip the dough out, knock back, lightly knead and shape into a ball.
  7. Place the loaf on a non-stick tray (I use a silpain mat) and prove for another 30 minutes.
  8. Pre-heat oven to 160C (fan bake) and cook the bread for about 40-45 minutes.
  9. Cool on a rack.