Chocolate Chip Biscuits (or Cookies, if you must)

20150925_132940

For some reason, we are not big chocolate chip biscuit makers in this household. This does not mean that we are not enthusiastic consumers of said comestible. I LOVE them and when the mid-morning or mid-afternoon hunger pangs hit at work I’ll often nip next door to the café and buy one.

I suspect the lack of home production stems more from the fact that we rarely have biscuits in the household full stop. However, last Friday afternoon Master 4 and I were off to a play date and I asked him what he wanted to take. Cue a search for a quick, simple chocolate chip biscuit recipe that wouldn’t require multiple trips to the shops.

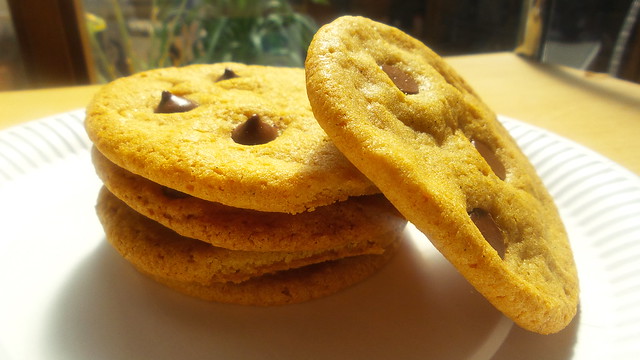
Luckily (as always) UK’s Delicious came to the rescue with this recipe. For anyone cooking with a child, it’s easy (OK – we do have a stand mixer!) and they will love eating the mixture, shaping the biscuits and pressing in the chocolate chips. As you can see from the photo, four chocolate chips per biscuit is woefully inadequate!

These biscuits strike, for me at least, the right balance between crispy and chewy. I think that that’s down to the combination of caster and light brown sugars. Make sure you use a good quality vanilla essence as the flavour does really shine through (especially if you are mean on the choc chip count and also if the biscuits last a couple of days). If you’re going to beef up the chocolate content, then you could probably omit the vanilla altogether.

We’ve really enjoyed eating these and as they were super quick to do I’m sure they’ll be making more regular appearances in our kitchen.

Chocolate Chip Biscuits

Ingredients

  • 100g unsalted butter, softened
  • 100g caster sugar
  • 100g light brown sugar
  • 1 egg
  • 1 tsp vanilla bean paste (or good quality extract, or omit altogether)
  • 165g plain flour
  • ¼ tsp salt
  • ½ tsp bicarb
  • chocolate chips - as many as you want!

Instructions

  1. Preheat your oven to 150°C fan (170°C conv) and line two baking trays with baking paper.
  2. Cream the butter and sugars until pale. Add in the egg then the vanilla, flour, salt and bicarb. Mix until well combined and smooth.
  3. Take a tablespoon and form large walnut sized balls of biscuit mixture. Place them on the baking trays - well spaced as they spread a lot (they are easy to separate so don't be too worried about them joining up during baking) and press in choc chips. Four per biscuit looks like a lot when they're a ball but looks like nothing once they're cooked - so be generous rather than mean.
  4. Bake for 15 minutes - the biscuits will spread and start to pick up a hint of brown at the edges. Depending on your oven you may want to keep an eye on them from the 10-12 minute mark. In my oven - 15 minutes was perfect.
  5. The recipe will make between 16 and 20 biscuits. The biscuits do end up quite large but they are also quite flat so they are not like the biscuits you get in cafes that are often as big as your head.
  6. Remove from the oven and allow to cool ever so slightly before carefully moving on to racks to cool completely.
  7. Eat!
https://eatingadelaide.com/chocolate-chip-biscuits-cookies/

Mary Berry’s Florentine Biscuit Recipe

20140901_125754

The Great British Bake Off is in full swing yet again. I love this program (you can follow along here in Australia as the Guardian has a weekly live blog of the action) because it is so much more gentle than any of the other reality cooking programs (and yes, that includes you, Great Australian Bake Off, with your nasty Big Brother style approach of making the contestants live together and your snippy female judge). Mary Berry is the grandma everyone should want to have and both Mary and Paul take the time to offer constructive criticism. There’s very little nastiness in the show at all (let’s leave aside Bingate and the fallout from that).

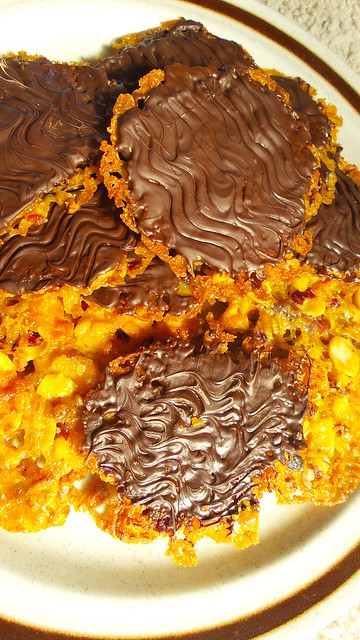
A couple of weeks ago the technical challenge was Florentines. Personally I really like the idea of Florentines but find that when you buy them in a cafe they are plate like, thick, and sometimes contain both peanuts and glacé cherries. One of those is bad, both is awful!

On the show, Mary impressed upon the competitors that they should be aiming for lacy, delicate biscuits and there wasn’t a peanut in sight! The real challenge on the program was that the bakers had to temper chocolate for the decoration and that they weren’t told what that decoration should be. I was surprised by how many were really uncertain about this – eat more biscuits, people!

I originally made this as a candidate for the Sweet Swap. However, they were far too delicate to survive in the post, I didn’t do a brilliant job of tempering the chocolate (it was late, I did it in the microwave …) and I’d also neglected to note that one of my swapees was lactose intolerant and these biscuits contain butter. The following recipe (thanks BBC Food) is egg free but does contain flour. I love that Mary uses dried cranberries as a cherry substitute – definitely the way forward – they offer a necessary sour counterpoint to all the sugariness from the caramel biscuit base. Be sure to use baking paper on your trays and handle the biscuits very carefully when they come out of the oven. They are perfectly good to eat without their chocolate back (if you feel that might be a bit too much faff!)


Mary Berry’s Florentine Biscuit Recipe

Ingredients

  • 50g butter
  • 50g golden caster sugar
  • 50g golden syrup
  • 50g plain flour
  • 25g dried cranberries (you might find them labelled as 'craisin')
  • 50g dried/candied peel
  • 25g slivered almonds
  • 25g walnut pieces (you can buy these but if you are using whole/part walnuts, finely chop them)
  • 200g dark chocolate

Instructions

  1. Heat oven to 180°C and line three baking trays with baking paper.
  2. Weigh butter, sugar and golden syrup into a small pan (preferably a non stick one - it will make cleaning up easier!) and heat gently to melt the butter. Remove from the heat and add the dry ingredients.
  3. Mix well.
  4. Drop teaspoonfuls of the mixture on to the prepared baking trays. This recipe makes roughly 18 - so 6 biscuits per tray. It's important to allow plenty of space between biscuits as they spread a lot!
  5. Bake for 8-10 minutes, or until golden brown.
  6. Leave them to cool on the trays for a little before using a broad palette knife and lifting them very gently and carefully onto racks to cool. You won't be stack them so make sure you have plenty of rack space.
  7. If using the chocolate, break half the chocolate into a bain-marie and heat to 53°C. When it hits this temperature, remove from the heat and stir in the remaining chocolate (grated or chopped) and stir gently to melt until the temperature drops to 26°C. Using a sugar thermometer can be tricky for this (they're designed for high temperatures!) so if you think you'll do this more than once, a chocolate thermometer might be a worthwhile investment.
  8. Spread the melted chocolate over the base of each biscuit and leave to cool slightly before creating the signature zig-zag pattern using a fork. If your biscuits are sufficiently lacy you will end up with very chocolatey hands!
  9. Allow to set completely and then store in an airtight container.
https://eatingadelaide.com/mary-berrys-florentine-biscuit-recipe/

Chocolate Bourbon Biscuit Recipe

20140728_103029

Something of an ongoing discussion in our household is whether the king of biscuits is the chocolate bourbon or the chocolate digestive. Now, obviously, all right thinking people know and understand that it is indeed the chocolate digestive. A quick vox pop on my personal Facebook page (I have plenty of English friends) even confirmed this fact.

But Andy maintains that the bourbon is king and when I saw this recipe I figured it would be worth giving them a crack. Especially as I am yet to spot the ‘real’ deal in shops here in Australia.

This is another recipe that I would definitely call store cupboard. If you’re a regular baker you’ll have everything to hand and even those who make more intermittent efforts will probably find that the only thing that it’s necessary to source is the golden syrup.

The biscuit dough is quick to make (especially if, like me, you throw everything in a food processor!) but actually cutting out the biscuits, cooking them, allowing them to cool and then sandwiching them together takes a little while. This is even more so the case if you have a three and a half year old assistant …

The dough does need to be kept cool. Even on a cold day in our cold kitchen, I found that by the time was on the last lot of biscuits the dough was becoming difficult to handle. If you’re operating in warmer conditions, definitely keep the dough you’re not using wrapped in cling film in the fridge.

Rolling out the biscuit dough between two sheets of cling film is a great idea – it makes turning the dough very easy to do and you don’t have to worry about the mess (either on the bench or on the biscuits) created by flour.

The biscuits keep well but do start to soften a bit once you fill them. If you’re making them ahead, don’t fill them until you need them. The buttercream filling can be made ahead too – you just need to remember to take it out of the fridge to soften a bit. I had quite a bit of filling left over, so obviously I was far too stingy … but it is absolutely delicious on toast!

Chocolate Bourbon Biscuit Recipe

Ingredients

  • 110g unsalted butter
  • 110g light brown sugar
  • 200g plain flour
  • 1 tsp bicarb
  • 40g cocoa
  • pinch of salt
  • ~ 3 tbsp golden syrup
  • 150g icing sugar
  • 5 tsp cocoa
  • 75g unsalted butter
  • ½ tsp vanilla extract
  • 3 tsp boiling water

Instructions

  1. Preheat the oven to 170°C (convention) and line a couple of baking sheets with baking paper.
  2. To make the biscuits, cream the butter and light brown sugar. Add the flour, cocoa, bicarb and salt. Then add 2 tbsp of the golden syrup. If the dough does not come together then add another teaspoon or so. Process well between any extra additions as you don't want to add too much. The exact amount you need will depend on weather conditions and your flour so it is likely to change every time you make the biscuits.
  3. Tip the dough out onto the bench and bring it together in a ball. Divide the ball into four and, if it's warm, refrigerate 3 pieces, wrapped in cling film.
  4. Roll each ball into a long sausage and place between two sheets of cling film and roll out until 2-3 mm thick. Cut into biscuits (apparently a bourbon is 6 cm x 3 cm so that's the size you're aiming for) and transfer onto the baking sheets. You'll probably need the help of a palette knife (or other broad bladed knife). Allow space between the biscuits.
  5. A bourbon has 10 indents in it - use the blunt end of a bamboo skewer to create two rows of five impressions and then bake for 10-12 minutes. The biscuits will still be soft on top but will move on the baking paper.
  6. Sprinkle a little caster sugar on each biscuit while hot and gently press in with the back of a spoon.
  7. Allow the biscuits 10-15 minutes cooling on the tray before transferring to a wire rack.
  8. To make the buttercream filling, sieve the icing sugar and cocoa (or process well in a food processor). This is important: failure to do this will result in gritty buttercream. Even if you're using a food processor you need to process the icing sugar and cocoa really well BEFORE you add the butter.
  9. Add the butter, vanilla extract and water and process until you have a smooth, fluffy cream.
  10. Sandwich the biscuits with the cream and serve.
  11. They keep perfectly well filled for a couple of days. After that they do go a little soft but still taste spot on!
https://eatingadelaide.com/chocolate-bourbon-biscuit-recipe/