Sunbeam Snack Heroes Cake Pop Maker

IMG_2835

Disclaimer: Sunbeam sent me the cake pop maker to trial.

Sunbeam has recently rereleased the Snack Heroes range. For not very much money at all (they’re all under the $40 mark) you can choose from an icecream maker, an egg cooker, a chocolate fountain, a popcorn maker or a cake pop maker.

It’s an interesting mix of products because some are definitely ‘novelty’ whereas others are pieces of kitchen kit serious cooks are likely to pick up – particularly the ice cream maker. The cake pop maker, which I tried out, falls somewhere between the two.

As you may have noticed, I’m a reasonably keen baker but one thing I’ve never tried to make is a cake pop. I daresay you need to buy some special tin for them or something. And, of course, you need to decorate them and I think we all know how lacking my decorating skills are …

Luckily for me, the cake pop maker comes with some pretty detailed instructions and helpful tips. For example, dipping the stick into a little melted chocolate before pushing into the cake pop to make it more secure, and chilling the cake pops for 15-20 minutes before decorating to make them more stable. Really obvious things, but ones I wouldn’t have thought of.

There’s also a selection of recipes which is incredibly useful because they’re all in cake pop friendly quantities and they give you a good idea about the different types of cooking times you need. I tried the plain vanilla recipe. As a trusty helper, I had one very interested toddler.

I melted 75g of unsalted butter in the microwave and mixed in ½ cup caster sugar, 1 egg, ¾ cup of self raising flour, ¼ cup of plain flour, 1 tsp vanilla essence and ⅓ cup of milk. For a change, I did all of this by hand! Give the mixture a good beating – and depending on your enthusiasm for beating it may be worth your time to sift the flours.

With the cake pop maker preheated, I gave it a quick spray with a neutrally flavoured oil. I then spooned 2 tsp (yes, that’s right!) of batter into each hole (there are 6) and cooked for 4 minutes.

The timing given in the recipe is spot on and the cake itself was nice (always a good start). I found myself to be pretty incompetent when it came to those 2 teaspoons of batter … I think this is one of those things where practice makes perfect. Some of my cake pops were perfect and others kind of did a bit of exploring and came out looking like odd shaped flying saucers. Tidying them up is easily done: I just trimmed off excess cake when they were cool and you’d have never known how wonky they were initially!

One thing I did notice was that the external surfaces of the maker got very hot. You do end up having it on for quite a while (most of the recipes make ~ 30 cake pops, so you’re doing to be doing 4 or 5 batches) and it started to get uncomfortable to open it. To be fair, the very first page of the manual notes “The temperature of surfaces may be high when the appliance is operating”. That is very accurate! It’s also a bit of a shame because this is very much the type of thing people are going to want to use with their kids (in fact, the first thing that Andy said was “oooh, that will be a great thing to do with the toddler”) and older children are going to want to be involved in the opening and shutting. So just make sure you read the instructions and exercise some commonsense!

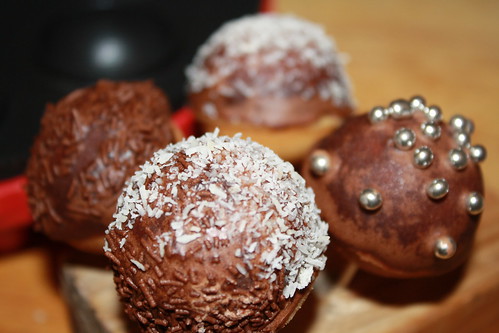
Cake pops tidied up, cooled and refrigerated, I set about decorating. This wasn’t actually as painful as I expected. I used toothpicks (NOT recommended if you’re going to be serving these to children!), balanced my cake pops in a strawberry container that had holes in the lid (! I think egg cartons would do well here too) and made a very simple chocolate icing (butter, icing sugar, cocoa and hot water).

You need to make your icing pretty thick and I experimented with dipping the cake pops into the icing, but I found that spooning it around them worked a lot better. I wasn’t going for full coverage – just enough to top them and cover up the seams (and any less than awesome trimming).

For decoration, again I found that dipping wasn’t ideal. I put the iced cake pops back into the strawberry container and sprinkled on the decoration. Chocolate sprinkles, dessicated coconut and some silver cachous. Of course, if you’re less lazy than me, you could do fancy things like pipe over a different coloured icing or do faces on them … For me, sprinkling was good enough and also meant that decorating them was a lot quicker than I expected!

So overall, the Sunbeam cake pop maker gets a thumbs up. It is easy to use, does the job and the recipes (or at least the one I tried!) work. It’s also quick. The only drawback I see is how hot it gets.

However, I think the best recommendation is that when I posted on my personal Facebook page that it had arrived one of my relatives immediately posted: “I have one and it is very good. All even in size and no hot spots like one may have in an oven.”

I guess now I just need to learn to decorate!

Banana Cake Recipe

Banana cake or banana bread? Who knows what the difference is? Certainly not me. It seems to be a bit of a geographic thing … if you’re in the eastern states of Australia (particularly New South Wales) it’s banana bread, similarly if you’re in the US or Canada.

Hopefully this family recipe will be what you’re after, whether you’re searching for a banana bread recipe or a banana cake recipe!

Now – the first thing you need is the time and the patience as baking is a tedious process. If you are not willing to put in the efforts, we highly suggest you buy your cakes online in Singapore by clicking here. Lets start with three super ripe bananas. The horrible ones that have gone all black. It can be tricky to score yourself three at the right level of super ripeness all at the same time BUT I have discovered that you can freeze bananas. All you need to do is take your super ripe banana and pop it in the freezer. You don’t need to wrap it or anything. When you want to use it, remove it from the freezer a few hours in advance (they defrost quickly) and place it on a plate or in a bowl. This is quite important because defrosting bananas lose quite a lot of water.

Make sure you peel the banana when it’s only defrosted a little bit (let’s say 15-30 minutes out of the freezer). Straight out of the freezer it will be too hard, and if you wait too long it will all be too gluggy and impossible to peel. When you’re ready to use the banana, drain off the water it’s lost and ignore the fact that it looks really really ugly and unpalatable!

For the cake, preheat your oven to 180°C (convection, not fan) and grease a 1lb loaf tin.

Beat together 125g of unsalted butter and 175g of caster sugar. If you have a food processor go ahead and use this! Add 2 eggs and beat well before adding 300g of self raising flour. This mixture will be quite stiff at this point.

Add your three overripe bananas, well mashed, and ensure the mix is well combined. Finish by adding 60mL (or ¼ cup) of milk, into which you’ve dissolved 1 tsp of bicarb. This will loosen the mixture up a little and you’ll be able to pour it into your loaf tin.

This will almost fill the tin – but don’t worry – you shouldn’t end up with cake mixture all over your oven!

Bake at 180°C for about 45-50 minutes. In our oven (which is a little slow on convection) it took 50 minutes. I actually started checking the cake around the 30 minute mark but at that point it was still very very wobbly. As usual with cakes, you want a skewer or toothpick to come out clean. And naturally, you want your cake to be lovely and golden.

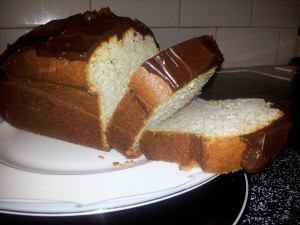
When done, remove from the oven, allow to cool for a few minutes and turn out onto a wire rack. When completely cool, top with chocolate ganache. You could also sprinkle a few chopped walnuts in a decorative line down the centre.

Perfect for afternoon tea … and using up bananas.

Two Tone Cheesecake

two tone cheesecake

I recently entered the Bikko’s Bake Off competition that was being run by Robern Menz.  I was very disappointed not to be one of the two lucky winners who will enjoying a day out with Robern Menz.  Congratulations to the choc mint cheesecake brownie and the dark chocolate salted caramel slice!

But everything has a silver lining and, in this case, it means I have a recipe all typed up and ready to go!  I was really happy with my photograph, too – quite a departure from my normal woeful efforts.

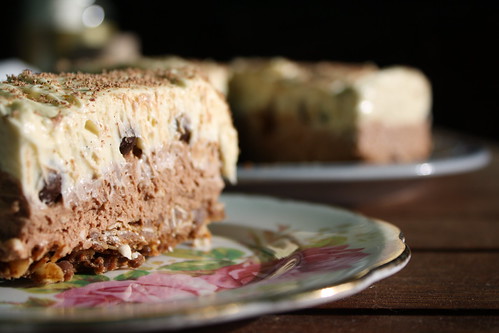
My creation was a two tone cheesecake:  chocolate and vanilla.  This was a bit of a departure from my usual cheesecake recipe, because I didn’t buy quite enough cream cheese.  However, I think this mix is better and it retains its two massive plus points:   no gelatine, so suitable for vegetarians and no eggs so suitable for those who don’t eat eggs.*

As it was a Bikko’s competition, my creation had to include Bikko’s, so I used milk chocolate ones in the base, and a layer of dark chocolate ones through the centre of the cake.

This is a set cheesecake so you do need to start it a little ahead of when you want to eat it!

Start with the base.

Grease and baseline a 23cm springform tin.

Coarsely crush 125g of milk chocolate Bikko’s and 50g of your favourite cheesecake base biscuits (I used gingernuts).

In a heavy bottomed frying pan, gently dry toast 80g of rolled oats.  Watch them carefully and as they start to brown, add 100g of unsalted butter (cubed, rather than in one big lump).  When the butter has melted, add the crushed Bikko’s and biscuits and stir for a little so the chocolate on the Bikko’s starts to melt too.

Gently press the mixture into the base of the tin.  The more firmly you compact down the biscuit base the harder it’s going to be and, while you want it to hold together, you don’t want people to be breaking their teeth.  I find that the quantities given above provide exactly the right amount for the base.

Place the tin in the fridge and start work on your filling.

I put the chocolate filling on the bottom, so that’s next.  Beat 300g cream cheese with 50g of sour cream until smooth (if you have a stand mixer, use this – the colder the cream cheese is the longer it will take to get it smooth but it’s worth it).  Mix in 75g of caster sugar.

Melt 100g of best quality dark chocolate (either in a bain-marie or in the microwave), allow it to cool slightly and stir into the cream cheese mix.

Whisk 150mL of cream (reasonably firm peaks, but not butter!) and fold this into the cream cheese mix.

Spread this mix over the cooled and set biscuit base.  Level it off and cover with 125g of dark chocolate Bikko’s, lightly pressing them into the mix.  Return to the fridge to set (at least an hour).

Now make the vanilla mix.  This is essentially the same as the chocolate mix but use 1tsp of vanilla bean paste instead of the 100g of chocolate.  Spread this mix evenly over the Bikko’s layer and return the cake to the fridge to set (again, another hour at least).

When ready to serve, grate over dark chocolate and job’s a good’un.

*Note that if you want to make the whole cheesecake egg free you need to choose your biscuits carefully.  Anzac biscuits (homemade) are an excellent egg free base material.