Chicken Biryani

IMG_3393

Usually we do a really good job of our menu planning but the last couple of months the ball has been rather dropped. However much work doing a meal plan on a Saturday afternoon is (not a lot) it’s a lot less work than getting to 4pm on a Thursday and realising that the toddler needs to be bathed and fed and some shopping needs to be done and … I have no idea what to cook for dinner.

So it’s time to get back in the routine which has kicked off this week. To help both myself and other hungry families, I’ll be publishing a meal plan each Saturday morning (in time for the Saturday shop hopefully!) – more details this Saturday when the first one appears. You’d better make sure you’re following Eating Adelaide on Facebook or subscribed to the email updates!

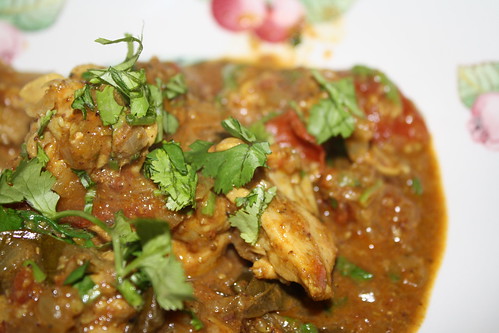
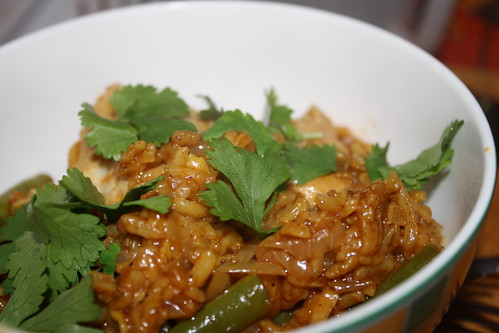
This week’s meal plan had to have something easy for Monday dinner because Monday’s moments of spare time would be spent cooking the pie filling for Tuesday’s dinner. Andy in particular loves biryani and so this (almost) one pot recipe hit the nail on the head.

The supermarket I went to didn’t sell any biryani paste (it did sell a jar of biryani stir through bake stuff but that all started to sound a bit too pre-made for me!) so thanks to a combination of the internet and what we had in the drawer, we made our own.

The finished product was an absolute HIT – with everyone, including the toddler. As is almost always the case with these things, we found that the cooking time was almost double what the recipe specifies … But that aside, this is a very easy recipe that is hearty and filling. Yes, you do need to have your oven on for a while – so choose a cooler day if you’re in the southern hemisphere and things are starting to heat up.

Chicken Biryani

Ingredients

    Biryani Paste
  • 3 tbsp canola oil
  • 1 tsp onion flakes
  • ½ tsp ground ginger
  • ¼ tsp turmeric
  • 1 tsp cayenne pepper
  • ½ tsp ground coriander
  • 1 tbsp tomato paste
  • ½ tsp salt
  • 1 tsp garam masala (we used my mum's spicy Sri Lankan curry powder)
  • For the Biryani
  • oil
  • 1 tbsp ghee
  • 3 large chicken thighs, skin on or off
  • 1 onion, finely sliced
  • 1 clove of garlic, crushed
  • 175g basmati or jasmine rice
  • small handful of flaked almonds
  • ~ 500mL vegetable or chicken stock
  • generous handful of green beans, cut into chunks
  • fresh coriander for garnish

Instructions

    Biryani paste
  1. To make the biryani paste, mix all the ingredients together and set aside.
  2. Biryani
  3. Preheat the oven to 180°C (160°C fan).
  4. In an oven proof dish, heat the oil and ghee and brown the chicken thighs. Remove and set aside.
  5. Add a little more oil to the pan and soften the onions and garlic.
  6. Add the biryani paste and stir though, cooking for a few minutes.
  7. Add a little more oil, and then add the rice. Stir the rice through, ensuring it is well coated with the spice mix.
  8. Add the almonds and stock. I use the little pots of jellied stock and boiling water. Return the chicken to the pan and ensure that there is enough liquid to cover the rice.
  9. Cover the pan tightly with til foil and a lid (if you have one) and place in the hot oven.
  10. After around 20 minutes, check progress. You may need to add more hot water and give it a good stir.
  11. After another 10 minutes, stir through the beans and add more liquid if required.
  12. Return to the oven until the beans and rice are cooked.
  13. Stir through some chopped coriander leaves and maybe some more almonds.
https://eatingadelaide.com/chicken-biryani/

Chicken, Ricotta and Lemon Pie

IMG_3236

If you are trying to be healthy, filo pastry is an excellent way of having pastry and feeling virtuous – all at once. It IS a pain to work with – no matter how beatific TV chefs look while they’re using it, cheerfully advising to cover it with a damp tea towel. Generally I find we open a packet, don’t use it quickly enough and it becomes a troublesome flaky and yet in patches gooey horrid mess.

I suppose the moral of that story is to use it more often.

The recipe I posted for Jamie Oliver’s spinach and feta filo pie is one of the most popular on this site. And as popular as it is in our household, variety is always the spice of life.

This pie will not only help use up that pesky filo, but contains meat (chicken), so it satisfies those who aren’t keen on a high vegetarian meal count!

It received a thumbs up from all and so will definitely be on the menu again.

Chicken, Ricotta and Lemon Pie

Chicken, Ricotta and Lemon Pie

Ingredients

  • 1 packet chicken thigh fillets (there are usually 6 in a packet and ~ 500g)
  • 250g frozen spinach
  • garlic (to taste) - I used a couple of cloves
  • chopped rosemary or thyme (fresh is best, but use dried thyme as a substitute, dried rosemary is horrible)
  • zest of 1 lemon
  • 6 eggs
  • 100g ricotta
  • filo pastry
  • olive oil

Instructions

  1. Defrost spinach in microwave and then dry fry in a hot frying pan, to evaporate the water. Set aside.
  2. Preheat oven to 220C (conv, 200C fan).
  3. Chop chicken into bite size pieces and place it in a bowl with some olive oil, the chopped garlic and chopped herbs. Season with salt and pepper. If you have time, set aside for half an hour.
  4. Heat a large, oven proof frying pan. Brown the chicken: do this in two or three patches so the pan stays hot and the chicken takes colour. Remove the chicken from the pan and set aside in a clean bowl.
  5. Wipe the pan out with a paper towel. Working quickly, brush the pan with olive oil and start layering the filo. Brush each layer of filo with olive oil. You will need about 6 or 7 layers. If you have the filo overhanging the pan you can fold it over the filling to make a pastry lid.
  6. Add the chicken to the pan, reserving the juices.
  7. To the juices add the lemon zest and eggs. And then beat in the spinach.
  8. Pour this mix over the chicken and scatter over the ricotta.
  9. Fold over any overhanging pastry.
  10. Cook on a medium heat on the stove for a few minutes before placing in the hot oven.
  11. Bake until filling is set. This took about 40 minutes (in our normally very fast oven). If the filo pastry starts to brown, cover lightly with either baking paper or tin foil.
  12. When the filling is set, remove from the oven, cover and set aside for 10 minutes. This makes it much easier to remove the pie from the pan.
https://eatingadelaide.com/chicken-ricotta-lemon-pie/

Anjum Anand’s Punjabi Chicken Curry Recipe

Punjabi Chicken Curry

A brief spate of cool weather saw us thinking about fitting in a curry. Andy initially wanted a lamb curry but we’d had arni souvlaki earlier in the the week so we ended up opting for chicken.

I chose this recipe, from Anjum’s New Indian, mainly because we had the ingredients all in house and ready to go. I’m not sure if Anjum Anand’s shows have made it on to Australian TV, but she did some fun programs in the UK where she showed curry enthusiasts that it was just as easy to cook a curry from scratch as it is to open a jar.

While this recipe doesn’t require a lot of cooking time for the meat, it does require time and it lends itself really well to being something you prep in the morning. Try throwing it together when you get home from work and you’re tired and hungry and I doubt it will turn out as well.

Begin by making a paste of about 1 tsp of crushed ginger, 5 cloves of garlic and a little water.

Next, take 2 black cardamom pods, give them a whack and put the seeds into a mortar. Add 2 cloves and grind and then mix in about ½ tsp of ground cinnamon. The black cardamom seeds smell amazing: they have the anise notes you’d expect but also a really strong menthol character. As in, really really strong. Make this curry if you have a cold!

In a large pan (in my case, the wok) heat some peanut oil, add about 20 curry leaves (washed and dried) and 1 onion, finely chopped. Anand uses a bay leaf but we have a curry leaf plant and I love the smell of them.

Now, boring part number one. Cook unti the onion browns. This takes ages. Don’t make the mistake of whacking up the temperature, because all that does is burn the onion. You need a medium temperature and you need to hang around and stir the onion so that it browns evenly. This part of making a curry bores me to tears but it is also well worth it.

When the onions are brown, add the garlic and ginger paste and, in my case, one dried Kashmiri chilli. Anand uses fresh, whole green chillis that you prick all over. But, as with the curry leaves, we have the dried chillis coming out of our ears so that’s what got used!

Cook this for a few minutes and then add your chicken. I used chicken thigh fillets (about 400g), cut into generous mouthful sized pieces. Anand always recommends using joints. Yes, the bones do mean flavour but generally I’m pretty lazy and thighs at least have more flavour than breast fillets. They’re also less likely to dry out.

Brown the chicken and then add the spices: 2½ tsp ground coriander, 1 tsp ground cumin, a pinch of red chilli powder (to taste, really), some turmeric and about 1 tsp of garam masala. And, of course, the cardamom, clove and cinnamon mix. Also add a good pinch of salt. Stir, and add three smallish tomatoes, cut into wedges. Top up the pan with some water and bring to the boil. Reduce the heat, cover and cook for a further 15 minutes.

Uncover the pan and increase the heat to high to brown and reduce your sauce. This is boring bit number two, but not as bad as the first as you don’t have to hang around quite as much. But you do really need to let it cook slowly for a while with the occasional stir. Suddenly you’ll notice the sauce has thickened and darkened.

When you’re ready to serve, mix through a generous handful of chopped coriander. Instead of rice, we had homemade naan bread. Delicious, and absolutely worth the hanging around and stirring!