date of visit: Saturday 1 August 2015
A couple of months back we were driving down Goodwood Road for some reason and spotted Sumac Cafe. After dark it’s a bit hard to miss – the windows are rather boldly edged with brightly coloured fairy lights making it seem, at first glance, rather less like a cafe.
As we’re both big fans of middle eastern food it went on the ‘to-do’ list and we almost made it there a month or so ago but some really feral weather put us off driving ‘too far’. Last weekend, there was no excuse.
We’d done our research and knew that Sumac was open all day, so our need to eat early wouldn’t be a problem. Even so, when we we arrived there were still quite a few tables occupied.
While the cafe feels quite large and spacious there’s not actually that many tables so if you were wanting to eat at a more sensible time than 5:30pm I’d recommend booking.
Everything is very casual – the menus are laminated and you order and pay at the counter and receive a table number. There’s a fridge for drinks and a water fountain. The cafe is unlicensed so don’t head along expecting a beer!
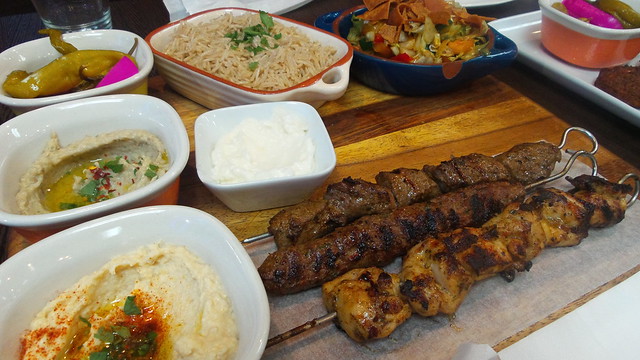
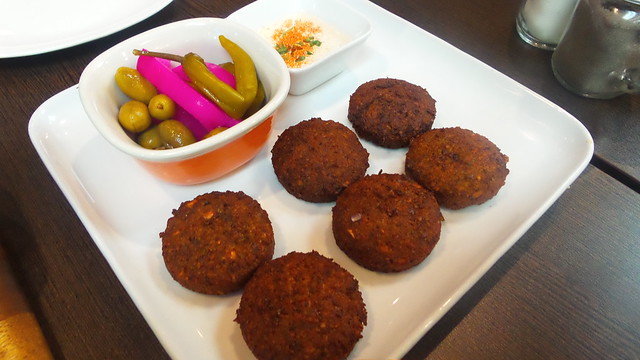
The menu is not excessively long and most of the options are based around platters, so this is an ideal venue if you like sharing your food. For any conservative eaters, there are burgers, and there are also middle eastern style pizzas, flavoured with things like za’atar. There are a few pictures on the menu so Master 4 decided he wanted the felafel plate ($9.90 for 6 felafel, pickles and tahini) while we chose the kebab/shaslik platter – $21.90 for one each of chicken, lamb and kofta kebabs, served with rice, salad (choice of fattoush or tabouleh), pickles, babaghanoush, hummous and toum. Of course, you also get pita bread on the side.
The food came out reasonably quickly – the grill is open to the restaurant so you get an excellent idea of what’s currently being cooked and how far off your food is. Obviously, it was not quickly enough for Master 4 (any tips on how to stop your four year old bellowing “Where’s my food?” greatly appreciated!) but when it arrived it was all hot, fresh and delicious.
For me, the revelation of the meal was the toum. Perfectly white, slightly lumpy in appearance, this is one ferociously garlicky sauce. To say it is like aioli is not really fair because aioli has eggs in it and toum is all about the garlic. It is basically garlic and oil. I don’t know whether toum is a peculiarly Lebanese thing or not – I’ve never knowingly had it in other middle eastern countries (and I’ve never been to Lebanon) but certainly, if you believe the internet, the Lebanese lay claim to it. Now I’ve discovered it, I don’t really care. After scoffing an unfair proportion of that served to us (unfair in both that I deprived Andy of a 50% portion and then breathed all over him!), I announced that it would be perfect on a big slice of bread or toast. It really is that good!
There were other things on the plate – the kebabs were all delicious, the fattoush was good (lots of crispy bread on top – yum!) and I also liked the lightly spiced rice and the hummous. Babaghanoush I never like (I did try it, I promise!).
The pickles were also tasty – pickled chillis that weren’t too hot, olives and some alarmingly bright pink pickle which I have since discovered is turnip and beetroot. It was really crunchy with a relatively neutral savoury pickle flavour. At the time, we couldn’t pick what it was.
We probably didn’t order quite enough food because of course we had to share our kebabs and rice (in particular) with Master Four who only reluctantly let us try his felafel (and only once he had established he was completely full). There was a family platter on offer and I think that might have been a better choice – something we can try out next time we head there!
Because I love middle eastern desserts and pastries we decided to investigate dessert – something of a rarity for us. I was really disappointed that the only desserts (or sweet things) on offer were all decidedly western European. Custard tart, cannoli, muffin? I asked about baklava and was told that they had sold out. I think that’s a bit of stock control that needs redressing – if you’re out of baklava at 6:30pm on a Saturday night the chances are there will be a few unhappy customers later in the evening.
One thing to be aware of – the cafe is also home to three massive TV screens. I don’t know why people do it. There was no sound, but TV screens are these horrible, horrible things that magically suck everyone into gawping at them and they have no place in a cafe or restaurant.
TV screes and fairy lights aside – we’ll definitely be heading back to Sumac and we left feeling it was quite a shame we didn’t live in the area so we could also make use of the takeaway side of the business!
Sumac Cafe
576-590 Goodwood Road
Colonel Light Gardens SA 5041
phone: 08 8177 1458