Adriano Zumbo’s Salted Caramel Macarons

IMG_3311

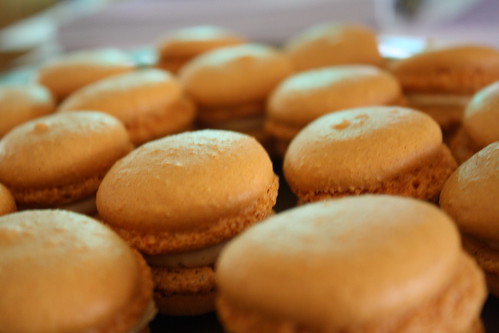
At the beginning of August I went to a fortieth birthday party. When the ‘cake’ appeared it was a big ziggurat of macarons. Everyone tucked in and amongst my group of friends, it was decided that the pale brown ones tasted just like a Golden Gaytime. If you’re not Australian you’re probably thinking “wtf?” right about now.

A Golden Gaytime is an icecream: it’s an awesome icecream. It’s vanilla icecream with some caramel and some little crunch biscuit bits and chocolate. They rock. The Golden Gaytime is my number one icecream (followed by other Australian icons such as Paddle Pops, Splices and Eskimo Pies). If you live in Australia and you haven’t tried one, the next warm day nip to your local deli and buy one!

Me, being me, I ate about 4 of these macarons at the party and a couple of days later emailed the birthday boy, asking for his friend’s recipe.

The response surprised me: they were Adriano Zumbo’s packet mix salted caramel macarons.

Now I’ve never made macarons before so I thought that providing the packet mix did not contain too many scary sounding ingredients (which it doesn’t, but there are some artificial colours and flavours), I’d give them a go. My resolution firmed when I spotted the packets at $2 off in a local supermarket! Always the bargain hunter, me!

I made them for our family Father’s Day lunch. I made the macarons themselves on Saturday and filled them on Sunday, although the little macaron bible I own suggests filling them a day in advance for flavours to mature.

On opening the box there is a packet of meringue mix, a packet of almond mix, a packet of caramel for the filling, a template and 2 disposable piping bags. All you need to have to hand is some butter and water.

The instructions on the back of the box are very clear and indicate where the tricky stages in the process are. There are videos on the Zumbo website to help you out too. Timing is ambitious (prep time 10 minutes, baking time 36 minutes – trust me, you won’t be finished in 46 minutes) but other than that, the instructions (which I did actually follow!) do the job.

You start by beating the macaron mix with water until aerated and stiff. Then you fold in the almond mix and give it a bit of a beat and then you pipe this onto baking paper (you can use the template provided, or download one from the website, or you can pipe freehand), and bake trays separately for 14-18 minutes. In our oven I found 14 minutes just about right.

The piping is pretty critical – if you pipe at an angle you’ll end up with lopsided macarons. So you need to pipe from above. It was really obvious (to me) which macarons I’d piped first!

You rest the macarons before baking to create a skin and, when you remove them from the oven, you slide them straight onto a cool surface and leave to cool on the baking paper.

To make the buttercream filling you just beat the caramel with some butter and add some salt flakes if you wish. You then pipe the buttercream into the macarons and sandwich together.

It is actually that easy. I would have to say though that the outcome of the exercise is not that I feel that I must rush out and buy more of these. While I’ll definitely be cooking macarons again, I’ll be cooking them from scratch.

The other thing I learnt? Well, disposable piping bags are absolutely the way forward. In the past I have wrestled with a reusable cloth piping bag which is hard to manipulate and even harder to wash. Never, ever again.

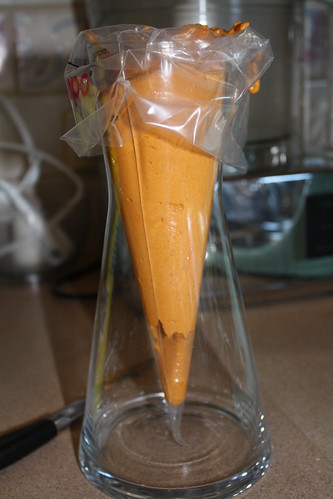
Finally – my tip for easy piping bag filling. Stand the piping bag in a tall container, folding down the edges (see the picture). This leaves you with two hands free for the filling and ensures the bag stays upright, open and doesn’t collapse and spill all over your counter.

IMG_3303

WIN! Paul Newman’s Own Aioli

Paul Newman Aioli

Disclaimer: I was sent the two new aiolis to try and Paul Newman’s Own has supplied the prizes.

I know that if you turn on a cooking programme on tv you’ll see a chef/cook/contestant whipping up mayonnaise or aioli in a matter of moments. And I’m pretty sure that most people don’t actually do that at home. We don’t do that at home. And do you know why?

Because when we want mayo or aioli we usually want such a tiny amount that the effort to make our own just never feels worth it. Plus, the whole point of having a BLT for dinner is minimal effort!

Paul Newman’s Own has just introduced two new aiolis to sit along its plain aioli: basil and black pepper and smoked paprika. The first thing I was impressed to note is that the products are made with the same things that you or I might use: oil, egg and no artificial flavourings.

Paul Newman’s Own is also a not for profit entity: all profits go to the Newman’s Own Foundation and they are then distributed to charities in the regions where the products are sold. So when you buy any of the products you can be confident that the profits will be directed back to charities in Australia, if not South Australia.

Last year, for example, the Foundation’s focus areas were children with life-limiting conditions and (fittingly, for a food company!) nutrition. South Australian charities that benefited were: Australian Cranio-Maxillo Facial Foundation, Day of Difference Foundation, Down Syndrome Society of SA and The Epilepsy Centre. (Check out the website for the full list of Australian 2012 recipients).

However, all these warm and fuzzies are just a bonus – they’re not the thing which will get you buying the products in the first place. That all comes down to taste.

I was sent jars of both the basil and black pepper and the smoked paprika aiolis to try out. The basil and black pepper aioli had an outing on the lazy Sunday night dinner: the BLT, while the smoked paprika I used to make a very quick and simple celeriac remoulade.

BLT

admittedly, this could be any random BLT … but trust me, it has aioli in it!

Of the two, I definitely preferred the smoked paprika aioli. This had a stronger flavour all round and definitely a stronger garlic flavour. The basil and black pepper was very subtle on the BLT (maybe I’m too stingy!) but tasted on its own, the fresh basil flavour does come through.

Paul Newman Aioli

For the remoulade, I simply chopped the celeriac very finely, put it in acidulated water and, after draining it, mixed through the aioli. This is a very easy way of doing remoulade and you could complicated it by mixing through a little sour cream or crème fraîche, or some mustard – but the beauty of the smoked paprika is that you don’t need to do any of that.

I also thought that both would work really well as a dip on a plate of crudités. They’re very pretty colours and the garlic is not overpowering.

If you’re interested in trying the new aiolis, you don’t even have to head to the shops. Paul Newman’s Own has FIVE prize packs (one of each aioli in a cute bag) for Eating Adelaide readers.

Entry is easy – just use the Rafflecopter entry form below*.

a Rafflecopter giveaway

*Ts&Cs:

You must be resident in Australia (and have an Australian postal address).

The only mandatory task is liking Eating Adelaide on Facebook.

Winners will be contacted by email, and published on the Eating Adelaide Facebook page. They will need to respond within 48 hours, otherwise I will redraw.

Product Review: Masha and a Recipe for Batata Vada

Batata Vada

Disclaimer: I was sent the Masha to review.

So, I think we all know that I love my kitchen gadgets. I blame working in small electrical in a local department store while at university. I’d come home with all manner of toys and I’m adamant that there’s plenty of room in my kitchen for more time saving goodies.

When it comes to mashed potatoes I am pretty picky. They have to be hot, hot, hot, laden with butter (and cream) and pepper and totally smooth. Now mashed potatoes are not something where there’s too much room for time saving. Despite the fact that you will often see people on cooking shows on tv throw the cooked potatoes into a food processor this is a MASSIVE no no. Cutting the potato messes with the starch and produces a gluey, claggy mess. So any time saving device needs to address this.

Now a good way of ensuring very smooth mashed potato is to use a potato ricer. This is something you should always use for potatoes for gnocchi but when making mash just a single pass through the ricer results in a slightly grainy finished product (no matter how much fat you through at it!). Multiple passes through the ricer obviously take more time, but also require more containers (and hence washing up). Mashing using a traditional masher takes ages, is inconsistent in its results and requires a lot of elbow grease.

So enter the Masha. A kitchen gadget which claims to produce perfectly smooth mash, in seconds, without over processing the starches.  Rather than chopping, it has a blunt blade and a perforated cage.  The blade pushes the potato through the cage, thus extruding (I love that word!) it, rather than chopping it.  In many ways it’s like a turbo charged ricer.

I boiled up about 5 or 6 potatoes (we are, after all, only 2 and the toddler pretty much refuses to eat mash), cut into small cubes to cook quickly. I drained them, returned them to the pan over the heat for a quick dry off and then took them off the heat and plugged in the Masha.

I am not joking when I say that I was gobsmacked by how fast the Masha did the job. For someone who usually spends at least 10 minutes ensuring that every lump is well and truly gone from the mash (yes, I might be a little OCD), the fact that I had a pan full of seriously smooth creamy potatoes in less than 30 seconds was a whole new experience.

Because I was making the mash for the following recipe, I hadn’t added any fat, so I had a bit of a prod, poke and taste and decided that maybe there was just a touch of the slightly elastic about the potatoes. Interestingly, this disappeared as the potatoes cooled and, after I gave them a good beating with a wooden spoon, they were really quite light and fluffy. Might be something worth keeping in mind. Andy felt sure that had I anointed them with a ton of butter and cream I would never have noticed.

The Masha is very easy to clean. The plastic blade is easy to take off and, provided you give it a rinse straight away (cold, dried mashed potato is second only to cold, dried out Weetbix in its concreting properties) the Masha cleans easily. I also loved the fact that the main unit has a green light which stays on while the unit is plugged in and powered. While it was somewhat startling to walk into a dark kitchen and be greeted by a glowing green light it was a brilliant reminder to unplug the Masha and put it away.

Naturally, the Masha can be used to mash anything that needs mashing. I guess where I’d advise caution is if you’re producing something where you want some texture as I imagine it would be very easy to over mash. Naturally, if you are someone who makes mash often, or needs to make it in large quantities, I’d suggest that the investment in a Masha is going to be more than worth it.

As a parent, I note that the one of the Masha’s suggested uses is for baby food. The amount of time that parents are advised to give their babies completely smooth purees is very limited. Lumps are very important for little people as they need to learn to chew, so don’t go crazy over mashing, just because you have a new toy!

Batata Vada

To make something a bit more interesting out of our mash, I decided to try my hand at making my own version of batata vada, an Indian street snack. This is basically mashed potato, battered and deep fried. Serve immediately – super hot, with plenty of salt. If you’re organised, some mint chutney on the side would be great. These are much quicker to make than pakoras. And of course, you should use my recipe as a starting point: just use the spices you love in the quantities you love!

Batata Vada

Yield: 12-18

Ingredients

    Potato Mix
  • 5-6 potatoes, peeled, cubed, cooked and well mashed
  • 2-3 tbsp ghee (use unsalted butter or a neutral cooking oil as a substitute)
  • 10-20 curry leaves
  • 1 tsp cumin seeds
  • 1 tsp ground coriander
  • 1 tsp black mustard seeds
  • 1 tsp garam masala
  • 1 red chilli, finely chopped
  • salt
  • Batter
  • ½ cup besan flour (gram flour, chickpea flour)
  • ½ tsp turmeric
  • pinch bicarb
  • salt
  • cold water
  • Oil for frying.

Instructions

    Potatoes
  1. In a small pan, heat the ghee. When it is melted and hot add the curry leaves, cumin seeds, coriander and black mustard seeds and fry until the mustard seeds start to pop, everything is sizzling and the aromas are all being released.
  2. Stir this mixture into the potato. Combine well.
  3. Add the garam masala and chilli to the potato mix and add salt to taste. If you want to jazz the potato mix up even further, add a generous teaspoon or so of your favourite (homemade, of course!) curry powder.
  4. Don't go too crazy with the flavourings, as they will intensify on frying.
  5. Batter
  6. Mix the besan flour, turmeric, salt and bicarb together in a bowl. While whisking, add cold water slowly to create a batter of medium thickness. You want a batter which is thicker than crêpe batter but not as thick as fish and chip batter. You will probably need between ½ and 1 cup of water. Better to have the batter too thick initially and thin it down as you go.
  7. Heat the oil.
  8. Take a tablespoon of the potato mixture, roll it into a ball, flatten it slightly and dip into the batter. Ensure the potato patty is well covered. Place it in the oil and cook until the batter is puffed and golden.
  9. If the batter is too thin you'll have gaps in it and it will go soggy quite quickly. You'll also find it goes soggy if you don't cook it for long enough. Generally you need to do a little bit of experimenting but this gives you the opportunity to adjust the seasoning or spicing of the finished product!
  10. Drain the batata vada on kitchen towel and serve immediately.
https://eatingadelaide.com/product-review-masha-recipe-batata-vada/