Chocolate and Pistachio Brownies

chocolate & pistachio brownies

It’s been a long time between brownie recipes, hasn’t it? I think the most recent effort was back in June with a good but very sweet batch.

This recipe comes originally from The City of London Cook Book (a book that sounds pretty cool to me!) but I actually found it on the UK Marie Claire site.

Before starting on this I was a bit nervous because of the HUGE amount of sugar involved (brace yourselves – it’s in excess of 500g). However, as I was baking these brownies for a BBQ I figured I wasn’t going to have to eat too many of these myself.

Begin my melting 255g of dark chocolate with 255g of unsalted butter (as always, this happened in the microwave). I omitted the vanilla essence – I’ve decided it’s pointless in chocolate brownies.

Add 280g of caster sugar and 280g of soft brown sugar to the chocolate and butter mix and melt again (also in the microwave for me – but now you’ve added the sugar be sure to be extra vigilant!).

After this stage, I transferred the mixture to the KitchenAid and added the 5 eggs, one at a time, beating well between each egg. If your chocolate mixture is quite warm I’d allow it to cool a little before adding the eggs – you don’t want them scrambling!

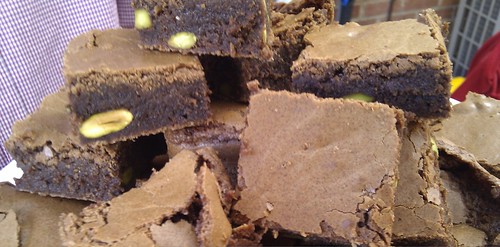
Once the eggs are well incorporated, add 280g of plain flour, 2 tsp of baking powder and a pinch of salt. Mix well before gently mixing through 80g of (shelled, and NOT salted) pistachios.

Pour the mixture into a base lined tin and baked in an oven preheated to 170°C (conventional, not fan) for 30-45 minutes. The top should be crisp, the cake mixture shouldn’t be wobbly, but a toothpick inserted should come out a bit cakey. You most definitely don’t want dry brownies.

Allow to cool in the tin (they will collapse a little) before cutting and serving.

These were a big hit – and were rated almost as good as the exceedingly popular caramel brownies. By “almost as good” I mean that there was no audible complaining about a different recipe.  I thought these brownies had a much better crust and they were super fudgy – no doubt due to all that sugar.

What’s also great is that even though there’s a relatively small amount of pistachio in this recipe, the flavour really goes through the whole brownie, giving it quite an exotic twist.

This is most definitely a brownie recipe I will revisit – but only when baking for a larger number of people.

Of course – you can check out the full brownie collection if you need more inspiration.

Easy Pork Fillet Recipe

Untitled

Pork fillet is one of my favourite cuts of pork. That is despite the fact that it has no rind. It’s easy and quick to prepare and usually retains a degree of moisture that will disappear in other cuts with sloppy cooking (although see my recent pork chop post for a way of avoiding that problem!).

I’ve previously blogged a pork fillet recipe, where the meat is served with a white wine and cream sauce. This time I give you something which is very much a one pot meal – it’s both easy and easy on the washing up.

This Rose Prince recipe comes from the Telegraph where it’s called “peppered pork fillet”. That’s because in the UK what we in Australia call a “capsicum” is called a “pepper” – not because this is a spicy dish.

Begin by preheating your oven to 180°C (fan, 200°C convention).

In an oven safe frying pan, heat some light olive oil and fry up about 500g of pork fillet. The original recipe says to cut the fillet into small dice but I cut it into discs a cm or so thick. I think this way you run less risk of the meat overcooking and you get satisfying pieces of meat on your plate. I also note that in the photo that accompanies the original article the pork hardly looks like small dice!

When the fillet is browned nicely, add half a red capsicum, finely chopped, a clove of garlic (chopped) and a pinch or two each of paprika, ground coriander and allspice. Give this all a stir around, then add 5 tbsp of risotto rice (the recipe specifies Carnaroli, but I always use Arborio because that’s what I have in the cupboard). Then add stock to the pan – I use one of the little pots of stock jelly and top up with water. You need add enough water to cover the rice by a cm or so.

Bring this all to the boil, then turn down to a simmer and cook on the stove top for 8 minutes (and yes, I do actually time this!).

When the 8 minutes is up, cut a cartouche from baking paper (that means “cut a circle of baking paper to cover your pan”) and cover the pan with it (no lid required) before putting it in the oven.

Cook in the oven until the rice is done and the stock has been absorbed. The recipe says 10 minutes, but I never find that quite long enough (more like 25!) – but I do like to make sure plenty of the stock has been absorbed so that the finished product isn’t too soupy.

Serve straight away, with a squeeze of lemon and a drizzle of olive oil.

I love this dish – it uses so few ingredients, it tastes fantastic (which suggests to me that allspice is underused in my kitchen) and it takes very little time to put together. I have used other cuts of pork – such as pork loin steaks – and while they will do in a pinch they do end up a bit tougher and drier than fillet.

A perfect mid week supper.

Xinjiang Lamb Recipe

Untitled

A super quick and easy recipe that I’ve had earmarked for ages. This lamb recipe is perfect for the BBQ – so definitely keep it in mind as the weather warms up.

The recipe comes from the New Zealand Herald, and I had no idea who/where/what Xinjiang is. It transpires that it’s a region in north west China that’s home to many ethnic groups, but the Uyghur make up roughly 45% of the mix. Given how much we enjoyed the food at Tangritah Uyghur back in 2010 (hmmm, really must go back there), it’s no surprise that we both thought this recipe was top notch.

You do need to start this a day ahead, to give the lamb time to marinate. But other than that, this is insanely easy and quick.

Begin with approximately 1kg of lamb shoulder, cut into bite sized cubes. In a bowl, mix 2 tbsp ground cumin, chilli flakes to taste (the recipe calls for 1 tbsp, but perhaps the chilli flakes in NZ aren’t quite as hot as they are here …), 1 tbsp of black pepper (freshly ground is always best), 2 tsp of ground ginger and, if you have it, 1 tsp of ground Sichuan pepper. We couldn’t track this down in a hurry (which means the supermarket didn’t stock it) so left it out and I don’t think we missed it at all. Perhaps with it dinner would have tasted even better!

Add 4 tbsp of peanut oil, 4 tbsp of soy sauce, 4 cloves of garlic, minced, and salt to taste. Toss the lamb through the marinade, ensuring every piece is well covered and then refrigerate overnight.

The recipe is a bit more exacting about what to do and the order in which to do it. I had already cut up the meat and dumped it in a bowl, and Andy just mixed all the marinade ingredients through the meat – so assemble it whatever way suits.

If you’re going for the kebab look, soak bamboo skewers in water for at least an hour and then thread on the lamb and grill. We couldn’t be bothered and were going to just BBQ it until we discovered we were out of gas! So we ended up pan frying the lamb – which worked a treat except you do need an industrial strength extractor fan, otherwise your house will end up smelling like a lamb frying factory.

We served the lamb with spicy fried potatoes and some steamed vegetables. It would work just as well in a wrap with a yoghurt sauce, or served with a couscous salad.

We had a ton of leftovers (although not as much as you might expect!) and it turns out that the meat is almost as delicious, the next day, straight from the fridge!