More Chocolate Brownies

chocolate brownies - gluten free

Here we’re gearing up for the baby’s first birthday which means thinking a LOT about the catering for his afternoon tea party. As the baby will be unaware of the significance of the event, and most likely a bit annoyed that strange people have turned up in numbers to interrupt his afternoon play, the party is all about what I like to eat. That’s why it’s afternoon tea.

One of my relatives is a coeliac (or celiac, if you’re American) and I actually find it rather fun to try out recipes that she’ll be able to eat. It’s actually surprising how easy gluten is to work around. However, one thing I haven’t investigated too much is gluten free baking – dessert wise there’s loads of things you can do without gluten so I’ve just never bothered.

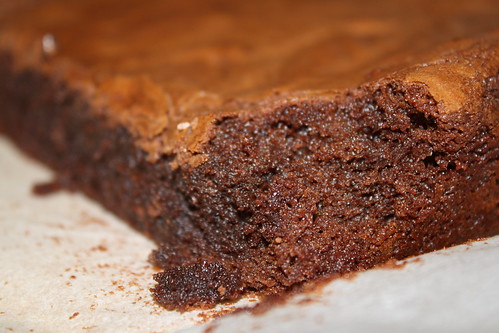
I have hundreds of baking recipes tagged in delicious and I thought it was time I made a departure from what has become my standard caramel chocolate brownie. I had a recipe from the Gluten Free Goddess tagged, but realised it wouldn’t do on several counts (the coconut oil, the measurements in cups, the huge amount of vanilla). Karina had based her version on a reader’s version and, after some sums, some substitution and some tasting during production I came up with this very easy, but also very tasty, recipe. The finished brownie is super squidgy in the middle and has a crisp crust which manages at the same time to be chewy.

The best compliment came from Andy who commented “well, you wouldn’t even know they’re gluten free”.

Preheat your oven to 180°C (or 160°C fan).

Melt 150g dark chocolate with 100g of unsalted butter. If you are aiming for dairy free as well as gluten free, I suppose you substitute a dairy free spread here. And, as always, I did this in the microwave.

Into the trusty KitchenAid went:

150g dark brown sugar
2 tbsp cocoa
50g ground almonds (almond meal)
50g rice flour*
1 tsp baking powder

Beat all of this with 2 eggs before adding the melted butter and chocolate.

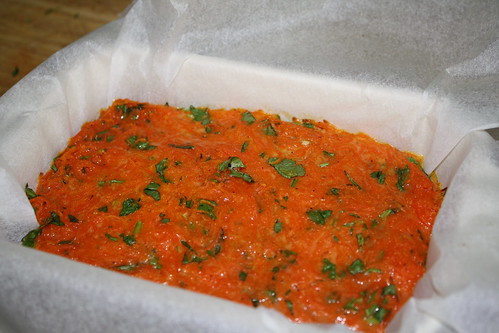
Pour the mixture into a baking dish lined with baking paper. I used a dish that is approximately 18cm x 27cm and I ended up with nice thick dense brownies.

Bake for about half an hour. On non fan my oven is a little slow, so I needed 40 minutes. The top will be firm and cracked and a toothpick should come out cleanly (or mostly cleanly – with brownies you don’t want to overcook them!).

Allow to cool before cutting (and eating).

If you’re particularly greedy, serve with cream. That’s what we did!

* In Australia this is widely available – you’ll find it in the baking aisle of most supermarkets. Just note that you want rice FLOUR and not GROUND rice – otherwise you’ll end up with gritty brownies!

Fish en Papillote

IMG_1329

Generally when we buy fish we just pan fry it. And in many respects there’s nothing nicer than a piece of fresh fish, quickly fried off in a bit of butter.

However, aiming for something a bit different, while staying light, I decided to give fish en papillote (wrapped in paper, baked and effectively steamed in its own juices) a go. I had a flick through a few cookbooks but couldn’t really find anything in the way of recipes that was satisfactory so just had to make it up as I went along.

I had bought two rather massive fillets of mulloway. If you are going to cook fish en papillote you need to make sure you’ve chosen something meaty and firm fleshed. Whiting or garfish just aren’t going to cut it – if you have those to hand, fry them off in a bit of butter!

Take a large piece of tin foil and cover it with a similarly sized piece of baking paper. You can really put whatever you want in your parcel but the thing to remember is that the fish will cook quickly so if you use any of the harder vegetables you’ll need to make sure you cut them finely. You also don’t want to go overboard with your flavours.

In my case, I’d already decided I was heading for an Asian themed dish (mainly because there was some fresh coriander in the fridge that needed using). I started by finely slicing some onion and then very very finely slicing some carrot (I actually used the mandolin to create long thin strips which I then cut into fine threads). I placed the fish on the bed of carrot, topped with some finely chopped spring onion and finely sliced lemon (using the mandolin, again) and anointed with a dressing made of soy sauce, sesame oil and some grated ginger. The soy gives the finished fish some much needed colour!

You do need to wrap your parcels well – begin by folding up the paper parcel and then use the tin foil to create a good seal. You need to leave space for the steam which will be generated by cooking, but you don’t want it to escape!

Bake at 200°C for around 15-20 minutes. The timing here depends a lot on your fish – after 15 minutes I pulled ours out, checked the larger piece and returned them to the oven for another 5 minutes.

You can serve the fish in its parcel (we discarded the tin foil layer) or, if you’re feeling brave, you can plate it up and pour the sauce from the parcel over the fish. Top with chopped coriander. We had the spicy fried potatoes with this – perhaps a little bit of a cultural mish-mash, but effectively just fish and chips!

Carrot and Coriander Galette

IMG_1334

This is really a very pared down version of Marcus Wareing’s recipe in One Perfect Ingredient. I’ve owned this book for ages and I love it. I’ve also been looking at this recipe for ages and never got around to making it. Either we have the coriander but not the carrots, or vice versa.

It turned out that we had plenty of both in the fridge and I thought this would be a brilliant way of feeding the baby carrot.

I was in a bit of a hurry (a small person was watching me, and dinner time was fast approaching) so I used just the outline of Wareing’s recipe. If he were to read what follows, he wouldn’t recognise it!

Preheat the oven to 180°C fan (200°C normal).

Begin by grating one large (peeled) carrot. I used the Magimix for this – you get carrot that’s like very fine spaghetti. Put the carrot in a frying pan with a generous splash of water (add more as necessary) and cook until the carrot softens and the water has evaporated. I also added some very finely grated ginger.

For the one large carrot I used 2 eggs and a handful of chopped coriander. Whisk the eggs, add the coriander and pepper to taste. When the carrots are done, tip into the egg and coriander and mix well (and quickly – you don’t really want the egg to start cooking). Pour into a baking paper lined baking dish (mine was about 20cm x 10cm) and bake for 15-20 minutes, until set. Serve immediately (or allow to cool, if serving to a baby!).

Even this very quick and dirty version of the recipe tasted pretty good. If I’d been eating it I would have had to add salt and more pepper, but the slight spiciness of the ginger with the sweetness of the carrot worked well. The coriander adds some much needed colour variation to the dish (even so, it looks very orange!) and the egg makes it filling enough for a quick snack.

Now I really do need to try out the proper recipe!