Spicy Fried Potatoes

IMG_1327

Everyone loves potatoes (don’t they?) but sometimes it’s tricky to do something other than sauté them, mash them, turn them into chips and so on.

Last night I was faced with an Asian style fish dish (recipe to come) that needed an accompaniment. We’d had rice the night before, there were no noodles in the cupboard and we had just two potatoes.

This is a great way to stretch those two potatoes a little further.

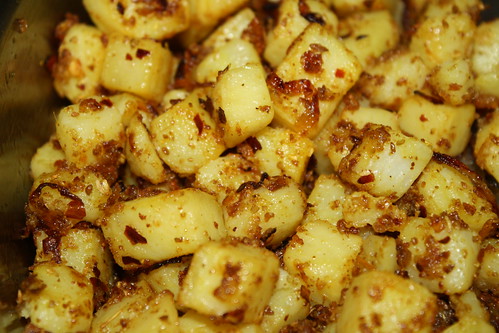
Start by taking your potatoes, peeling them and cutting them into approximately 1 cm square cubes. Cook them in boiling water – slightly under is better than slightly over. Drain. You can leave them to cool or not.

Heat a generous tablespoon of ghee in a frying pan. If you have no ghee a combination of butter and a light oil (such as peanut, or a very light olive oil) will do. When the ghee is hot, add a little very finely sliced onion (I used about a quarter of an onion as that’s what I had left over – but if you love onion then a whole one will be fine!) and one clove of garlic, finely chopped. When the onion starts to take on a little colour, add 2 tsp of ground coriander, 1 tsp of ground cumin, about ½ tsp of turmeric and chilli flakes to taste. Fry these spices for a minute or so and then add the potatoes.

Now, this is best done a little in advance because you don’t want to be hurrying the potatoes. You want to get them plenty of frying time so everything gets good and crispy. You don’t have to worry about serving them immediately they look done – they keep hot very nicely. The only problem might be snacking on them while you finish off other things … if you do that you’ll find your potatoes don’t go quite as far as you hoped!

I needed to season the potatoes reasonably generously with salt. I almost never add salt to cooking so my idea of “reasonably generous” is probably nowhere near enough for many people. As always … season to taste.

Serve with whatever you happen to be eating. These would be awesome with any type of curry, or at a BBQ – any meal with robust flavours that can stand up to a bit of chilli. Delicious!

Asparagus and Bacon Tart

IMG_1314

This is a quick midweek supper: supplement it with a salad and make sure you don’t eat it all as it’s delicious cold for lunch the next day!

Asparagus has a short season – this was beaten into me while living in England when everyone (well, everyone interested in food) goes a bit mental banging on about the 6 weeks of the year you can buy English asparagus.  Anyway, it’s asparagus season now in Australia and you can should be able to pick some young tender stalks up cheaply.

This is another proper storecupboard meal – once you have your asparagus everything else you’ll probably have hanging around the house.

Begin by making your pastry (or, grabbing some pre-made shortcrust from the freezer).  I always make shortcrust because, with the aid of a food processor, it’s so quick it’s a shame not to.

My basic recipe is 150g of plain flour, 75g cold, unsalted butter, 1 egg yolk (use the white to make meringues!), a pinch of salt and cold water to bring it all together.  Rest in the fridge, wrapped in clingfilm, for half an hour or so.  This makes enough pastry for  a 23cm (or so) tart tin.  If you have the will, bake it blind – it does really pay off with a nice crispy base!

For the filling, chop and fry 2 rashers of bacon.  Spread this evenly over the base of the pastry case.  Now add your fresh, roughly chopped asparagus.  You might want to reserve 3 or 4 spears for decoration – you might not.  I used the best part of 2 bunches of young asparagus.

Whisk together 5 eggs, add a generous couple of tablespoons of thick cream, and season with pepper (no salt!).  Pour over the bacon and asparagus, top with some grated parmesan and some grated cheddar and bake in an oven preheated to 160°C fan (or 180°C normal) for about half an hour – until the egg is puffed up and the tart is golden.

You don’t need to serve this piping hot – as the warmer weather approaches, room temperature would be perfectly acceptable. The tart filling will sink back a bit as it cools, but it will still look – and tast – fantastic.

Chocolate and Hazelnut Pithivier

Chocolate pithivier

This is definitely a dish for the health conscious. Or perhaps not, becaused this is really like eating a giant pile of chocolate spread with a giant pile of puff pastry. And this means it’s absolutely delicious – but small servings are required!

As a dessert, this chocolate and hazelnut pithivier, from the April issue of UK Delicious is a bit of a winner. It’s quick to make, it doesn’t need to be served hot so you can make it in advance and (better yet) you can freeze it and have it as a standby dessert. And it’s so rich it will go a long way and you don’t need any special accompaniments (although good fresh cream won’t go astray).

If you’re keen – make your own puff pastry. Otherwise, have to hand 2 sheets of ready made. You’ll need to cut 24 and 26 cm diameter circles from these respectively. Put the smaller circle of pastry on a non stick baking sheet and preheat your oven to 180°C fan.

Making the filling does rather require a food processor – or a lot of patience. The original recipe specifies 150g of blanched hazelnuts. I don’t know if blanched hazelnuts are more readily accessible in the UK than Australia, but when I make this again I’ll be using 150g of ground hazelnuts. Otherwise you’re left with the task of roasting and then peeling the hazelnuts and peeling hazelnuts is a task best left to someone else, as far as I’m concerned!

So – take your 150g of hazelnuts and, if they’re not already ground, whizzy them up with 150g of good quality dark chocolate, 125g of golden caster sugar and 20g of cocoa powder until you get a fine crumbly mix. To this add 25g of unsalted butter, 2 egg yolks and 2 tbsp of dark rum (there’s no reason why a liqueur such as Frangelico wouldn’t work well here). The alcohol is, of course, optional and it’s best not to go mad with it – stick to the 2 tbsp!

Whizzy this up again and you will end up with a firm (and extremely tasty) paste.

Put this paste in the centre of your pastry base, spreading it out evenly and leaving about 1cm around the edge. Take one of your left over egg whites, lightly whisk it and brush this margin with it, before topping the pithivier with the second disk of pastry. Press down carefully at the edge, ensuring there is no air left in the middle (you want to push the pastry down around the filling).

If you can chill the pithivier at this point – that’s a good thing. Leave it in the fridge for about 30 minutes.

When you’re ready to cook, score the top of the pithivier with a swirled spoke pattern and then brush with egg white. Bake for 40 minutes. Keep an eye on it while it’s cooking – if the pastry starts to brown too quickly, lower the temperature a little.

Best served at room temperature – if you can wait that long!