The Sweet Swap: Espresso Fudge

IMG_3266all packed up & ready to go!

A while back, Sara, of Belly Rumbles, and Amanda, of Chew Town, got in touch about a blogging project they were setting up called The Sweet Swap. For a small entry fee, which was donated to ChildFund Australia, each participating blogger was matched with three other bloggers. Once you had received your matches and chosen the sweet to make, you’d package it up and send it off, while waiting for your own sweet treats to arrive.

Now, you may have noticed that I am not, exactly, a confectioner. Apart from chocolate, I don’t really like sweets. So in this instance I knew I was not only going to have to choose something that would post well (a challenge in itself!) but most likely something I don’t like eating.

I had a practice run making marshmallow and thought that it might be fun to make rocky road (fun for Andy and our workmates – even with chocolate marshmallow is still going to be gross).

I’m really sorry if any of my matches would have preferred rocky road: just as I should have been in the kitchen making marshmallow my toddler decided it would be fun to have temperatures spiking 40°C for a few days and ended up in hospital. There needed to be some seriously quick revision of plans and, in what can only be blind panic (the deadline for posting had passed!) I chose to make fudge.

Now, I have never made fudge before and I couldn’t even claim to have eaten enough to call myself a connoisseur, so I was really winging it. I chose to make this espresso fudge because I like chocolate and coffee.

I wasn’t happy because the recipe was a bit vague (temperatures for the different stages would have made me happy) but I was out of time and there for nothing for it but to hit the stove.

My inability to focus on stirring turned out to be a blessing: if you over-stir fudge it turns out grainy, but this, my first effort was dense and creamy with a solid, but not overpowering, hit of coffee.

I probably sound really pleased with myself, and I am. But I’m sure it’s all beginner’s luck and I’ll never be happy with another batch of fudge ever again!
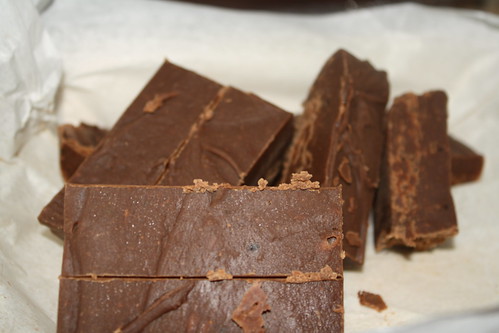
IMG_3271heart attack inducing size pieces of fudge

Espresso Fudge

Ingredients

  • 1 tin sweetened condensed milk (395g - the standard size in the shops)
  • 1 cup dark brown sugar
  • 2 tbsp glucose syrup
  • 180g dark chocolate, broken up
  • 3 tsp instant coffee (strong will do, espresso if you have it)

Instructions

  1. Place the condensed milk, sugar and glucose syrup in a pan over a low heat and wait for the sugar to melt, stirring only occasionally. This takes quite a while so be patient.
  2. When the sugar has melted, turn up the heat (medium - high) and bring the mix to a simmer. Be a little more attentive with your stirring. In time the mixture will start to thicken and come away from the sides of the pan. If you are using a good non stick pan (and you really should) the mixture will come away from the sides quite quickly but you need to keep stirring until it thickens up.
  3. Take the mixture off the heat and mix in the chocolate and instant coffee. Mix until the chocolate has melted completely and then pour into a greased and lined baking dish (I used one that is approx 20cmx20cm). Allow to cool and then refrigerate. Overnight is best.
  4. Cut up: this is very rich so small squares is a good idea. For serving you may wish to dust with cocoa powder, but the fudge is so rich it doesn't need it. A cup of coffee on the side could be considered essential though!
https://eatingadelaide.com/sweet-swap-espresso-fudge/

I think there might have been a slight glitch in the Sweet Swap because I actually received FOUR sweets, not three.

From Gareth at Humble Crumble I received some black forest fudge – chocolate fudge studded with cherries. From Joanna at The Hangry Bitch sacher tortingtons – a quirky take on lamingtons, stuffed with a homemade orange marmalade, iced and decorated with flaked coconut, Aga at At Matter of Taste sent Polish biscuits that her grandmother used to make and Amy at Melbourne Food Snob sent chewy coconut caramels. Quite a little haul (and some of which is still being eaten, which is a massive win!).

My fudge went Aga, Billy and Leah. Aga quit sugar just before the Sweet Swap (really terrible timing) but I hope Billy and Leah enjoyed the fudge and my apologies for the delay.

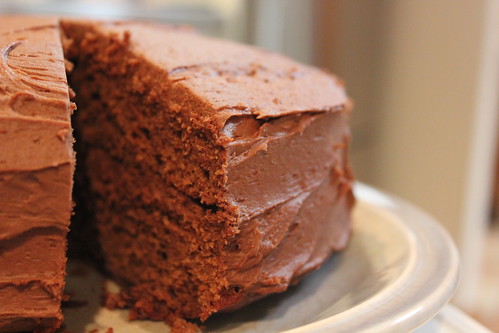
Dan Lepard’s Sour Cream Chocolate Cake

Sour Cream Chocolate Cake

Big lunch with the family at Easter and, as usual, I got to cook dessert. One day I will have to volunteer to cook something else!

My dad is quite partial to a bit of chocolate cake and I’ve had my eye on this sour cream chocolate cake for ages. I have plenty of chocolate cake recipes that are tried, tested and, indeed, popular, but there’s no harm in trying something new. And in the past I’ve found Dan Lepard’s recipes very reliable (see his tollhouse yoyos).

I received instructions from dad to make sure I used chilli chocolate. I ignored this and just followed the recipe.

The cake itself has a degree of novelty as it uses oil and sour cream rather than butter. And the icing is also based around sour cream. The cake also has less chocolate than I expected in the cake itself and, I thought, there was far too much vanilla in the whole thing.

Begin by making the cake. Prepare 2 18cm (or in my case I think they were 19cm) sponge tins: I used new silicon ones so I just gave them a slick of canola oil and base lined them with baking paper. Preheat the oven to 180°C (160°C fan).

Melt 75g dark chocolate. Beat together 75mL of sunflower oil, 75g of sour cream (I actually used light sour cream because if you shop at 4pm on Maundy Thursday you use what is on the shelf!), 125g caster sugar, 75g of runny honey, 2 tsp vanilla extract, and 3 eggs. Then add the slightly cooled melted chocolate.

Mix together 175g plain flour, 25g of chocolate and 2 tsp of baking powder and sift it into your cake mix.

Divide the mix between the two pans and bake until done – which in my case was just on 20 minutes. Lepard’s original recipe suggests 25 minutes but I knew my pans were potentially slightly larger than they should have been and I also know my oven is quick. You want the cake to be done but you also want a few crumbs sticking to the skewer.

Remove the cakes from the oven, stab all over with a skewer and dress with a simple syrup of 25g sifted icing sugar adn 25 mL boiling water. The original recipe suggests adding 2 tsp of vanilla extract, which I did, but the finished product was so overhelmingly vanilla-y that I’d definitely omit that at this step.

Cover the cakes (I used cling film) and allow to cool. In my case, this was overnight.

When ready to assemble I made the sour cream icing. Take 300g of dark chocolate and melt with 50g of unsalted butter. Add 50g of runny honey, a splash of rum (Bundaberg, of course!), 100g of sifted icing sugar and 125 g of the light sour cream. Mix until smooth.

Despite sieving the icing sugar, mixing until smooth involved putting it all in the KitchenAid and giving it a good beating with the paddle beater. It made quite a pale fluffy icing.

Sandwich the cakes together (pro tip – sandwich together the two flat sides – the bases) with the icing and cover the top and sides.

Serve at room temperature with plenty of cream.

The verdict?

Personally, I was massively underwhelmed by this. There was waaaay too much vanilla – I’d definitely drop the vanilla from the syrup, and probably also halve it in the cake (although I suspect the vanilla in the syrup was the main offender, not being cooked out). I’d probably also go for a straight chocolate ganache: I found the icing too sweet and would have to rework it to reuse it.

I was ho-hum about the cake. I’d prefer something darker and more chocolately and fudgy.

Andy liked the total package and loyally said he’d be happy to eat it all day.

Mum rated the cake highly but wasn’t sure about the icing. In fact, the icing seemed the most contentious part of the cake.

Dad? Well, he complained because I didn’t use chilli chocolate!

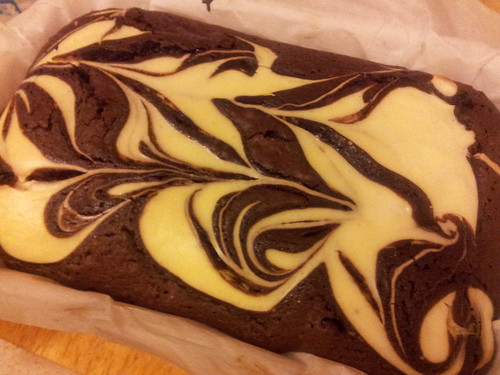
Marbled Chocolate Brownies

Untitled

I can’t believe that the last lot of brownies I made was back in September last year. Those chocolate and pistachio brownies got a big tick from my brownie taste panel but did rather freak me out on account of the huge amounts of sugar.

Every now and then I catch Justine Schofield’s Everyday Gourmet and it was on that program I saw these marbled chocolate brownies.

There’s not too much different about the brownies, but they have a cream cheese topping which is used to give a very pretty marbled effect. Perfect for people like me who are far too lazy and inept to produce beautifully decorated desserts!

Preheat your oven to 180°C and line a small baking pan with baking paper.

On the stove, in a large pan, melt 125g unsalted butter with 125g dark chocolate and 1 up of brown sugar. If this was just chocolate and butter I would normally do this in the microwave, but here the idea is to get the sugar completely melted, so there’s no graininess in the mixture. You need to be patient and do this over a low heat, with plenty of stirring and monitoring. No wandering off!

Once the sugar is fully dissolved, remove the pan from the heat and mix in ⅓ cup of plain flour, ⅓ cup of cocoa (not drinking chocolate!), ½ tsp of baking powder and 3 eggs. If you are doing this by hand (which I did, for a change!) it will pay to give the eggs a light beating before mixing them in. The mixture will look very very loose – but don’t be alarmed, keep beating and it will thicken up as the chocolate cools and the eggs get incorporated.

Pour the brownie mix into the prepared baking tin.

Now, for your cream cheese topping. The original recipe calls for a branded light, spreadable, cream cheese. Normally, I eschew anything dairy that’s “light” but because cream cheese can be very stiff I did actually buy the spreadable light cream cheese*. Mix 250g of the cream cheese with 1 egg and ¼ cup of caster sugar. I actually found this made too much topping – it’s a shame it’s not possible to halve an egg!

Dollop generous spoonfuls of the cream cheese mix over the top of the brownie mix. I ended up with 6 or 7 large tablespoonful dollops. Take a knife, and use this to swirl the cream cheese topping through the brownie mix. I went the length of the tin followed by dragging the knife across the width. It’s up to you what you do though!

Finish by baking for 35-40 minutes (40 minutes in our oven), until cooked but still moist.

Allow to cool before cutting into portions. The Everyday Gourmet recipe says it makes 24 but that would be 24 tiny brownies for chocolate hating, not hungry types! I say it makes about 12!

The brown sugar makes for a lovely depth of flavour, the brownies are fudgy, they look stunning and the topping makes a slightly tart counterpoint to the sweetness of the brownies.

Excellent stuff. Even if you don’t fancy fiddling with your favourite brownie recipe, just try adding the topping!

* I was relieved, after reading the ingredients, they actually seemed to be innocuous – quite often all manner of interesting additives are used to replicate the mouth feel and weight of the fat that has been removed.