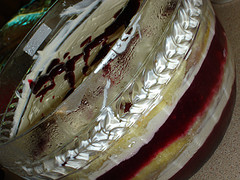
December’s Australian Gourmet Traveller (AGT) featured a stunning dark berry trifle on its cover which was also the month’s Perfect Match recipe.
Trifle is one of those dishes where everyone has a recipe and that recipe is the ‘definitive’ recipe. So no doubt there will be some complainers that some aspect of this version is wrong (in advance, I warn you there is no custard).
However, at this time of year they are almost a pan-world dessert: those of us sweltering in the southern hemisphere can enjoy the trifle for its cool-straight-from-the-fridge-ness and those freezing (somewhat too literally for friends in the UK and Europe!) in the northern hemisphere can enjoy the rich, fatty, comforting creaminess of it. This year, I was hosting Christmas Day and so … this trifle made its appearance as Christmas pudding.
Two notes before embarking on the recipe. Firstly, you need to make your trifle a day ahead and you need to have pretty much the whole day available to you. This is not because it takes a whole day, but there’s a lot of “waiting for jelly to set”.
Secondly, the sponge recipe given in AGT is either woefully inadequate and wrong or I can’t bake. The abject failure which emerged from the even was eventually consigned to the bin, as I realised I needed to start again. My second attempt was using Marcus Wareing’s sponge recipe from One Perfect Ingredient*. A gorgeous, risen, fluffy sponge emerged from the oven … so I’m guessing I can bake after all.
The ingredients here are suitable for a 3 litre trifle bowl. Choose your prettiest glass bowl so your guests can admire the layers!
This is a long recipe … so let’s dive in!
Begin by making the sponge.
Preheat oven to 165°C fan (180°C) and baseline a 24cm x 24 cm baking dish or cake tin. You need to make sure that the tin in which you bake the cake is large enough to result in cake that will fit your trifle bowl.
Cream 100g of soft, unsalted butter with 100g of caster sugar. Whisk in 2 medium eggs and fold in 100g of plain flour mixed with 1 tsp of baking powder. Bake until risen and golden, and a skewer comes out clean – around 20 minutes. Allow to cool in the pan, before turning out on to a wire rack. When ready to use, trim to fit your trifle bowl and then cut in half horizontally. Make sure the cake is completely cool before doing this.
Start on the jelly.
In a large pan, mix 500g of berries (I used all raspberries, but you should use any mix that suits) with 150 g of caster sugar, half a tsp of vanilla paste (or half a vanilla bean and seeds)** and 550mL of water. Simmer over low heat for at least 50 minutes. It doesn’t require any more attention than a quick stir every now and then so you can easily factor in a cup of tea during this.
Strain the fruit mix through a fine sieve and discard the solids. Now, if you want a really clear jelly you need to be a bit careful here and not force the mix through the sieve. If you’re not fussed, then you can be a bit more vigorous. Either way, the resulting solids should be discarded into a bowl for eating by the chef! Transfer 500mL of the liquid to a bowl and reserve the remainder.
Soak 5 sheets of titanium strength gelatine*** in a bowl of cold water for 5 minutes. Squeeze out the sheets of gelatine and whisk into the hot fruit liquid until dissolved. Add 150mL of pink moscato, juice of half a lemon and 40 mL of crème de cassis. Pour (or strain, if you’re going for the super clear jelly) half this mix into your trifle bowl. Scatter over approximately 150g of berries and refrigerate until set – approximately 2 and a half hours. Keep the remaining jelly mixture cool – if you put in the fridge be sure to take it out and give it a stir to make sure it doesn’t set!
Take the reserved fruit liquid and heat over a high heat until well reduced. Allow to cool and then refrigerate.
In a large bowl combine 600mL of sour cream, the finely grated rind of one lemon, 20g of icing sugar and half a tsp of vanilla paste (or the seeds from half a bean). Add milk to thin the mixture to a spreadable consistency.
Once the jelly has set, spread one third of your cream mixture over the jelly and top with one of your halves of sponge cake – fill any gaps with cake trimmings. Drizzle with about 60mL of crème de cassis. Scatter over another 100g (or so) of berries and pour over remaining jelly mixture. Refrigerate again – that’s another 2 or so hours for cups of tea …
Cups of tea and setting over, spread half your remaining cream mixture over the jelly, top with the sponge and drizzle over another 60mL (or so) of crème de cassis, before finishing off with the last of the cream mixture.
Cover and refrigerate overnight. When ready to serve, top with more fresh berries and the berry syrup.
This recipe easily served 10 people at Christmas lunch with plenty of left overs. It does keep well so that isn’t really a problem!
* One Perfect Ingredient is also available through Amazon US .
.
** Vanilla paste is widely available and is usually a combination of vanilla extract with vanilla seeds. It is cheaper than using vanilla beans and ideal for those of us prone to a little laziness.
***Titanium strength gelatine costs a lot ($10 for 12 sheets from David Jones in Adelaide) but as this recipe contains alcohol it’s money well spent. It should also be noted that the use of gelatine makes this recipe unsuitable for vegetarians and I suspect that in this case substituting agar-agar would not work.


