Gluten Free Shortbread

IMG_1537

I’ve been doing a ton of cooking lately – a first birthday party, followed by a Christmas party and I’ve still got a Christmas Eve party AND the big day itself to go!

For the first birthday I was on the hunt for gluten free (or coeliac friendly) recipes.  As with vegetarian food, I find it better to seek out those things that are naturally gluten free, or very nearly so, rather than try to adapt a full fat version of a recipe.

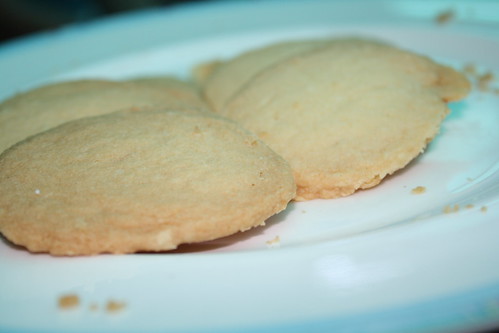
A few years ago I went on a bit of a shortbread baking spree and remembered that many of the recipes made use of rice flour and/or polenta so I figured that I should be able to find, or at worst adapt, a gluten free recipe.

And I was right – I found this recipe on the That’s Life site. It’s really simple and I think you’re probably better off not even bothering with the food processor in the first place. I did and just had to transfer the mix to a bowl to bring it to a dough!

Sift together ½ cup of corn flour (do check that the corn flour is 100% corn and is gluten free if you’re catering for coeliacs), ½ cup of icing sugar (again, check it’s pure icing sugar and not an “icing mix”) and 1 cup of rice flour. Add 180g of unsalted butter. Now the butter can be cold and hard and you can grate it in, or you could use it slightly softened. If you do this first part in a food processor it doesn’t really matter.

Mix with your hands until the mixture comes together in a very soft dough. Chill for an hour. To make life easy for yourself, roll the dough into a sausage or log – this way, when you come to bake the biscuits you can just cut off slices.

So, while the chilling is going on, preheat your oven to 180°C (or 160°C fan). Line some baking trays with baking paper and then take a sharp knife to your log of shortbread. Take thin slices of shortbread, spread out on the baking tray (they’ll expand a little while cooking) and bake for 15-20 minutes. The edges of the shortbreads will start to go brown but you don’t want to over cook them.

Remove from the oven and carefully place on racks to cool. Hot they will be very very fragile so use a slice and allow them to cool before hoeing in.

Then make yourself a cup of tea and indulge!

More Chocolate Brownies

chocolate brownies - gluten free

Here we’re gearing up for the baby’s first birthday which means thinking a LOT about the catering for his afternoon tea party. As the baby will be unaware of the significance of the event, and most likely a bit annoyed that strange people have turned up in numbers to interrupt his afternoon play, the party is all about what I like to eat. That’s why it’s afternoon tea.

One of my relatives is a coeliac (or celiac, if you’re American) and I actually find it rather fun to try out recipes that she’ll be able to eat. It’s actually surprising how easy gluten is to work around. However, one thing I haven’t investigated too much is gluten free baking – dessert wise there’s loads of things you can do without gluten so I’ve just never bothered.

I have hundreds of baking recipes tagged in delicious and I thought it was time I made a departure from what has become my standard caramel chocolate brownie. I had a recipe from the Gluten Free Goddess tagged, but realised it wouldn’t do on several counts (the coconut oil, the measurements in cups, the huge amount of vanilla). Karina had based her version on a reader’s version and, after some sums, some substitution and some tasting during production I came up with this very easy, but also very tasty, recipe. The finished brownie is super squidgy in the middle and has a crisp crust which manages at the same time to be chewy.

The best compliment came from Andy who commented “well, you wouldn’t even know they’re gluten free”.

Preheat your oven to 180°C (or 160°C fan).

Melt 150g dark chocolate with 100g of unsalted butter. If you are aiming for dairy free as well as gluten free, I suppose you substitute a dairy free spread here. And, as always, I did this in the microwave.

Into the trusty KitchenAid went:

150g dark brown sugar
2 tbsp cocoa
50g ground almonds (almond meal)
50g rice flour*
1 tsp baking powder

Beat all of this with 2 eggs before adding the melted butter and chocolate.

Pour the mixture into a baking dish lined with baking paper. I used a dish that is approximately 18cm x 27cm and I ended up with nice thick dense brownies.

Bake for about half an hour. On non fan my oven is a little slow, so I needed 40 minutes. The top will be firm and cracked and a toothpick should come out cleanly (or mostly cleanly – with brownies you don’t want to overcook them!).

Allow to cool before cutting (and eating).

If you’re particularly greedy, serve with cream. That’s what we did!

* In Australia this is widely available – you’ll find it in the baking aisle of most supermarkets. Just note that you want rice FLOUR and not GROUND rice – otherwise you’ll end up with gritty brownies!

Lemon Polenta Cake

lemon & polenta cake

Last week I was asked about how many of my recipes I make up and I realised it’s been a while since I’ve done any of my own ‘recipe development’.

On Sunday I was going to make a lemon and olive oil cake. As Andy headed off to the shops he asked if I needed anything. Oh no, I had everything I needed. Half an hour later, I discovered that I barely had enough olive oil for the recipe and, if I did, I’d be leaving us with none.

However, I took this as an opportunity to create my own cake. Initially that opportunity was not grasped entirely gracefully – there was a lot of muttering about not being able to find a recipe that suited exactly what was in the cupboard. But the end product was lovely!

Begin by preheating the oven to 160°C fan and grease and baseline a 23 cm springform tin. Using a 23cm tin gives a thinner cake – if you want a deeper cake use a 20cm tin, but remember you’ll need to cook the cake for a little longer.

In the trusty MagiMix, cream 200g of unsalted butter with 200g of caster sugar. Add 100g of almonds and 100g of fine polenta. Make sure you use fine otherwise rather than “texture” you’ll end up with gritty cake! Beat in 3 eggs and 2 tsp of baking powder.

At this point the mixture will be really stiff.

Now grate in the zest of 2 small lemons and add the juice of one (about 1 tbsp) and mix well. The mixture will be quite loose now. Pour it into the prepared tin and bake for 55 mins, or until a skewer comes out clean. I also had to cover my cake with foil for the last 10 minutes or so, as it was starting to take on too much colour.

When you’ve got about 10 minutes of cooking left, start work on the syrup. In a small pan, place 100g of caster sugar along with the juice of 2 lemons and 1 tbsp of rum. Heat this up to create a syrup – you may need to add a splash or two of hot water along the way. When the sugar has fully dissolved, you are good to go. Ensure you don’t heat it so much that it boils and starts to turn into caramel!

Remove the cake from the oven and, while it’s hot, prick all over with a skewer or toothpick and then spoon over the syrup. You probably won’t need all of it (I had a tablespoon or two left). If you have a silicon brush, even better because you spread the syrup out over the cake a lot more evenly.

Leave the cake to cool, and absorb the syrup, in the tin. When cool, remove the tin and baking paper. Serve with cream.

It keeps well: the syrup and almonds keep it moist and the texture of the polenta does soften a little over time.

Note that as this cake is made with polenta and NO flour, it is gluten free (suitable for coeliacs).