Disclaimer: I was sent the Masha to review.
So, I think we all know that I love my kitchen gadgets. I blame working in small electrical in a local department store while at university. I’d come home with all manner of toys and I’m adamant that there’s plenty of room in my kitchen for more time saving goodies.
When it comes to mashed potatoes I am pretty picky. They have to be hot, hot, hot, laden with butter (and cream) and pepper and totally smooth. Now mashed potatoes are not something where there’s too much room for time saving. Despite the fact that you will often see people on cooking shows on tv throw the cooked potatoes into a food processor this is a MASSIVE no no. Cutting the potato messes with the starch and produces a gluey, claggy mess. So any time saving device needs to address this.
Now a good way of ensuring very smooth mashed potato is to use a potato ricer. This is something you should always use for potatoes for gnocchi but when making mash just a single pass through the ricer results in a slightly grainy finished product (no matter how much fat you through at it!). Multiple passes through the ricer obviously take more time, but also require more containers (and hence washing up). Mashing using a traditional masher takes ages, is inconsistent in its results and requires a lot of elbow grease.

So enter the Masha. A kitchen gadget which claims to produce perfectly smooth mash, in seconds, without over processing the starches. Rather than chopping, it has a blunt blade and a perforated cage. The blade pushes the potato through the cage, thus extruding (I love that word!) it, rather than chopping it. In many ways it’s like a turbo charged ricer.
I boiled up about 5 or 6 potatoes (we are, after all, only 2 and the toddler pretty much refuses to eat mash), cut into small cubes to cook quickly. I drained them, returned them to the pan over the heat for a quick dry off and then took them off the heat and plugged in the Masha.
I am not joking when I say that I was gobsmacked by how fast the Masha did the job. For someone who usually spends at least 10 minutes ensuring that every lump is well and truly gone from the mash (yes, I might be a little OCD), the fact that I had a pan full of seriously smooth creamy potatoes in less than 30 seconds was a whole new experience.
Because I was making the mash for the following recipe, I hadn’t added any fat, so I had a bit of a prod, poke and taste and decided that maybe there was just a touch of the slightly elastic about the potatoes. Interestingly, this disappeared as the potatoes cooled and, after I gave them a good beating with a wooden spoon, they were really quite light and fluffy. Might be something worth keeping in mind. Andy felt sure that had I anointed them with a ton of butter and cream I would never have noticed.
The Masha is very easy to clean. The plastic blade is easy to take off and, provided you give it a rinse straight away (cold, dried mashed potato is second only to cold, dried out Weetbix in its concreting properties) the Masha cleans easily. I also loved the fact that the main unit has a green light which stays on while the unit is plugged in and powered. While it was somewhat startling to walk into a dark kitchen and be greeted by a glowing green light it was a brilliant reminder to unplug the Masha and put it away.
Naturally, the Masha can be used to mash anything that needs mashing. I guess where I’d advise caution is if you’re producing something where you want some texture as I imagine it would be very easy to over mash. Naturally, if you are someone who makes mash often, or needs to make it in large quantities, I’d suggest that the investment in a Masha is going to be more than worth it.
As a parent, I note that the one of the Masha’s suggested uses is for baby food. The amount of time that parents are advised to give their babies completely smooth purees is very limited. Lumps are very important for little people as they need to learn to chew, so don’t go crazy over mashing, just because you have a new toy!
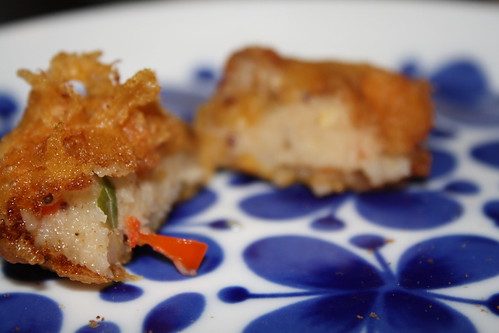
To make something a bit more interesting out of our mash, I decided to try my hand at making my own version of batata vada, an Indian street snack. This is basically mashed potato, battered and deep fried. Serve immediately – super hot, with plenty of salt. If you’re organised, some mint chutney on the side would be great. These are much quicker to make than pakoras. And of course, you should use my recipe as a starting point: just use the spices you love in the quantities you love!
Ingredients
Potato Mix
- 5-6 potatoes, peeled, cubed, cooked and well mashed
- 2-3 tbsp ghee (use unsalted butter or a neutral cooking oil as a substitute)
- 10-20 curry leaves
- 1 tsp cumin seeds
- 1 tsp ground coriander
- 1 tsp black mustard seeds
- 1 tsp garam masala
- 1 red chilli, finely chopped
- salt
-
Batter
- ½ cup besan flour (gram flour, chickpea flour)
- ½ tsp turmeric
- pinch bicarb
- salt
- cold water
-
- Oil for frying.
Instructions
Potatoes
- In a small pan, heat the ghee. When it is melted and hot add the curry leaves, cumin seeds, coriander and black mustard seeds and fry until the mustard seeds start to pop, everything is sizzling and the aromas are all being released.
- Stir this mixture into the potato. Combine well.
- Add the garam masala and chilli to the potato mix and add salt to taste. If you want to jazz the potato mix up even further, add a generous teaspoon or so of your favourite (homemade, of course!) curry powder.
- Don't go too crazy with the flavourings, as they will intensify on frying.
Batter
- Mix the besan flour, turmeric, salt and bicarb together in a bowl. While whisking, add cold water slowly to create a batter of medium thickness. You want a batter which is thicker than crêpe batter but not as thick as fish and chip batter. You will probably need between ½ and 1 cup of water. Better to have the batter too thick initially and thin it down as you go.
- Heat the oil.
- Take a tablespoon of the potato mixture, roll it into a ball, flatten it slightly and dip into the batter. Ensure the potato patty is well covered. Place it in the oil and cook until the batter is puffed and golden.
- If the batter is too thin you'll have gaps in it and it will go soggy quite quickly. You'll also find it goes soggy if you don't cook it for long enough. Generally you need to do a little bit of experimenting but this gives you the opportunity to adjust the seasoning or spicing of the finished product!
- Drain the batata vada on kitchen towel and serve immediately.
3.1
https://eatingadelaide.com/product-review-masha-recipe-batata-vada/