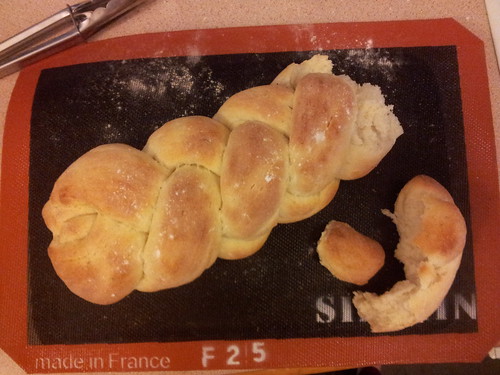
Potato Bread and How to Four Plait

Untitled finished product

At present, we are feeling rather swamped in our crop of home grown Dutch Cream potatoes. So far it is not even a particularly prolific crop (there are still four plants in the ground about which I’m feeling very nervous) but it has produced more potatoes than we can reasonably eat and we are not in possession of a root cellar. If we were, it would be a wine cellar.

Fortunately, I’ve made potato bread before and I thought it would be an opportunity to kill a couple of birds with one stone. The toddler refuses to eat both potatoes and bread (the exceptions being chips in a pub and one type of milk roll that my mum makes). I originally thought that growing and digging up potatoes might enthuse him but it turns out that it has only enthused him in shouting about the “tatoes in the garden” and ferreting about in the soil.

Making the bread dough (using a recipe from The Big Book of Bread) with him was surprisingly difficult. He was excellent at ricing the potatoes but four hands in a mixing bowl (yep, we did this all by hand … the KitchenAid got a break!) made for a lot of flour on the bench and made it very difficult for me to judge how much water we needed to add. And a toddler can shove a surprising amount of part made bread dough in his mouth when you’re not looking. Apparently raw flour, raw dough and everything in between are ripe for ‘tasting’.

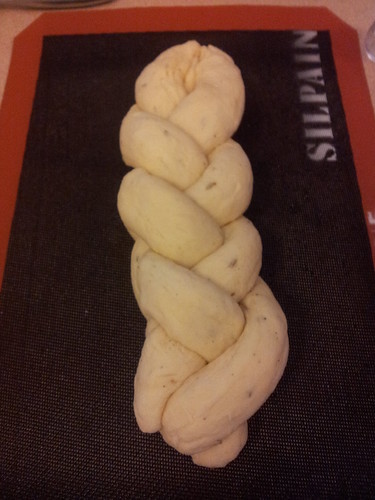
It’s surprising then that doing the four plait with his help was actually really easy. While Peppa Pig is inculcating my child with all manner of feminist socialist politics, she’s also taught him all about creating ‘wiggly worms’ so I was able to give him chunks of dough and let him loose.

So – the four plait. We were originally going to make rolls, as I figured that small hands might be able to work with simple knots. However, I decided that I also need to stretch myself just a bit. I enjoyed watching almost all of Masterchef Professionals (UK), including the bread skills test where Monica Galetti set four chefs the task of, amongst others, doing a four plait.

I’ve never done this before but having had long hair almost my entire life I am totally adept at a three plait (in hair, but not shabby when it comes to bread either). So when I say that I found this easy to do – you’ve got your caveat.

Untitled before

I had a look around the internet for written (rather than video) instructions because the thing with plaiting is that you need to know which strand to put where. The instructions at Alchemy in the Kitchen were exactly what I needed.

With plaiting you number the positions of the strands (left to right or right to left doesn’t matter) and then you follow a sequence. You’ll find variations on this but I followed the above which is:

4 over 2
1 over 3
2 over 3

rinse and repeat

You need to make your strands of dough tapered at the ends so that you can tuck them under and make a tidy loaf (note – not what I did!). And you need to keep your plaiting tight so you do need to do a bit of fiddling as you work. The “2 over 3” step is particularly counter intuitive. What this is doing is creating a spine for the rest of the plait to sit on. Keep this in mind and work tight and you’ll be fine!  Though perhaps not up to doing this in front of Monica Galetti …

However, your toddler might still refuse to eat bread and you’ll scoff the lot with plenty of butter in the space of a couple of days …

Potato Bread

Ingredients

  • ~ 350g potato, peeled, cubed, boiled, riced/mashed and cooled
  • 500g flour
  • 2 tsp (7g) dried yeast
  • 2 tsp salt (don't skimp)
  • 35g finely grated parmesan cheese (this doesn't need to be too precise, use more if using a not so strongly flavoured cheese)
  • 1 1/2 tsp fennel seeds (or other herb/seed of your choice - carraway would work well too)
  • freshly ground black pepper
  • ~ 200mL warm water

Instructions

  1. Mix the flour and potato together in a large bowl. Use your hands and incorporate so that the mix is crumbly.
  2. Add the yeast, salt, cheese, seeds and pepper and mix well.
  3. Slowly add the warm water. You may need more or less than the 200mL depending on your flour, so add about half and incorporate well before adding a little more as you need it. You need to bring all the ingredients together in a soft dough.
  4. Tip the dough out onto a lightly floured bench and give it a good keading, until the dough is soft and silky. Lightly grease the dough and return to its bowl. Cover the bowl and leave to rise until roughly doubled in size.
  5. Lightly knead again and, if doing a four plait, divide the dough into four equal portions and form these into ropes that are slightly tapered at both ends.
  6. Plait using the 4 over 2, 1 over 3, 2 over 3 approach. Do the plait on a slightly floured baking tray (or use a siplain (silicone) mat, which you can move onto a baking tray easily later).
  7. If not plaiting, shape into whatever shape you want. Or even make rolls.
  8. Cover and leave to roughly double again.
  9. Preheat oven to 180C fan (200C conventional) and cook for approximately half an hour. Bread should be risen, tanned in colour and should sound hollow when tapped on the base. If making rolls, you'll probably need about 15-20 minutes in the oven.
  10. Leave to cool on a wire rack and gobble down with lashings of butter!
https://eatingadelaide.com/potato-bread-four-plait/

Potatoes Dauphinoise

IMG_3324

We have a big bag of potatoes lurking in a cupboard. This always happens. I spot the potatoes at a cheap price, buy them and then we hide them in a cupboard and wonder what to do with them.

As we currently have eight Dutch Cream potato plants turning into triffids in our garden, it’s time to do some long overdue potato experimenting.

Potatoes Dauphinoise (or pommes dauphinoise, or pommes de terre à la dauphinoise or dauphinoise potatoes) is hardly experimental but I suspect that it’s the type of dish that most people eat at a restaurant rather than at home.

It’s NOT health food: this is sometimes food, not every day food. But because it survives reheating excellently, it’s ideal when you’re cooking a roast or short on oven space. You can 95% cook the potatoes in advance and return them to the empty oven to reheat while the meat is resting. This makes timing a roast a LOT easier than if you try to do roast potatoes. Of course, the left overs are also top notch!

While this is a very basic, store cupboard recipe, a word of advice. A mandoline is essential. Unless you have super sharp knives, the patience of a saint and some really mad cutting skills.

This recipe also scales very easily. You just need to adjust the cooking time – the potatoes are done with a knife slides in easily.

Potatoes Dauphinoise

Ingredients

  • 2 large potatoes, peeled and finely sliced (with a mandoline)
  • softened butter
  • 1 clove of garlic, crushed
  • freshly ground black pepper
  • parmesan cheese
  • approximately 150mL pure cream

Instructions

  1. Preheat the oven to 200°C (180°C fan).
  2. Grease a baking dish well and then rub the clove of garlic around the dish.
  3. Layer the potatoes in the dish. This doesn't have to be perfect: rough layers will do fine. In between layers, sprinkle with black pepper and add three or four dobs of garlic.
  4. Finish with a layer of potatoes. Pour over the cream. If it very thick pure cream it might be too thick for pouring, in which case just spread it across the potatoes as evenly as possible.
  5. Grate over a generous amount of parmesan cheese. Cover and bake in the hot oven for around 30 minutes. The potatoes are done when a knife slides in and out easily.
  6. To get some colour on the top, finish or reheat uncovered.
https://eatingadelaide.com/potatoes-dauphinoise/

Product Review: Masha and a Recipe for Batata Vada

Batata Vada

Disclaimer: I was sent the Masha to review.

So, I think we all know that I love my kitchen gadgets. I blame working in small electrical in a local department store while at university. I’d come home with all manner of toys and I’m adamant that there’s plenty of room in my kitchen for more time saving goodies.

When it comes to mashed potatoes I am pretty picky. They have to be hot, hot, hot, laden with butter (and cream) and pepper and totally smooth. Now mashed potatoes are not something where there’s too much room for time saving. Despite the fact that you will often see people on cooking shows on tv throw the cooked potatoes into a food processor this is a MASSIVE no no. Cutting the potato messes with the starch and produces a gluey, claggy mess. So any time saving device needs to address this.

Now a good way of ensuring very smooth mashed potato is to use a potato ricer. This is something you should always use for potatoes for gnocchi but when making mash just a single pass through the ricer results in a slightly grainy finished product (no matter how much fat you through at it!). Multiple passes through the ricer obviously take more time, but also require more containers (and hence washing up). Mashing using a traditional masher takes ages, is inconsistent in its results and requires a lot of elbow grease.

So enter the Masha. A kitchen gadget which claims to produce perfectly smooth mash, in seconds, without over processing the starches.  Rather than chopping, it has a blunt blade and a perforated cage.  The blade pushes the potato through the cage, thus extruding (I love that word!) it, rather than chopping it.  In many ways it’s like a turbo charged ricer.

I boiled up about 5 or 6 potatoes (we are, after all, only 2 and the toddler pretty much refuses to eat mash), cut into small cubes to cook quickly. I drained them, returned them to the pan over the heat for a quick dry off and then took them off the heat and plugged in the Masha.

I am not joking when I say that I was gobsmacked by how fast the Masha did the job. For someone who usually spends at least 10 minutes ensuring that every lump is well and truly gone from the mash (yes, I might be a little OCD), the fact that I had a pan full of seriously smooth creamy potatoes in less than 30 seconds was a whole new experience.

Because I was making the mash for the following recipe, I hadn’t added any fat, so I had a bit of a prod, poke and taste and decided that maybe there was just a touch of the slightly elastic about the potatoes. Interestingly, this disappeared as the potatoes cooled and, after I gave them a good beating with a wooden spoon, they were really quite light and fluffy. Might be something worth keeping in mind. Andy felt sure that had I anointed them with a ton of butter and cream I would never have noticed.

The Masha is very easy to clean. The plastic blade is easy to take off and, provided you give it a rinse straight away (cold, dried mashed potato is second only to cold, dried out Weetbix in its concreting properties) the Masha cleans easily. I also loved the fact that the main unit has a green light which stays on while the unit is plugged in and powered. While it was somewhat startling to walk into a dark kitchen and be greeted by a glowing green light it was a brilliant reminder to unplug the Masha and put it away.

Naturally, the Masha can be used to mash anything that needs mashing. I guess where I’d advise caution is if you’re producing something where you want some texture as I imagine it would be very easy to over mash. Naturally, if you are someone who makes mash often, or needs to make it in large quantities, I’d suggest that the investment in a Masha is going to be more than worth it.

As a parent, I note that the one of the Masha’s suggested uses is for baby food. The amount of time that parents are advised to give their babies completely smooth purees is very limited. Lumps are very important for little people as they need to learn to chew, so don’t go crazy over mashing, just because you have a new toy!

Batata Vada

To make something a bit more interesting out of our mash, I decided to try my hand at making my own version of batata vada, an Indian street snack. This is basically mashed potato, battered and deep fried. Serve immediately – super hot, with plenty of salt. If you’re organised, some mint chutney on the side would be great. These are much quicker to make than pakoras. And of course, you should use my recipe as a starting point: just use the spices you love in the quantities you love!

Batata Vada

Yield: 12-18

Ingredients

    Potato Mix
  • 5-6 potatoes, peeled, cubed, cooked and well mashed
  • 2-3 tbsp ghee (use unsalted butter or a neutral cooking oil as a substitute)
  • 10-20 curry leaves
  • 1 tsp cumin seeds
  • 1 tsp ground coriander
  • 1 tsp black mustard seeds
  • 1 tsp garam masala
  • 1 red chilli, finely chopped
  • salt
  • Batter
  • ½ cup besan flour (gram flour, chickpea flour)
  • ½ tsp turmeric
  • pinch bicarb
  • salt
  • cold water
  • Oil for frying.

Instructions

    Potatoes
  1. In a small pan, heat the ghee. When it is melted and hot add the curry leaves, cumin seeds, coriander and black mustard seeds and fry until the mustard seeds start to pop, everything is sizzling and the aromas are all being released.
  2. Stir this mixture into the potato. Combine well.
  3. Add the garam masala and chilli to the potato mix and add salt to taste. If you want to jazz the potato mix up even further, add a generous teaspoon or so of your favourite (homemade, of course!) curry powder.
  4. Don't go too crazy with the flavourings, as they will intensify on frying.
  5. Batter
  6. Mix the besan flour, turmeric, salt and bicarb together in a bowl. While whisking, add cold water slowly to create a batter of medium thickness. You want a batter which is thicker than crêpe batter but not as thick as fish and chip batter. You will probably need between ½ and 1 cup of water. Better to have the batter too thick initially and thin it down as you go.
  7. Heat the oil.
  8. Take a tablespoon of the potato mixture, roll it into a ball, flatten it slightly and dip into the batter. Ensure the potato patty is well covered. Place it in the oil and cook until the batter is puffed and golden.
  9. If the batter is too thin you'll have gaps in it and it will go soggy quite quickly. You'll also find it goes soggy if you don't cook it for long enough. Generally you need to do a little bit of experimenting but this gives you the opportunity to adjust the seasoning or spicing of the finished product!
  10. Drain the batata vada on kitchen towel and serve immediately.
https://eatingadelaide.com/product-review-masha-recipe-batata-vada/