
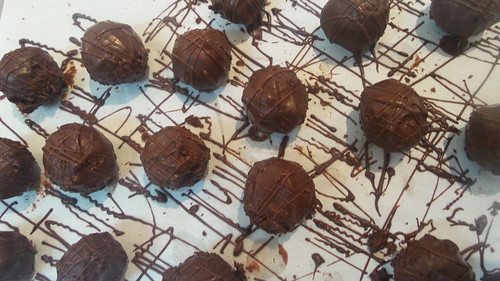
 finished product
Not so long ago a friend of mine spotted a group buying deal for a truffle making class at the Adelaide Chocolate School. It worked out at half price and seemed like a fun way to spend an afternoon so why not? We bought the deal and booked ourselves in straight away (see my top five hints for group buying restaurant deals). The booking process (which my mate did, not me!) seemed a bit long winded, as you had to reserve online and then wait for confirmation of your chosen date/time – so it might not be ideal for anyone with a very restricted schedule.
Fortunately, we got our desired date/time and so we headed along last Sunday afternoon to see what it was all about. While I’m happy and confident making ganache, I have never actually made truffles so I was really interested to have the experience and (to a certain extent) have my hand held through it.
The class is 2 hours long and it does absolutely start on time! We arrived very early so we went for a coffee, which meant we walked through the door of the chocolate school bang on 1pm (maybe a minute after!) and things had just started and we were the last ones there. Be early!
There was a bit of introduction before we moved on to choosing our chocolate and starting on our ganache. We had a choice of white, milk or dark chocolate (I chose dark) and we each got 300g of chocolate and a funky little bench top electric bain-marie. I normally melt chocolate in the microwave so going back to the bain-marie method was a bit sloooow for impatient me but it was really interesting to learn that you can use anything which has an element to melt your chocolate. Our elements were set at 80°C (I don’t think they got quite that high) and the instructor said that if, for example, you had an electric fry pan you could heat to a low temperature you could use that. No water required – just place your chocolate in a metal dish on the element.
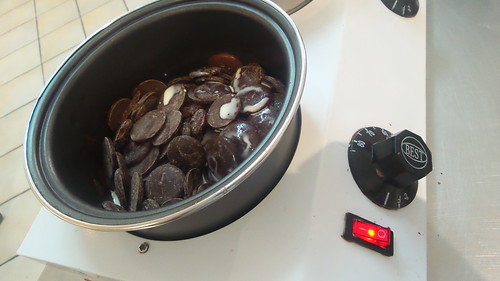 electric bain-marie
We melted our 300g of chocolate with ⅓ cup of cream (we used full fat UHT cream). Being dark chocolate mine took ages to melt and I would have liked a bit more time at this stage of proceedings.
Once the chocolate and cream was smooth, we divided it in to two batches and flavoured each. I chose rose and coffee as my flavourings. We used flavouring essences which I wasn’t such a fan of. The flavour wasn’t quite as true or intense as I would like but I do understand that essences are a great way of imparting flavour without having to mess with proportions. A few drops of coffee essence is a much easier way of doing things, than using actual coffee and ensuring you reduce the amount of cream appropriately. This makes it extremely versatile and easy in a class situation but not a way I’d be flavouring my own truffles in the future.
 snap!
snap!
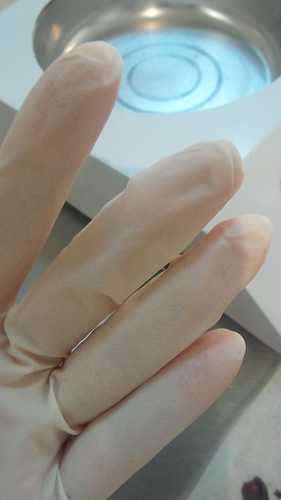
Flavourings added and adjusted, we poured the ganache onto baking paper and popped it into the fridge to firm up. This is another step where I’d have liked a little more time, as when we came to work our ganache, mine was still quite soft, which made it quite sticky. Nonetheless, the ganache was easy to work with and it was simple to break it up and roll it into little balls. We then did two layers of chocolate covering. This was the messy part and fortunately we had plenty of latex gloves to hand. Rather than dipping the truffles, we spooned melted chocolate onto a gloved hand and then rolled the truffle lightly and quickly to coat it. I’m really glad I had a first go at doing this in class. At home I would never have worn gloves (which would have been a mistake!) and you do actually need to use quite a lot of chocolate. Because my truffles were slightly rough from being a bit warm when I rolled them, being parsimonious with the chocolate meant I ended up with slightly spiky truffles! Next time, I’ll make sure to load up!
Two coats of chocolate and then on to decoration. As I am not a pretty-pretty-let’s-decorate-everything kind of person I went for immensely stylish drizzles of white and dark chocolate on my rose and coffee truffles respectively. Loads of people in the class did much more creative and painstaking decoration than I will ever manage!
After decorating you need to leave the chocolates to dry before bagging them up (or, better yet, bring a hard container from home and you can store them neatly in one layer and preserve your decoration) and then the class was over.
I thought that for $35 the class was great fun and good value for money but I don’t think I’d have felt the same way had it cost me $80 (current website price). I wasn’t madly in love with my chocolates (hasn’t stopped me eating them, mind!) – and I personally would use couverture chocolate (in class we used compound chocolate which just doesn’t taste as good). An excellent tip was that even if you use couverture chocolate for your ganache, if you’re not tempering it, use compound chocolate for the dipping stages to ensure a glossy finish.
What the class has done is given me is the much needed kick to ensure that I actually have a go at making my own truffles in future. I will definitely invest in the latex gloves and ensure I’m generous with the dipping chocolate. The question of flavourings is going to give me a lot of room for experimentation but I’m reasonably sure I’ll be able to put in place plenty of quality control measures …
Adelaide Chocolate School
48 Melbourne Street
North Adelaide SA 5006
(08) 7120 2664