Pumpkin Soup Recipe

Pumpkin Soup Pumpkin Soup

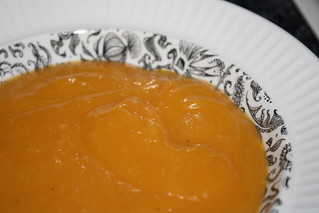
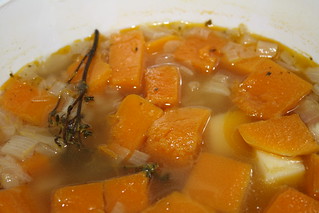
Before blitzing …                                                                                                                                                                          … and the finished product.


The weather is getting a little colder now (it’s officially winter here in Australia) and as far as I’m concerned this means it’s soup time because soup is easy, warming and comforting. There is nothing better than curling up on the sofa with a big bowl of piping hot soup and some toast.

We’d had some leftover pumpkin (actually a butternut squash) and I decided that I could easily turn this bit of vege into dinner.

This is my standard approach to soup and it works perfectly well for pretty much any left over vegetable. If the vegetable you’re using is particularly watery you should up the amount of potato you use – as potato is the magic thickener.

Begin by finely chopping half a large onion (or a whole medium sized one) and sauté it in some light olive oil or butter. With pumpkin soup you don’t have to worry about the onion taking on colour. When the onion starts to soften add 1 potato which you’ve peeled and chopped and then add your chopped pumpkin. For the two of us, and the above amounts of onion and potato I used a quarter of a butternut squash.

Give the vegetables a very quick sauté and then add enough stock to just cover them. You really need to use the best stock you can get your hands on and these days there’s no need to use stock cubes because there’s plenty of real stock options available. I usually use a stock jelly so I can just add that and top up with water. Give the mix a good stir and, if you have any fresh thyme to hand, add a sprig or two of that and bring the mix to the boil. Then reduce the heat and let it simmer until the vegetables are really well cooked.

Finish the soup by pulsing with a stab mixer (first take out the sprigs of thyme!) to make the mix as smooth as you want it. It may be super thick, in which case let it down with some water.

And if you have a bit more time to spare, you can always roast the pumpkin/squash. If you’re going to do this, it will be soft anyway, so cook the potato thoroughly before adding the pumpkin to the soup.

Serve piping hot, perhaps with a dollop of sour cream (or normal cream) as decoration. Just make sure you have plenty of hot, buttery toast on the side. Feeling like you need some protein with this? Top with some crispy, fried bacon!

Chocolate Brownie Recipe

IMG_2042

Even I’m starting to lose track of which chocolate brownie recipe I’m up to now … but here’s yet another one! I’m slowly making a dent on all those bookmarks …

I’ve also decided that at some point I need to start collating some statistics about the different ratios of ingredients and the outcome in the finished product because then I should be able to give you, the reader, some insight into what type of brownie recipe you need to follow to achieve a certain outcome.

Today’s recipe comes to us from Leite’s Culinaria, where they are grandly titled “Robert’s Absolute Best Brownies”. I am always a little sceptical of “best” or “best ever” because that’s the type of thing that’s in the eye of the beholder. But yes, these were pretty good.

The recipe provides imperial measurements for the chocolate and butter and, as my scales do both, I used imperial rather than converting to metric. I tried converting the cup measures for the dry ingredients to metric (because I think weighing ingredients is the only way to go) but the conversions I found for the sugar seemed way off, so I resorted to cup measures.

The original recipe is very enthusiastic about beating everything by hand, but that doesn’t happen in this household. If you have a stand mixer, grab the flat beater and let’s start!

Preheat the oven to 175°C (not fan) and base line a baking dish (8″x8″ – so slightly smaller than I use for many of my brownie baking adventures).

Melt 8 oz of unsalted butter with 3 oz of dark chocolate. I did this in the microwave but you can always use a bain-marie. Tip the smooth melted mixture into your stand mixer and beat in ¾ cup of caster sugar (Andy felt these brownies were a bit on the sweet side so you may like to reduce that) and 1 tsp of vanilla extract.

I’m not convinced that the vanilla extract adds anything so feel free to leave it out. Personally, I’m heading towards omitting it from chocolate brownie recipes in future – it seems unnecessary, having almost no effect on the finished product and I think it’s detrimental to the taste of the batter pre-cooking.

When the chocolate, butter and sugar mixture is smooth, add 2 eggs, one at a time, beating between each. Then add ¼ cup of plain flour and beat like crazy. The original recipe says to beat vigorously for 1 full minute. I let the KitchenAid do its thing until the mixture was quite pale, light and mousse like.

Finally, take a cup of walnuts (or other nut of choice), roughly chop them and stir them through the batter. You’re best off doing this bit by hand, irrespective of how you’ve got to this point!

Tip the batter into the prepared baking dish and you’re done – into the oven. The recipe states 30 minutes but that was nowhere near long enough for my baking dish/oven. Perhaps my dish was a little smaller so the brownie mix was deeper as I ended up baking them for about 45 minutes. You want the mixture to be cooked but you don’t want it to be dry: there still should be some moisture on the tooth pick.

Allow to cool and then cut, serve with cream and eat!

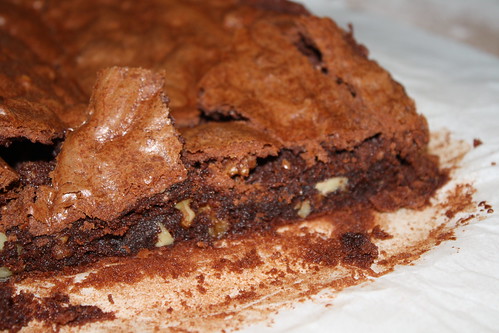
This brownie had an excellent crust – really crispy (and crumbly – what a mess it made cutting it up) with a lovely squidgy middle. Of course, with so much chocolate and so little flour it was really chocolatey too. I agree with Andy that the sugar could be reduced slightly and I see no reason why the filling would need to be restricted to nuts – I’m a big fan of chopped up chocolates in brownies!

The finished product is very reminiscent of the last lot of brownies, and you can check out the full collection here.

If you’re after something chocolate but NOT a brownie, check out Jamie Oliver’s chocolate pudding recipe.

Mike Press Adelaide Hills Chardonnay 2011

mike press chard

So, back on the Chardonnay wagon (unwooded, this time – no oak here!) and there’s nothing like having someone else do the work for you. This wine was suggested by Adam Easterbrook through the magic of Twitter. Adam even sent me a list of retailers of this wine!

I picked up the Mike Press Adelaide Hills Single Vineyard Chardonnay 2011 (that’s one seriously long name there!) from Cellarbrations at Brighton for the princely sum of $9.99. Yes – that is outside my $15-20 price bracket for this exercise, but packing punch for price is what this exercise is all about …

In the glass the wine is pale gold and with quite a pronounced nose. I’d actually go so far as to describe this wine as surprisingly aromatic. Yes – that’s not a word you’d normally associate with Chardonnay but it’s very apt for this wine. The wine is very tropical fruit – pineapple, mango, some sweet citrus (think pink grapefruit) and maybe even some banana. And the wine tastes of those same tropical fruits as well as some ripe stone fruit – think pineapple and nectarine. The wine has some good, refreshing acidity and nice length and weight.

At just shy of $10 a bottle this wine is really good value – or perhaps it should be ‘insanely good value’. The wine is not for those after something oaky, and nor is it for the occasion where you’re after a restrained, cool climate specimen. However, if you have friends who are Chardonnay nay-sayers (and particularly any obsessed with Sauvignon Blanc) then this is a great wine to show them. Drink it with fish and chips, roast chicken, roast pork … or, indeed, just by itself.

If you have a favourite Chardonnay that everyone should be drinking … let us know!