Marbled Chocolate Brownies

Untitled

I can’t believe that the last lot of brownies I made was back in September last year. Those chocolate and pistachio brownies got a big tick from my brownie taste panel but did rather freak me out on account of the huge amounts of sugar.

Every now and then I catch Justine Schofield’s Everyday Gourmet and it was on that program I saw these marbled chocolate brownies.

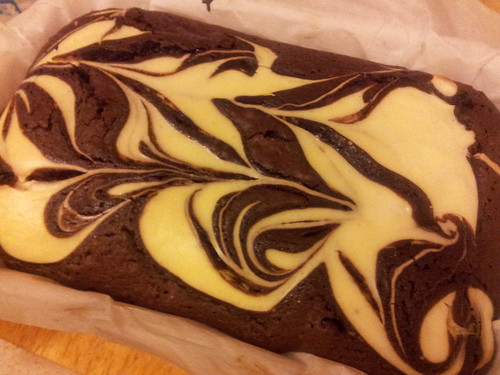
There’s not too much different about the brownies, but they have a cream cheese topping which is used to give a very pretty marbled effect. Perfect for people like me who are far too lazy and inept to produce beautifully decorated desserts!

Preheat your oven to 180°C and line a small baking pan with baking paper.

On the stove, in a large pan, melt 125g unsalted butter with 125g dark chocolate and 1 up of brown sugar. If this was just chocolate and butter I would normally do this in the microwave, but here the idea is to get the sugar completely melted, so there’s no graininess in the mixture. You need to be patient and do this over a low heat, with plenty of stirring and monitoring. No wandering off!

Once the sugar is fully dissolved, remove the pan from the heat and mix in ⅓ cup of plain flour, ⅓ cup of cocoa (not drinking chocolate!), ½ tsp of baking powder and 3 eggs. If you are doing this by hand (which I did, for a change!) it will pay to give the eggs a light beating before mixing them in. The mixture will look very very loose – but don’t be alarmed, keep beating and it will thicken up as the chocolate cools and the eggs get incorporated.

Pour the brownie mix into the prepared baking tin.

Now, for your cream cheese topping. The original recipe calls for a branded light, spreadable, cream cheese. Normally, I eschew anything dairy that’s “light” but because cream cheese can be very stiff I did actually buy the spreadable light cream cheese*. Mix 250g of the cream cheese with 1 egg and ¼ cup of caster sugar. I actually found this made too much topping – it’s a shame it’s not possible to halve an egg!

Dollop generous spoonfuls of the cream cheese mix over the top of the brownie mix. I ended up with 6 or 7 large tablespoonful dollops. Take a knife, and use this to swirl the cream cheese topping through the brownie mix. I went the length of the tin followed by dragging the knife across the width. It’s up to you what you do though!

Finish by baking for 35-40 minutes (40 minutes in our oven), until cooked but still moist.

Allow to cool before cutting into portions. The Everyday Gourmet recipe says it makes 24 but that would be 24 tiny brownies for chocolate hating, not hungry types! I say it makes about 12!

The brown sugar makes for a lovely depth of flavour, the brownies are fudgy, they look stunning and the topping makes a slightly tart counterpoint to the sweetness of the brownies.

Excellent stuff. Even if you don’t fancy fiddling with your favourite brownie recipe, just try adding the topping!

* I was relieved, after reading the ingredients, they actually seemed to be innocuous – quite often all manner of interesting additives are used to replicate the mouth feel and weight of the fat that has been removed.

Pork Chops with Gremolata and Polenta

Untitled

Pork recipes are always hugely popular on Eating Adelaide for some reason. The most popular in the last month has been this super easy one pan pork fillet recipe. Today, let’s look at a slightly cheaper cut: the pork chop.

This is not so much a recipe, because all you do is pan fry the pork chop, but it’s more some ideas of what to serve with your pork chop to jazz it up a bit. I always remove the rind from the chops before frying: in the pan they never get crisp and it’s better to remove them, let them dry out in the fridge for a couple of days and throw them on the grill on the weekend when you do your bacon. Delicious!

In this meal, inspired by Delicious (UK), you serve your chop with polenta and gremolata. I added buttered spinach too, for some greens, but a salad would work well and give you a bit more vegetable variety.

For 2 people we find 100g of (quick cook) polenta, cooked with 400g of water, just a little too much. I always have plans to do something with it the next day (polenta crisps, Roman gnocchi) but it just never happens. But the rule is, four times as much water as polenta. Boil the polenta up on the stove, stirring it and keeping the heat under control. If it gets too hot, you’ll have little geysers of polenta exploding out of the pan and if one hits you, you’ll know all about it! HOT!

Cook the polenta until it’s done: and done is when it’s a silky consistency and it no longer feels grainy or gritty. I’ve never yet managed to overcook polenta and, if you find it’s ready a bit soon, you can turn off the heat because it reheats beautifully.

If you watched My Kitchen Rules last night, you’ll have heard Pete Evans mention that polenta needs seasoning. He is not wrong. Don’t be shy with the salt. At a minimum I add grated parmesan and salted butter to my polenta (both to taste or according to how much is actually left in the fridge!). If you have cream, or better yet, mascarpone, add this for beautiful silky smooth polenta. Seasoning is even more critical in a dish like this, where you don’t really have any sauce for the polenta to soak up. Taste as you go, and season by feel.

Gremolata is easy: chop parsely and add finely minced garlic, some chilli flakes and some grated lemon rind. Be careful with the garlic – as it’s not cooked it can easily become overpowering and hot, which is not what you want.

Serve the polenta on hot plates, top with a pork chop and sprinkle with gremolata. Serve extra gremolata on the side, along with some vegetables.

You’ll be able to do the polenta in the time it takes the pork chops to cook, which makes this dish extremely quick – as well as tasty and a pleasant change to a plain pork chop with salad.

Oh – and I’d recommend not serving it in a bowl.  Because there’s no sauce you don’t have to worry about the polenta going sloppy and running everywhere and it can be tricky to cut a chop, and work your way around the bone, in a bowl!!!

Devilled Kidneys

Untitled

On Saturday night I caught the tail end of Jimmy and the Giant Supermarket on SBS. Jimmy the farmer was trying to produce a free range sausage that would hit Tesco’s ‘value’ range price point. In order to do this, he’d used various lesser cuts, including heart and tongue. Now, the heart and tongue are both muscles, as is, say, a piece of rump, so I was a bit bemused when Tesco insisted on telling its consumer panel that the sausages were 27% ‘meat’ and the remainder was heart and tongue. I was even more frustrated when the consumer panel, despite loving the flavour of the sausages, had something of a meltdown when heart and tongue were mentioned.

So I guess you can figure out that I like offal! One bone of contention in our household is kidneys. Unlike heart and tongue, kidneys are not a muscle, but Andy refuses to eat them, not on that ground, but because “they filter wee” (this is not really 100% correct but this isn’t a physiology blog so let’s let that one ride). And I love them.

And by coincidence, when I was at the butcher shop on Saturday afternoon, 2 lamb kidneys sat on the bench looking all lonely, so I rescued them, ready for the pot for Sunday morning’s breakfast.

Devilled kidneys on toast is one of the kings of a weekend breakfast, as far as I’m concerned. And this is how I make them.

For one person, take half an onion, finely sliced and sweat it down (in olive oil) in a pan with garlic and chilli to taste.

Prepare and chop the kidneys (you may need to skin them, you will definitely need to core them – which is taking out the sort of hard, fatty bit in the middle of the kidney). I personally like them chopped in smallish bite size morsels – they cook more quickly that way. Dust the kidneys in seasoned (plain) flour and then fry with the onions. You want the pan on a reasonable heat so that you get some colour on the kidneys and flour: this will mean you end up with a good sauce.

When the kidneys are looking mostly done (again, to your liking), crank the heat up a bit and add some water to the pan and give it a good stir. At first the water will boil off but judicious stirring and the slow addition of extra water, and maybe a touch more flour, if you want more sauce (I always do), will give you a lovely thick gravy. If you do add more flour, ensure that you give it a good cook out as you don’t that nasty raw flour taste.

Serve on thickly buttered toast, and season generously with salt and pepper. If you’re taking a photo for a blog post, then you can always garnish with some parsley.

I think this is delicious … but where do you stand on offal?