Cucumber and Chilli Salad

Cucumber & Chilli Salad

I’m generally pretty rubbish when it comes to things horticultural, particularly if they’re vegetables. Flowers I’m actually reasonable at. Vegetables – horrendous. So it’s come as something of a shock to harvest four telegraph cucumbers in the space of 2 days.

This set me to start investigating cucumber recipes … and cucumber and chilli salad seemed a super easy place to start.

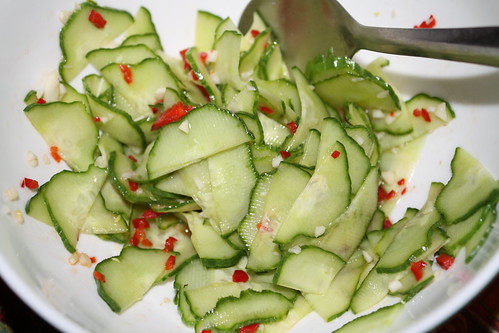
Of course, I didn’t rush off an buy Lebanese cucumbers, I made use of what I had. I used approximately half one of my cucumbers and I halved the remainder of the ingredients. I opted to use fresh chilli instead of chilli flakes too – I think it made the finished product just that bit more colourful.

Begin by halving and then finely slicing your cucumber(s) of choice. I used a mandoline because that way you know your slices will be even and actually fine!

Place the sliced cucumber in a bowl and add 1 clove of garlic, crushed and finely chopped, half a finely chopped red chilli, 1 tsp of caster sugar, 1 tbsp of vinegar (I used white wine vinegar) and 1 tsp of sesame oil. Give it all a good mix together to help the caster sugar dissolve and to ensure the cucumber is well coated.

Set the salad aside for at least an hour. This is one of those great salads that doesn’t wilt if you leave it – so next time you need to take a salad to a BBQ it’s worth considering. If you want to make it well in advance, cover in cling film and pop it in the fridge until about half an hour before you need it.

As this is a cucumber salad, make sure you have to salt to hand!

We ate this sald with our favourite quick and easy mid week dinner, a spicy chicken stir fry.

Dan Lepard’s Toll House Yo-Yos

IMG_1544

One of my Christmas presents was Dan Lepard‘s new book Short and Sweet. I’m a huge fan of his thanks to his column in the Guardian – his recipes never seem to go wrong.

I’ve made these toll house yo-yos before and I have mucked around with the recipe a bit – mainly because the original makes use of custard powder and this is something we never have in the house.

These are easy to make and you can pretend they’re healthy, as they contain oats. In addition, you can make the mixture up, wrap it in cling film and freeze it for when you need it.

Grind 75g of rolled oats to a powder.

Then beat 150g unsalted butter with 175g of icing sugar, until light and creamy. Add 175g of plain flour, the ground oats, 2 tsp vanilla essence and 2-4 tbsp of milk (enough to bring the mixture together). Finish by adding 150g of dark chocolate, broken up. Lepard says to cut the chocolate into ½ cm chips. I am way too impatient for that type of thing. Typically, I roughly chop the chocolate and then throw it into the MagiMix. However, I think this is the wrong approach. You are better off using a stand mixer to make the biscuits (yes, you’ll need to make sure you butter is slightly soft and not rock hard out of the fridge) and mixing in good quality dark chocolate chips/buttons at the end.

Why?

Because if you use my slap dash approach, you end up with biscuits that have a kind of uniform brown background to them, and if you take a bit more time, you’ll have cream biscuits attractively studded with chocolate.

However you get there, roll your dough into a log approximately 5cm in diameter, wrap in cling film and refrigerate for around ½ an hour.

When you’re ready to cook, preheat your oven to 180°C, line a baking sheet with baking paper and simply cut your log into discs 1-1½ cm thick.

Bake for 25-30 minutes until golden and cool on a baking rack. Dan Lepard sandwiches the biscuits together with an icing made from icing sugar, vanilla essence and milk. I am FAR too lazy health conscious for that! The biscuits are perfectly good to eat without sandwiching!

Chocolate Brownies

Chocolate Brownies (mealsavers)

I’m a keen user of delicious, which is a fantastic electronic way of keeping together all those things that in real life I’d have on bits of paper floating around the house (and driving Andy up the wall).

It turns out I have 27 brownie recipes tagged (let’s not even talk about the 100+ chocolate cake recipes) and I thought that there’s no point in having these recipes tagged and never looking at them, let alone cooking them. Normally I’m the type of cook who likes to try something out at home first before inflicting it on others, but with this ridiculous number of recipes I decided I needed to bit the bullet and start cooking. If other people don’t like it, then tough luck.

Being me, I am going to work backwards through the recipes (chronological order) so this is one I tagged on 7 April 2009. I still lived in England then! This is from the mealsavers website, about which I know nothing.

I was horrified by the idea of using ½ kilo of sugar in a recipe so I decided half measures were in order (yes, I know that doesn’t change the proportions). This recipe has the bonus that you don’t need to melt chocolate and butter together. If you use the microwave it’s not such a pain to do that but it does slow things down a bit so if you are after a super quick brownie recipe this may be for you!

Begin by creaming 175g of unsalted butter with 250g of caster sugar. When the mixture is light and fluffy add 2 eggs and 1 egg yolk. Add 65g of self raising flour and 65 g of cocoa powder (both sifted) and beat well. I also added 1 tsp of baking powder at this point. Finish by adding 50g of pecan nuts and 75g of chocolate drops. For this I used the flat beater and my KitchenAid – you don’t really want to use a food processor for this recipe as it will decimate your nuts and chocolate drops.

Pour into a baking paper lined dish and bake at 160°C fan for about 40 minutes (or until done). The original recipe says 20-25 minutes and I found this woefully inadequate. Perhaps my brownies were a lot thicker.

The finished product was well received (after the wails of “oh no, don’t change recipes, we like your OTHER brownies“). People who like nuts in their brownies will, obviously, like them. The brownies themselves are very rich and chewy – not only do they taste like they have a LOT of sugar in them, but the butter is very evident too.  In fact, if I were to make these again (after I’ve made the other 20 odd brownies) I’d try cutting back on the butter a tad.

Aside from the really scary amount of sugar in these, I’ll definitely keep them in mind when I need to make brownies in a hurry.