Mary Berry’s Chocolate Brownies

Untitled

A while back I bought a copy of Mary Berry’s 100 Sweet Treats and Puds (I bought it from Clouston and Hall but they no longer have it).

Mary Berry is a UK baking icon and co-hosts the original Great British Bake Off. I hope she’s not offended by me saying she’s a very grandmotherly type. Both my grandmas were pretty good cooks and I certainly didn’t go short of sweet and savoury treats. But if you didn’t have a grandma who baked then one episode of Bake Off and you’d probably be interested in adopting Mary Berry.

I spent quite a bit of time reading through the book deciding what to cook first. A reasonably impromptu Father’s Day lunch saw me volunteer desserts and, realising I was short of time, I decided on the brownies because they looked really easy.

It turned out that time was even more of the essence than I’d realised because, on the morning of lunch, with brownies yet to make and the other dessert to assemble, one of our neighbours popped his head over the fence and the already tight schedule was thrown out of whack!

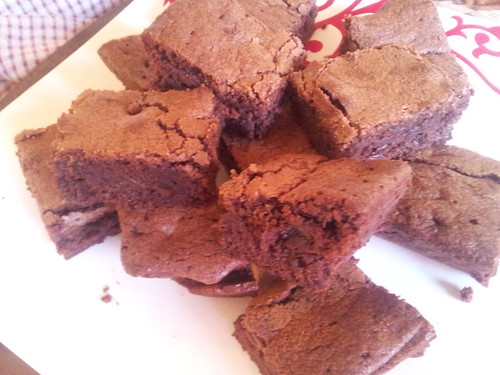
These brownies taste great with a deep chocolate flavour, are slightly squishy and fudgy and are really easy. If you’re not confident melting chocolate, you want a store cupboard alternative or you want a quick recipe (you still need 40 minutes baking time though!) then this is the recipe for you.

A couple of notes: don’t be freaked out by what feel like unconventional quantities of ingredients. Hold your nerve! Mary Berry’s original recipe uses 375g caster sugar but I had only 300g left and topped up with dark brown sugar. This is always a result in brownies and adds extra richness.

Mary Berry’s Chocolate Brownies

Ingredients

  • 275g unsalted butter (slightly softened if you working by hand or using a stand mixer)
  • 300g caster sugar
  • 75g dark brown sugar
  • 4 eggs
  • 75g cocoa powder
  • 100g self raising flour
  • 100g dark chocolate chips

Instructions

  1. Preheat oven to 160°C fan and line a roasting tin (30cm x 23 cm) with baking paper.
  2. Combine the butter and sugars then add the eggs. Mix in the cocoa powder and self raising flour and finish by stirring in the chocolate chips.
  3. The mixture will be very thick. Spoon it into the baking dish, smooth it out and bake for 40-45 minutes. The cake should be set and a skewer should come out clean but you also don't want to over bake because otherwise the brownies won't be squidgy.
  4. Leave to cool in the tin (if appropriately squidgy it will collapse a little) before cutting into 24 squares and serving.
https://eatingadelaide.com/mary-berrys-chocolate-brownies/

Quiche Lorraine

Quiche Lorrainecheck out that shrinking pastry … don’t let your toddler drive the food processor!

One of my slightly less hip hobbies is entering competitions. I caught the bug while living in the UK and I’d say that it’s rare a day goes by when I don’t enter at least one. It goes without saying that my favourite competitions to enter (and win) are those involving food or cooking.

One of my most recent wins was Australian Women’s Weekly Country Classics, through a Kambrook competition. The Women’s Weekly cookbooks are famous throughout the world and I think everyone (or everyone’s mum or grandma) has at least one of these at home.

I was keen to try it out as soon as possible and, after having a good read through, I settled on quiche lorraine. Now, people can get a bit het up over quiche lorraine because it is one of those foods that has been well loved and well adapted. If you think this version is not quite right please feel free to tell me (and the Women’s Weekly!) what is wrong!

My toddler helped me make the pastry for this and it ended up somewhat overworked (when I came to roll it out it was elastic rather than silky …) and so we had a bit of shrinkage. I used all the bacon and onion mixture but have about 500mL of cream filling left. I’m planning on making a rather luxe omelette with it, and grating through some courgette so I feel healthy …

The pastry was good: short, crumbly and I enjoyed the hint of lemon. The filling was excellent and this is such a storecupboard kind of dish, with a bit of practice it could easily be a mid-week lifesaver.

Overall, the Country Classics cookbook is filled with solid recipes that will stand a novice cook, in particular, in good stead. Quite of the few salad and sandwich ideas I’m looking forward to appropriating and adapting in future and you never know, one day I might even make use of the “camp fire” section …

Quiche Lorraine

Ingredients

  • Pastry
  • 260g plain flour
  • 150g cold unsalted butter, cubed
  • 1 egg yolk
  • 2 tsp lemon juice
  • iced water, as required
  • Filling
  • 1 medium onion, finely chopped
  • 200g bacon, finely chopped
  • 3 eggs
  • 300mL cream
  • 125mL milk
  • 90g grated cheese (Gruyère is 'traditional' but I used standard tasty cheese)

Instructions

  1. Make the pastry by combining the butter and flour in a food processor. When crumbly, add the egg yolk and the lemon juice, and then slowly add the water until there is just enough for the mix to come together. Knead lightly, wrap in cling film and refrigerate for ~ ½ hour.
  2. To make the filling, fry the onions and bacon until the onion starts to turn golden. Drain on kitchen towel.
  3. In a bowl (or large jug, if you have one) whisk the eggs, and add the milk and cream. Stir through the grated cheese.
  4. Line a 24cm deep, loose bottomed quiche dish, with the pastry. Bake blind, with baking beans, at 180°C fan (200°C conv) for 10 mins. Remove the beans and bake for another 10 or so minutes until golden.
  5. Spread the bacon and onion mix over the base. Pour over the cream filling (if you have made the filling in a bowl it is probably worthwhile pouring it into a jug for this!). Do this slowly to give the mix time to spread around, otherwise you'll end up overfilling.
  6. Bake at 160°C fan (180°C conv) for 30-35 minutes, until golden and set. I personally prefer just set: I think it makes for a creamier end product.
  7. Stand for 5 minutes in the tin, and then remove. Serve hot or warm with either salad or steamed vegetables.
  8. Tip 1: place the quiche dish on a baking tray BEFORE blind baking. This makes it much easier to get it in and out of the oven and if your filling does overflow, you only have a tray, not an oven, to clean.
  9. Tip 2: to remove the quiche from its tin, pop it on a mug as this will allow you to remove the outer ring of the pan easily. Using a fish slice or palette knife, you can then gently manoeuvre it on to a serving plate or cutting board.
https://eatingadelaide.com/quiche-lorraine/

ANZAC Biscuits

ANZAC Biscuits

Today (25 April) is ANZAC Day. Alongside Australia Day it is easily the most important national holiday here. It commemorates the first military action fought by Australian (and New Zealand troops). Australia was only federated in 1901 so when the First World War broke out the nation was a baby. In 1915, Australian and New Zealand troops were deployed to Turkey and they landed at Gallipoli on this day.

In theory, it was going to be a quick strike, but that single campaign was to last eight months and by the end of the year the allied troops had to be evacuated. Over 8000 Australians had been killed.

Today, ANZAC Day commemorates all Australian servicemen and women, and the national holiday and dawn services give everyone an opportunity to reflect on the commitment that those who serve give to their fellow countrymen.

Anyway, history lesson over. Let’s get to the biscuits (note, biscuits, NOT cookies). The story goes that these egg free biscuits were sent to troops by loved ones back in Australia. Food historians may wish to argue this point, and while I am normally a really tedious stickler for facts, in this instance I think we should let accuracy slide and just go with the collective wisdom.

This is my recipe for ANZAC biscuits. It’s not a tried and tested family recipe but one I created back in 2006. It is egg free but not dairy or gluten free. Apologies in advance for the imperial measurements and the mix of volume and weight measurements!

It’s a really simple recipe – so simple in fact that I made these biscuits this afternoon with my toddler.

Just remember – these are ALWAYS biscuits!

ANZAC Biscuits

Ingredients

    Dry Ingredients
  • ¾ cup dessicated coconut
  • ½ cup caster sugar
  • 1 cup oats
  • 1 cup plain flour
  • pinch of salt
  • Wet Ingredients
  • 4 oz unsalted butter
  • 2 tbsp golden syrup
  • 1 tsp bicarb
  • 2 tbsp boiling water

Instructions

  1. Preheat oven to 180°C (convention).
  2. Mix the dry ingredients together in a bowl.
  3. On the stove, melt the butter and the golden syrup. Then add the bicarb and boiling water. The mixture will froth a little.
  4. Add the wet ingredients to the dry and mix well. You may need to add a little extra boiling water.
  5. Make large walnut sized balls of mixture and flatten on baking trays (lined with baking paper). The biscuits will spread as they cook, so ensure you leave ample space between them.
  6. Cook for 10-15 minutes. Less cooking leads to chewy biscuits, more cooking: crunchier biscuits.
  7. Makes approximately 18 biscuits.
https://eatingadelaide.com/anzac-biscuits/