Dan Lepard’s Sour Cream Chocolate Cake

Sour Cream Chocolate Cake

Big lunch with the family at Easter and, as usual, I got to cook dessert. One day I will have to volunteer to cook something else!

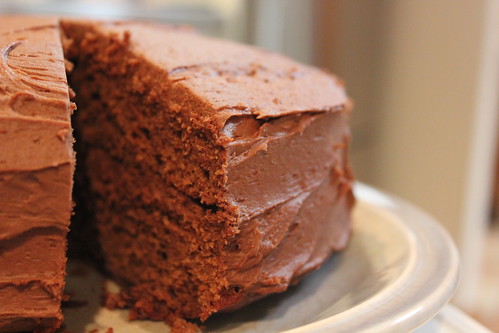
My dad is quite partial to a bit of chocolate cake and I’ve had my eye on this sour cream chocolate cake for ages. I have plenty of chocolate cake recipes that are tried, tested and, indeed, popular, but there’s no harm in trying something new. And in the past I’ve found Dan Lepard’s recipes very reliable (see his tollhouse yoyos).

I received instructions from dad to make sure I used chilli chocolate. I ignored this and just followed the recipe.

The cake itself has a degree of novelty as it uses oil and sour cream rather than butter. And the icing is also based around sour cream. The cake also has less chocolate than I expected in the cake itself and, I thought, there was far too much vanilla in the whole thing.

Begin by making the cake. Prepare 2 18cm (or in my case I think they were 19cm) sponge tins: I used new silicon ones so I just gave them a slick of canola oil and base lined them with baking paper. Preheat the oven to 180°C (160°C fan).

Melt 75g dark chocolate. Beat together 75mL of sunflower oil, 75g of sour cream (I actually used light sour cream because if you shop at 4pm on Maundy Thursday you use what is on the shelf!), 125g caster sugar, 75g of runny honey, 2 tsp vanilla extract, and 3 eggs. Then add the slightly cooled melted chocolate.

Mix together 175g plain flour, 25g of chocolate and 2 tsp of baking powder and sift it into your cake mix.

Divide the mix between the two pans and bake until done – which in my case was just on 20 minutes. Lepard’s original recipe suggests 25 minutes but I knew my pans were potentially slightly larger than they should have been and I also know my oven is quick. You want the cake to be done but you also want a few crumbs sticking to the skewer.

Remove the cakes from the oven, stab all over with a skewer and dress with a simple syrup of 25g sifted icing sugar adn 25 mL boiling water. The original recipe suggests adding 2 tsp of vanilla extract, which I did, but the finished product was so overhelmingly vanilla-y that I’d definitely omit that at this step.

Cover the cakes (I used cling film) and allow to cool. In my case, this was overnight.

When ready to assemble I made the sour cream icing. Take 300g of dark chocolate and melt with 50g of unsalted butter. Add 50g of runny honey, a splash of rum (Bundaberg, of course!), 100g of sifted icing sugar and 125 g of the light sour cream. Mix until smooth.

Despite sieving the icing sugar, mixing until smooth involved putting it all in the KitchenAid and giving it a good beating with the paddle beater. It made quite a pale fluffy icing.

Sandwich the cakes together (pro tip – sandwich together the two flat sides – the bases) with the icing and cover the top and sides.

Serve at room temperature with plenty of cream.

The verdict?

Personally, I was massively underwhelmed by this. There was waaaay too much vanilla – I’d definitely drop the vanilla from the syrup, and probably also halve it in the cake (although I suspect the vanilla in the syrup was the main offender, not being cooked out). I’d probably also go for a straight chocolate ganache: I found the icing too sweet and would have to rework it to reuse it.

I was ho-hum about the cake. I’d prefer something darker and more chocolately and fudgy.

Andy liked the total package and loyally said he’d be happy to eat it all day.

Mum rated the cake highly but wasn’t sure about the icing. In fact, the icing seemed the most contentious part of the cake.

Dad? Well, he complained because I didn’t use chilli chocolate!

Incaberry Flapjack Recipe

IMG_3097

disclaimer: I was sent the Incaberries to try.

I am not someone who seeks out so-called ‘superfoods’. I am a great believer in all things in moderation (except bananas, which are truly awful and I would say that they should be banished from the planet, except my toddler loves them). So many food trends pass me by … yes, I’ve heard all about goji berries, acai (I still don’t know how to pronounce that) and quinoa (OK – I do actually want to try that one) but I’m not rushing out to try the latest and greatest antioxidant packed goodie that comes along.

However, I am very much into trying new things so when the internet offered me Incaberries*, who was I to say no?

The Incaberries (actually a type of physalis) come from Ecuador and are organic, high in fibre and antioxidants. They are billed as “a great tasting superfood that you will actually enjoy eating”.

Physalis sp.physalis by Thomas Bresson

Physalis is often used as decoration and is known as being quite tart and the Incaberries live up to this reputation. You should have seen the palpable disappointment on my toddler’s face when he first tried them, clearly expecting the berry to be a particularly large sultana …

Andy and I have had quite a lot of discussion about what they actually taste like. Texture wise, they are a dried fruit so they are very similar to a raisin (not quite as juicy as a sultana). The flavour is citrussy and sherberty. Somewhere between a tart raspberry, mixed with some rhubarb, some tangelo and a hint of sour lollies.

If you’re not into tart flavours, it won’t be your thing at all. However, I personally loved them and even Mr Toddler has come around and likes them!

When it came to cooking with them I was originally thinking of making the chocolate brownie recipe that’s on the Incaberry website. However, after tasting them and thinking about both their texture and flavour, I decided that flapjacks would be the way to go.

Now, lots of people seem to think that because flapjacks contain oats they are healthy. This is not true. Yes, oats are another superfood but flapjacks are really just butter, sugar and golden syrup and the oats are there as a vehicle for that. But if you want to pretend they’re a health food – just add incaberries and they’re even healthier!

Flapjacks are a brilliant thing to make with small children. They have few ingredients and it’s a very quick return on your effort. In our household we always seem to have everything we need in the cupboard, too!

Begin by melting 60g unsalted butter with 60g of sugar (I used light brown, but would have used dark brown had I known where it was hiding!) and 2 tbsp of golden syrup. With the golden syrup, lightly coat your spoon (both sides) in a neutral oil before dipping it into the jar: this will ensure the syrup slides off into the pan. For 2 tbsp you only need to do this the once.

When the butter is melted and the sugar has dissolved, pour this mix into 100g of oats and mix well. The mixture will be quite crumbly – almost like you’re making the base for a cheesecake. Finishing by mixing through 40g of incaberries.

Grease a 20cm diameter round baking pan and press the mixture into it (it will be just under 1cm thick). Ensure the incaberries are spread through evenly and bake at 180°C (convention) for about 15 minutes.

I was a bit alarmed by the incaberries all puffing up during cooking but they collapse back down as the flapjacks cooled. The tartness of the berries worked really well to counterpoint the sweetness of the flapjacks.  After all the sugar you get a lip smacking finish.

A word of warning: don’t use baking paper like me! You actually end up having to wait until the flapjacks are stone cold (and at least half a day old) before you can peel it off easily …

* You can find out where to buy incaberries near you using the store locator.

Marbled Chocolate Brownies

Untitled

I can’t believe that the last lot of brownies I made was back in September last year. Those chocolate and pistachio brownies got a big tick from my brownie taste panel but did rather freak me out on account of the huge amounts of sugar.

Every now and then I catch Justine Schofield’s Everyday Gourmet and it was on that program I saw these marbled chocolate brownies.

There’s not too much different about the brownies, but they have a cream cheese topping which is used to give a very pretty marbled effect. Perfect for people like me who are far too lazy and inept to produce beautifully decorated desserts!

Preheat your oven to 180°C and line a small baking pan with baking paper.

On the stove, in a large pan, melt 125g unsalted butter with 125g dark chocolate and 1 up of brown sugar. If this was just chocolate and butter I would normally do this in the microwave, but here the idea is to get the sugar completely melted, so there’s no graininess in the mixture. You need to be patient and do this over a low heat, with plenty of stirring and monitoring. No wandering off!

Once the sugar is fully dissolved, remove the pan from the heat and mix in ⅓ cup of plain flour, ⅓ cup of cocoa (not drinking chocolate!), ½ tsp of baking powder and 3 eggs. If you are doing this by hand (which I did, for a change!) it will pay to give the eggs a light beating before mixing them in. The mixture will look very very loose – but don’t be alarmed, keep beating and it will thicken up as the chocolate cools and the eggs get incorporated.

Pour the brownie mix into the prepared baking tin.

Now, for your cream cheese topping. The original recipe calls for a branded light, spreadable, cream cheese. Normally, I eschew anything dairy that’s “light” but because cream cheese can be very stiff I did actually buy the spreadable light cream cheese*. Mix 250g of the cream cheese with 1 egg and ¼ cup of caster sugar. I actually found this made too much topping – it’s a shame it’s not possible to halve an egg!

Dollop generous spoonfuls of the cream cheese mix over the top of the brownie mix. I ended up with 6 or 7 large tablespoonful dollops. Take a knife, and use this to swirl the cream cheese topping through the brownie mix. I went the length of the tin followed by dragging the knife across the width. It’s up to you what you do though!

Finish by baking for 35-40 minutes (40 minutes in our oven), until cooked but still moist.

Allow to cool before cutting into portions. The Everyday Gourmet recipe says it makes 24 but that would be 24 tiny brownies for chocolate hating, not hungry types! I say it makes about 12!

The brown sugar makes for a lovely depth of flavour, the brownies are fudgy, they look stunning and the topping makes a slightly tart counterpoint to the sweetness of the brownies.

Excellent stuff. Even if you don’t fancy fiddling with your favourite brownie recipe, just try adding the topping!

* I was relieved, after reading the ingredients, they actually seemed to be innocuous – quite often all manner of interesting additives are used to replicate the mouth feel and weight of the fat that has been removed.